1977 Chevelle Malibu Classic Progress Photo's aka Mali
+40
pila
dynchel
Mcarlo77
Joe73
driveit
Hawk03
Fishgrinder
1973 454 MONTE
bracketchev1221
Limey SE
chevellelaguna
1973montec
Bruisr
bigredlaguna
jerry46765
BicknellWelding
geoff528
2fat2fly
Jim_Rockford
DiscoMalibu
Brainstain
Laguna Budman
Dubie
74MonteCarlo
JB2wheeler
WyldeBill66
Wallyuph
dragons_lair59
77ElClassic
Dead Man
Graham Perkins
jrb75
chromereverse
Checyxtc
74Guna
texan01
abajc3
JiMi_DRiX
orange Juiced
HDHugger
44 posters
G3GM :: Media :: G3 Project Pictures
Page 16 of 27
Page 16 of 27 •  1 ... 9 ... 15, 16, 17 ... 21 ... 27
 Re: 1977 Chevelle Malibu Classic Progress Photo's aka Mali
Sorry.. Lol. Brand new Flowtechs.. I got em last year and bought an LS1 about a month later.
These.
http://www.jegs.com/i/Flowtech/387/11100/10002/-1?parentProductId=
These.
http://www.jegs.com/i/Flowtech/387/11100/10002/-1?parentProductId=
Brainstain- Donating Member

- Street Cred : 8
 Re: 1977 Chevelle Malibu Classic Progress Photo's aka Mali
These are mine or at least they would be if bought new again.
http://www.jegs.com/webapp/wcs/stores/servlet/KeywordSearchCmd?storeId=10001&catalogId=10002&langId=-1&Ntk=all&Jnar=0&Ne=1%2B2%2B3%2B13%2B1147708&searchTerm=hooker+2451
http://www.jegs.com/webapp/wcs/stores/servlet/KeywordSearchCmd?storeId=10001&catalogId=10002&langId=-1&Ntk=all&Jnar=0&Ne=1%2B2%2B3%2B13%2B1147708&searchTerm=hooker+2451
77mali- Donating Member

- Street Cred : 62
 Re: 1977 Chevelle Malibu Classic Progress Photo's aka Mali
I had planned on buying the Flowtech 11100 myself, can't beat the price. I even found a scratch and dent sent from Flowtech on EBay for $100. 

DiscoMalibu- G3GM Member

- Street Cred : 7
 Re: 1977 Chevelle Malibu Classic Progress Photo's aka Mali
Hard to beat a price like that.....
pila- Donating Member

- Street Cred : 43
 Re: 1977 Chevelle Malibu Classic Progress Photo's aka Mali
hope you turned the engine over 1 revolution after lining up the timing marks, dot to dot is lined up for #6 to fire, Not 1 No.1 position it the dot on the timing gear at the top. Also you had a late model block, why not use a good roller cam?

Jim_Rockford- G3GM Member

- Street Cred : 4
 Re: 1977 Chevelle Malibu Classic Progress Photo's aka Mali
Not yet but it will be taken care of when doing the valve lash to get #1 @ TDC first, then set the rest. Need to reinstall the balancer 1st to make it easy on myself but thanks. If I had gone w/ a roller cam set up I probably could have gotten a few more horses out of the build but as it is- what I have is good for me. If I had done this 10-15 years ago, different story but now I have too many other lives to think about in the car besides my own. 

77mali- Donating Member

- Street Cred : 62
 Re: 1977 Chevelle Malibu Classic Progress Photo's aka Mali
Valves are lashed lots of other stuff going on...LOL. She's starting to come together finally.

Lash procedure:
http://www.g3gm.com/t4830-valve-lash#54855
Balancer & Flywheel install:
http://www.g3gm.com/t6168-stopping-crank-rotation#54884

Lash procedure:
http://www.g3gm.com/t4830-valve-lash#54855
Balancer & Flywheel install:
http://www.g3gm.com/t6168-stopping-crank-rotation#54884

77mali- Donating Member

- Street Cred : 62
 Re: 1977 Chevelle Malibu Classic Progress Photo's aka Mali
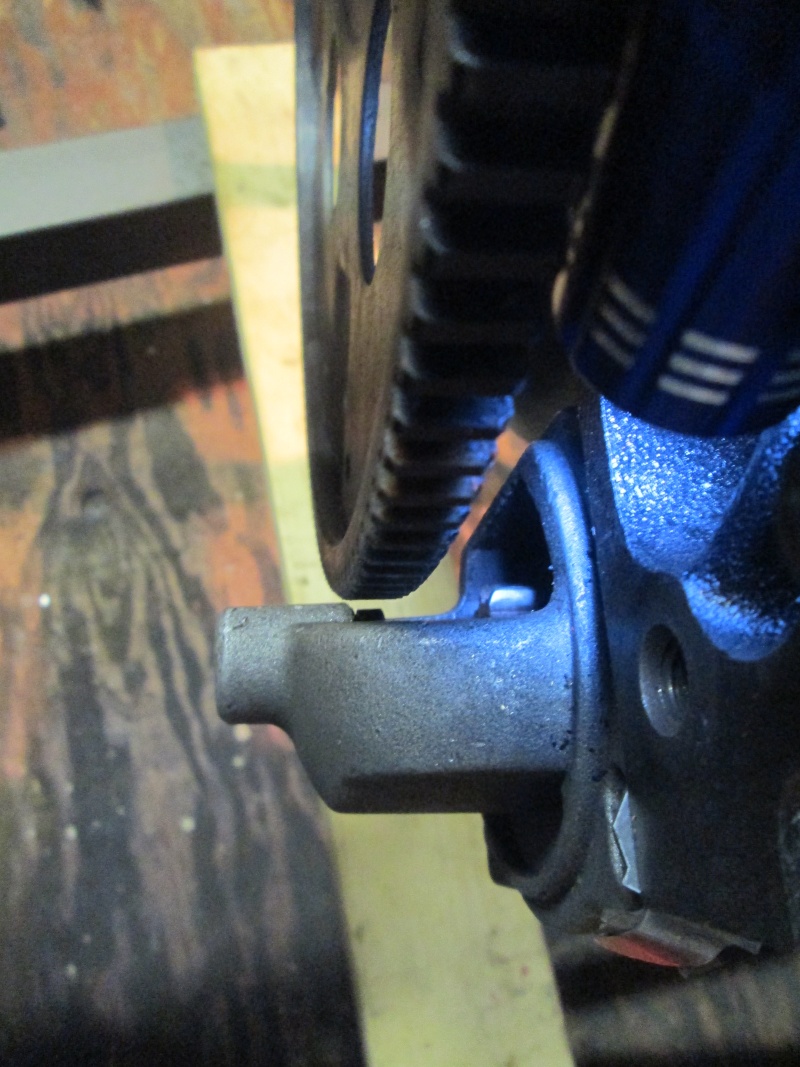
Does this look right? How can you move the turner in the starter out to see if it fits properly? The wheel looks to close to the aluminum housing to me. Wish I had remembered to take a pic of this darn thing in the old block 


77mali- Donating Member

- Street Cred : 62
 Re: 1977 Chevelle Malibu Classic Progress Photo's aka Mali
Here is a link to some installation instructions from Autozone.
http://econtent.autozone.com:24999/znetcs/psb/en_US/2/0/45/tbstr01.pdf
I also remember using a gauge supplied with the starter that measured the distance between the starter shaft and the flywheel teeth. I think it was about 1/8" or so.
You can use a screwdriver to move the pinion gear out to engage the flywheel teeth so you can use the measurement described in the link.
bigredlaguna- G3GM Senior Member

- Street Cred : 53
 Re: 1977 Chevelle Malibu Classic Progress Photo's aka Mali
Thanks Bigred that helps a lot. I watched a couple youtubes but no info on the pinion gear. It's been over a year since the starters been off it, progress is slow.

77mali- Donating Member

- Street Cred : 62
 Re: 1977 Chevelle Malibu Classic Progress Photo's aka Mali
If you noticed your Cred go up....I gave out points on Mali's thread today.
(Don't know if there is a limit to what someone can give out in a single day-& it looks like the thing stopped working after a while so if I missed ya sorry but that may be why).
Just wanted to say thanks to everyone for the help, suggestions, compliments, advice...etc. Much appreciated!!!
(Don't know if there is a limit to what someone can give out in a single day-& it looks like the thing stopped working after a while so if I missed ya sorry but that may be why).
Just wanted to say thanks to everyone for the help, suggestions, compliments, advice...etc. Much appreciated!!!

77mali- Donating Member

- Street Cred : 62
 Re: 1977 Chevelle Malibu Classic Progress Photo's aka Mali
77mali wrote:Does this look right? How can you move the turner in the starter out to see if it fits properly? The wheel looks to close to the aluminum housing to me. Wish I had remembered to take a pic of this darn thing in the old block
 looks good and there is a way to engage the pinion, disconnect the wire going to the motor itself then excite the solenoid and the gap between the flywheel and your starter pinion should be about the thickness of a paper clip, always worked for me !!


2fat2fly- Donating Member

- Street Cred : 2
 Re: 1977 Chevelle Malibu Classic Progress Photo's aka Mali
Thank you for the tip.
If you notice in the pic & its kind of hard to see but just where the wheel & edge of the starter housing look like they're touching (& they just barely do) might require some shimming on the inboard bolt side...I think?
Anyway, I'll start with the thinnest one in the package & see what it looks like & how the pinion sits.

77mali- Donating Member

- Street Cred : 62
 Re: 1977 Chevelle Malibu Classic Progress Photo's aka Mali
Slight progress...Respray over the POR 15 on the intake manifold, still have not tackled the starter but I'll get there.


Still...it's looking a bit better.


Still...it's looking a bit better.


77mali- Donating Member

- Street Cred : 62
 Re: 1977 Chevelle Malibu Classic Progress Photo's aka Mali
Well after a late night & many different shim combos ended up pretty good on the starter using a 1/64 & 1/32" to get it correct. If this thing ever dies there will be a hi-torque mini-starter in Mali's future.
Ended up using this large magnet/pick up tool to hold the pushrod in place while getting the gaskets set for fuel pump...as a few of us discussed on Jimi's 75 Monte thread, my block lacks that cool bolt hole that goes through to the rods chamber. (Come to think of it theose bolt holes might go to bolt in the fuel line- LOL). I used Permatec's "Ultra Black" gasket maker to butter the back side of the plate in addition to the gasket that will rest against the block and again (by itself) on the face of the pump that rests against the plate. (The stuff is really good).


The magnet is pretty strong but the lever on the pump will catch the bottom of the pushrod as it's being installed. Took 5 minutes (unlike the starter)

Installed the water pump too.


Ended up using this large magnet/pick up tool to hold the pushrod in place while getting the gaskets set for fuel pump...as a few of us discussed on Jimi's 75 Monte thread, my block lacks that cool bolt hole that goes through to the rods chamber. (Come to think of it theose bolt holes might go to bolt in the fuel line- LOL). I used Permatec's "Ultra Black" gasket maker to butter the back side of the plate in addition to the gasket that will rest against the block and again (by itself) on the face of the pump that rests against the plate. (The stuff is really good).


The magnet is pretty strong but the lever on the pump will catch the bottom of the pushrod as it's being installed. Took 5 minutes (unlike the starter)

Installed the water pump too.


77mali- Donating Member

- Street Cred : 62
 Re: 1977 Chevelle Malibu Classic Progress Photo's aka Mali
Awesome Mali !! 
Fishgrinder- G3GM Member

- Street Cred : 4
 Re: 1977 Chevelle Malibu Classic Progress Photo's aka Mali
Lookin' good !! 
pila- Donating Member

- Street Cred : 43
 Re: 1977 Chevelle Malibu Classic Progress Photo's aka Mali
Thanks guys. Oil pump's primed (another small victory but I'll take it!) The break-in oil looks just like maple syrup & has about the same viscosity when cold. A bit slow at first to get it through & up to the galleries. Should have let it sit in the house the day before but once it got moving...wow. I think I made the right choice on the oil pump.


77mali- Donating Member

- Street Cred : 62
 Re: 1977 Chevelle Malibu Classic Progress Photo's aka Mali
Great Paul,should be burning tires by spring.
ant7377- G3GM Addict

- Street Cred : 36
 Re: 1977 Chevelle Malibu Classic Progress Photo's aka Mali
ant7377 wrote:Great Paul,should be burning tires by spring.
I hope so. Plan is to have it back in the car as soon as it gets warm enough to finish off the engine bay. Hoping to test run & break in by the end of Feb. It would be faster but there's much more little stuff that needs to be taken care of too like the throttle/trans cable bracket & a bunch more crap like that, plus building a safe test stand too.


77mali- Donating Member

- Street Cred : 62
 Re: 1977 Chevelle Malibu Classic Progress Photo's aka Mali
Came to find that my new valve covers are a bit different than the original center bolts (re-pop from Taiwan)- had to stretch & use some ultra black seal to get the Felpro gaskets to fit right & not pop off during install. My old set has a taller "lip" around the inside where it meets the back of the gasket. They are also have the larger openings for the breather & PCV, so now I've got to get the larger black plastic "plugs". 
Oh well...there a worse things that can happen...lol

Oh well...there a worse things that can happen...lol


77mali- Donating Member

- Street Cred : 62
 Re: 1977 Chevelle Malibu Classic Progress Photo's aka Mali
i got some sweet center bolt chromies with T handles for mine
geoff528- G3GM Newbie

- Street Cred : 0
 Re: 1977 Chevelle Malibu Classic Progress Photo's aka Mali

Diz, Intake & Carb have been installed & torqued! Test stand in the works. 90% there


77mali- Donating Member

- Street Cred : 62
 Re: 1977 Chevelle Malibu Classic Progress Photo's aka Mali
u might not beable to install the right motor mount bolt with the starter mounted. make sure you have clearance b4 you install motor.
1973 454 MONTE- Donating Member

- Street Cred : 36
 Re: 1977 Chevelle Malibu Classic Progress Photo's aka Mali
[quote="77mali"]Came to find that my new valve covers are a bit different than the original center bolts (re-pop from Taiwan)- had to stretch & use some ultra black seal to get the Felpro gaskets to fit right & not pop off during install. My old set has a taller "lip" around the inside where it meets the back of the gasket. They are also have the larger openings for the breather & PCV, so now I've got to get the larger black plastic "plugs". 
Oh well...there a worse things that can happen...lol[quote="77mali"]
My brothers got a set of Edelbrock elite series centerbolt valve covers. They just came of his 87 Monte. Need some cleaning and or paint. Didn't know if you'd be interested in a cheap set of aftermarkets?
Oh well...there a worse things that can happen...lol[quote="77mali"]
My brothers got a set of Edelbrock elite series centerbolt valve covers. They just came of his 87 Monte. Need some cleaning and or paint. Didn't know if you'd be interested in a cheap set of aftermarkets?
BicknellWelding- Donating Member

- Street Cred : 3
Page 16 of 27 •  1 ... 9 ... 15, 16, 17 ... 21 ... 27
 Similar topics
» Clunkers and Classic YouTube build 1977 Malibu Classic
» '77 Chevelle Malibu Classic - Disco Malibu
» 74 Chevelle Malibu Classic 454 with a 4-speed
» '77 Chevelle Malibu Classic - Disco Malibu
» 74 Chevelle Malibu Classic 454 with a 4-speed
G3GM :: Media :: G3 Project Pictures
Page 16 of 27
Permissions in this forum:
You cannot reply to topics in this forum|
|
|


» Roll Call and Car showcase
» Central Texas Noob
» Welcome Keith Seymore
» Wanted: Front park lamp assemblies
» 75 Hurst Olds T-tpos
» G3 Chevy rims- help ID these
» 75 el camino project.
» Have had a few questions
» vinyl top removal