1975 Monte Carlo
+22
Joe73
LSANTI76
dynchel
Bruisr
magic marouke
1973montec
DiscoMalibu
brad
Mcarlo77
74MonteCarlo
JiMi_DRiX
Limey SE
The Dude
ant7377
abajc3
bigredlaguna
74Malibu383
JB2wheeler
McCauley5983
Jedediah
Biomedtech
Laguna Budman
26 posters
G3GM :: Media :: G3 Project Pictures
Page 6 of 11
Page 6 of 11 •  1, 2, 3 ... 5, 6, 7 ... 9, 10, 11
 Re: 1975 Monte Carlo
That is definitely different than mine, but it looks like it fits well! Thanks for the part # also.

JiMi_DRiX- G3GM Enthusiast

- Street Cred : 3
 Re: 1975 Monte Carlo
On saturday I hooked up all the lights, and to my amazement it all worked! Good to get a positive surprise for one time sake. However, I need a new brake light switch, turn light sockets, and a new headlight as the low beam doesnt work on the brand new Wagner Truview Sealed Beam..

I had hired temporary lisence plated for sunday so I could test drive the car. But when it came to the startup I had of course drained the battery after all the light-tests, and also because the ignition key was on for a long time. Used jumper cables from my other car, and got it started. Took it for a drive and turned the lights on, but after 5 mins it started to die on me, and as I returned to the garage it stopped. Jump started again, and drove with lights off. This worked.
I went up to my parents house, and as I drove down the driveway I honked. At that was enough to kill the car instantly!
We did some troubleshooting, and concluded that the generator is defect.
Some pics from the test drive. Here it had stopped again as I tried to back up to turn around. Backing lights probably came on and killed the engine.


I now see the height is pretty far from 1973_454_Monte's. But I think it looks ok, and I'm quite reluctant to do any more suspension work this year.
Another thing I'm not very happy about is some strange behaviour from the transmisson (TH400). At slow acceleration it hessitates a little when shifting between 1 and 2.gear. Like it spends time on the shift it self. It was this way that time I bought it as well, but I've always taken it for a very smooth shift. Tried to give more throttle out of an intersection yesterday, and this ugly grinding sound was heard at the 1-2 shift. Like when you miss a gear with an old manual car.
Oil is looks fine and does not smell burnt, although it was very low on some of the previous test drives. They were less than a mile however. The transmission was allegedly just rebuilt as well, and it certainly looks brand new. I see worst case scenarios, but I'll read up on the mighty web first.

I had hired temporary lisence plated for sunday so I could test drive the car. But when it came to the startup I had of course drained the battery after all the light-tests, and also because the ignition key was on for a long time. Used jumper cables from my other car, and got it started. Took it for a drive and turned the lights on, but after 5 mins it started to die on me, and as I returned to the garage it stopped. Jump started again, and drove with lights off. This worked.
I went up to my parents house, and as I drove down the driveway I honked. At that was enough to kill the car instantly!
We did some troubleshooting, and concluded that the generator is defect.
Some pics from the test drive. Here it had stopped again as I tried to back up to turn around. Backing lights probably came on and killed the engine.


I now see the height is pretty far from 1973_454_Monte's. But I think it looks ok, and I'm quite reluctant to do any more suspension work this year.
Another thing I'm not very happy about is some strange behaviour from the transmisson (TH400). At slow acceleration it hessitates a little when shifting between 1 and 2.gear. Like it spends time on the shift it self. It was this way that time I bought it as well, but I've always taken it for a very smooth shift. Tried to give more throttle out of an intersection yesterday, and this ugly grinding sound was heard at the 1-2 shift. Like when you miss a gear with an old manual car.
Oil is looks fine and does not smell burnt, although it was very low on some of the previous test drives. They were less than a mile however. The transmission was allegedly just rebuilt as well, and it certainly looks brand new. I see worst case scenarios, but I'll read up on the mighty web first.
Fishgrinder- G3GM Member

- Street Cred : 4
 Re: 1975 Monte Carlo
that looks really good Fishgrinder it sits really nice I think as well the wheels set it off for sure ........
___________________________________________
1977 Chevelle SE x2
One Mild original
one Wild NON original
Anthony

Limey SE- Management

- Street Cred : 98
 Re: 1975 Monte Carlo
Som news about the generator issue.
My father did som experimenting (swapped wires) and found out that the thing was charging as it should. However it was charging so hard it was about to blow the battery.
After some further research it is likely that this generator had an external voltage regulator, as it belongs to the Buick 430 engine from 1969. Apparantly, the previous owner didn't take this with him the time he put the engine in.
So the plan now is to buy an original generator for a 1975 MC with an internal regulator. Just have to check that the bolt holes are the same.
Fishgrinder- G3GM Member

- Street Cred : 4
 Re: 1975 Monte Carlo
Some pictures of this weekend's work
Headliner installation
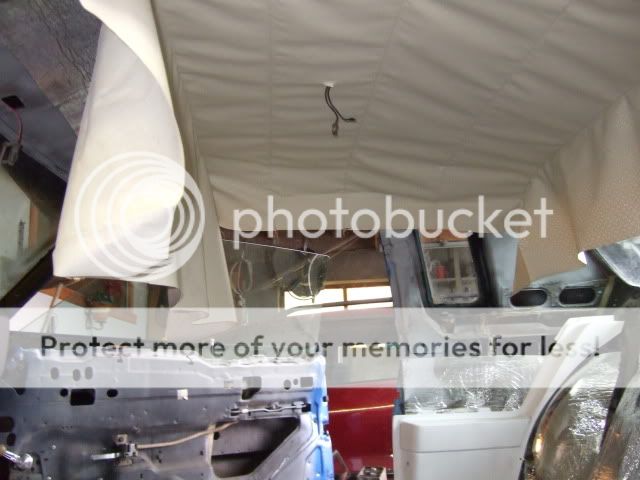

At this point I was pretty satisfied, and planned to use a heat gun to smooth out the remaining wrinkles
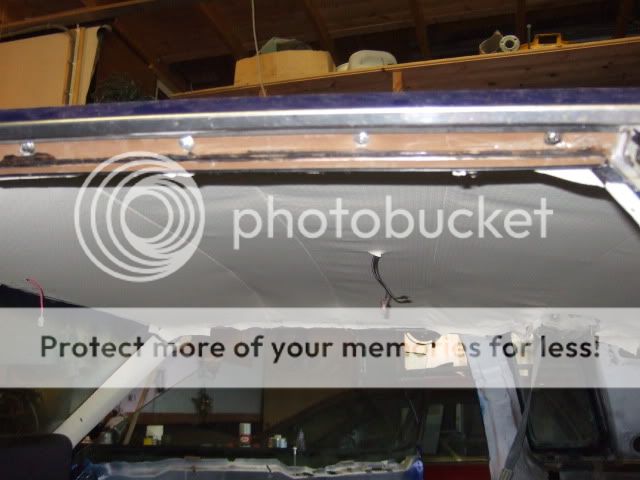
The next day I used the heat gun, but in some parts it got so hot the glue started to loosen, and it got even worse.
However, after letting it cool the glue had a cement like property. And it would hold on to the fabric better than the day before, while still being able to move it. So I stretched it like hell, and ended up with this:
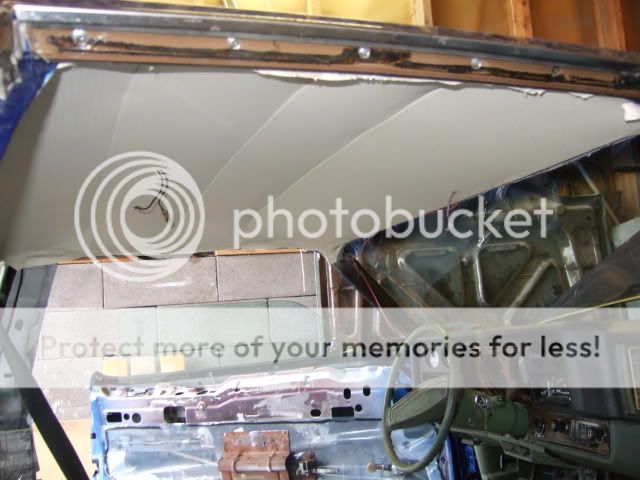
Some of the insulation is touching down here and there, but overall I'm happy with the result.
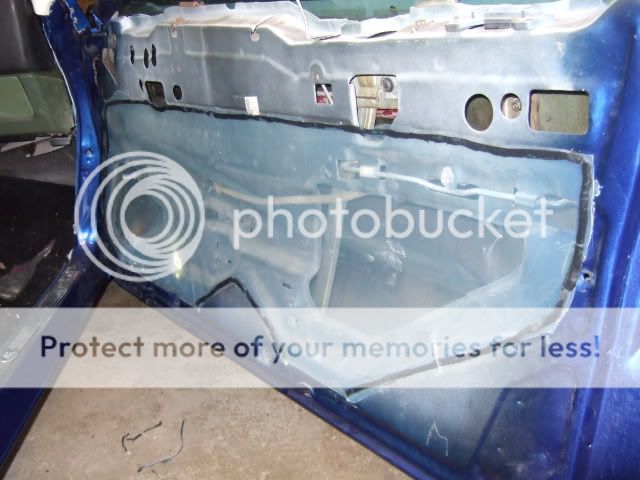
I also put in moisture shields in the doors. Kind of thinking that I should have covered the whole door as I'm writing this..well, it's a pretty straight forward job
Headliner installation


At this point I was pretty satisfied, and planned to use a heat gun to smooth out the remaining wrinkles

The next day I used the heat gun, but in some parts it got so hot the glue started to loosen, and it got even worse.
However, after letting it cool the glue had a cement like property. And it would hold on to the fabric better than the day before, while still being able to move it. So I stretched it like hell, and ended up with this:

Some of the insulation is touching down here and there, but overall I'm happy with the result.
I also put in moisture shields in the doors. Kind of thinking that I should have covered the whole door as I'm writing this..well, it's a pretty straight forward job

Fishgrinder- G3GM Member

- Street Cred : 4
 Re: 1975 Monte Carlo
great job on that headliner! i have that isolation issue too, but its under the sunvisor so i dont really care
abajc3- G3GM Member

- Street Cred : 3
 Re: 1975 Monte Carlo
hey whats that wire hanging out of the headliner above the windshield?
abajc3- G3GM Member

- Street Cred : 3
 Re: 1975 Monte Carlo
Great job! I'm dreading mine...one of the few things I may pay someone to do.
77mali- Donating Member

- Street Cred : 62
 Re: 1975 Monte Carlo
77mali wrote:Great job! I'm dreading mine...one of the few things I may pay someone to do.
no need man, save your money. it really isnt that hard
abajc3- G3GM Member

- Street Cred : 3
 Re: 1975 Monte Carlo
I agree with abjac3.
This was my first time as well, and it really was quite self explaining once you get started. If it gets too messed up you can always heat the glue and start over again. Think I spent about 5 hours. I'm not going to call it 100% perfect, but good enough for me.. for now
This video could give you some tips: https://www.youtube.com/watch?v=ucjvgMKls9U
Abjac: that wire in the front goes to a small lamp.
Fishgrinder- G3GM Member

- Street Cred : 4
 Re: 1975 Monte Carlo
I'm more afraid that it won't stretch correctly and "centering" is not one of my favorite things to do. Somehow I'm always off by an eighth or quarter inch 
I'll check out the vid though. Maybe I'll be brave.
I'll check out the vid though. Maybe I'll be brave.

77mali- Donating Member

- Street Cred : 62
 Re: 1975 Monte Carlo
Took a day off on friday so I got a long weekend to work on the car. Put in a new generator with an internal regulator, and it functions properly.
Speaking of the headliner, it had sagged pretty bad since my last stretching. The glue probably lost its strength when I heated it. So it was out with the spray on glue again to redo it in the relevant spots. Was still holding up good when I left today.
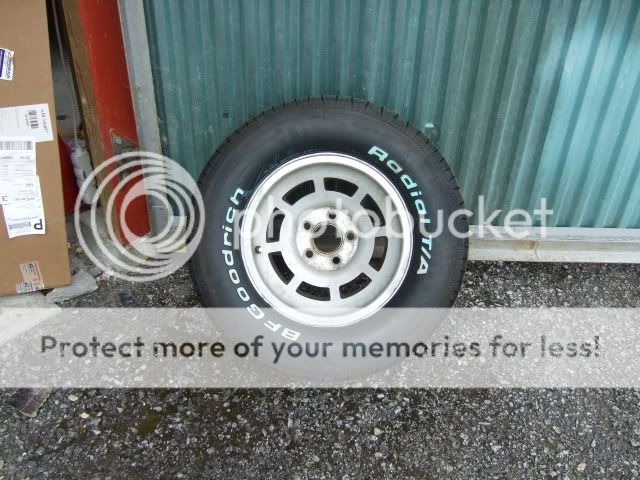
Finally changed to 275/60 BFG
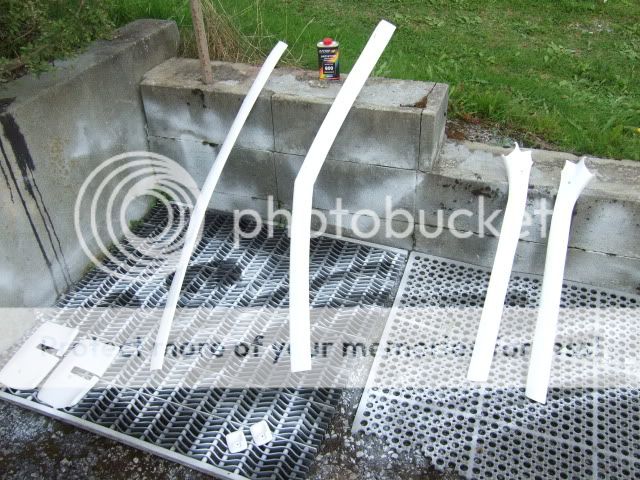
Painted some of the remaining interior. Poor adhesion, but these parts aren't very exposed.
Got the seats back from the upholstery shop, so I could reassemble the interior. The opera window panels were so crispy at the tips that they cracked up.

All of the exterior lights work. My father helped me here as i suck with electronics.

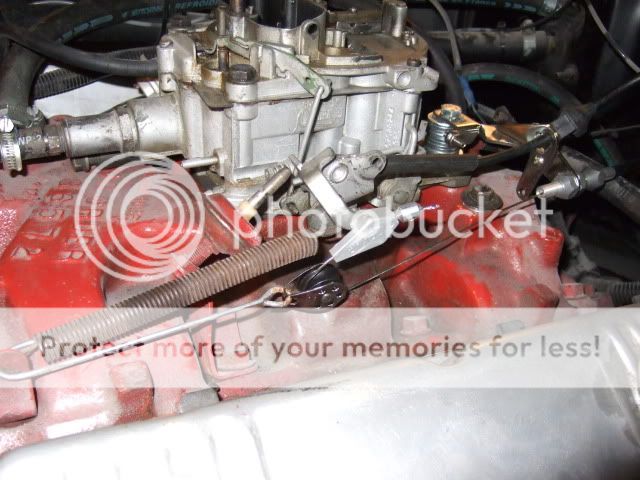
Makeshift kickdown arrangement. The donor car must have had a switch under the throttle pedal. The lokar kit i bought hooks up to the carburetor, but the only attachment point we could find was on the wrong side of the shaft axis. So more throttle makes the cable looser instead of tighter hehe. This block fixed it
Took it for a spin on saturday night. Although the roads were moist, I was actually surprised how easy it was to spin the tires, even with the positrac axle. Lots of torque in that 430. That "hesitating" shift and sound from the transmission is still there occasionally, but it is not messing up the driving.
Washed the car and put in driver side roof rail gasket today. Still need the small rail on the passenger side to put the gasket in. Ordered this together with some interior parts from Monte Man, which should be on its way now.


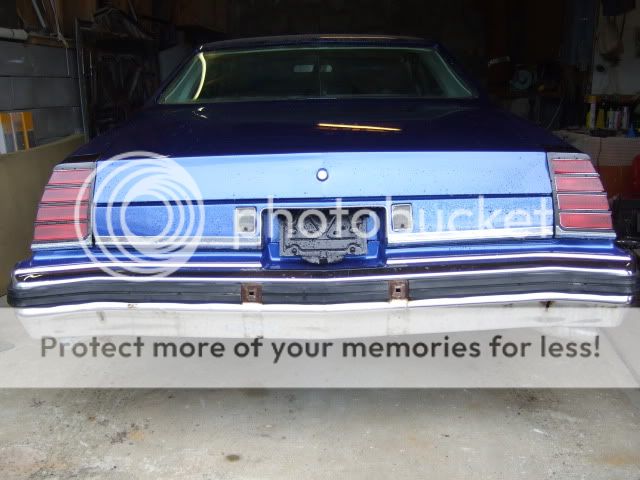
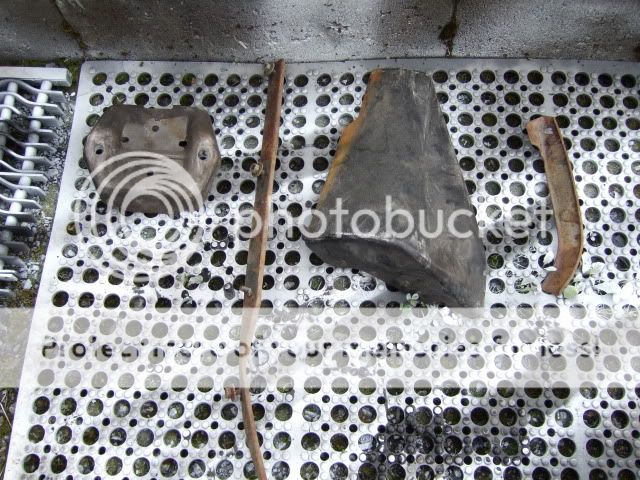
Here's a quiz for you guys. Tell me what the leftover parts in this picture are for. Item #3 from the left is in rubber.
Speaking of the headliner, it had sagged pretty bad since my last stretching. The glue probably lost its strength when I heated it. So it was out with the spray on glue again to redo it in the relevant spots. Was still holding up good when I left today.
Finally changed to 275/60 BFG

Painted some of the remaining interior. Poor adhesion, but these parts aren't very exposed.

Got the seats back from the upholstery shop, so I could reassemble the interior. The opera window panels were so crispy at the tips that they cracked up.

All of the exterior lights work. My father helped me here as i suck with electronics.

Makeshift kickdown arrangement. The donor car must have had a switch under the throttle pedal. The lokar kit i bought hooks up to the carburetor, but the only attachment point we could find was on the wrong side of the shaft axis. So more throttle makes the cable looser instead of tighter hehe. This block fixed it

Took it for a spin on saturday night. Although the roads were moist, I was actually surprised how easy it was to spin the tires, even with the positrac axle. Lots of torque in that 430. That "hesitating" shift and sound from the transmission is still there occasionally, but it is not messing up the driving.
Washed the car and put in driver side roof rail gasket today. Still need the small rail on the passenger side to put the gasket in. Ordered this together with some interior parts from Monte Man, which should be on its way now.


Here's a quiz for you guys. Tell me what the leftover parts in this picture are for. Item #3 from the left is in rubber.

Fishgrinder- G3GM Member

- Street Cred : 4
 Re: 1975 Monte Carlo
THe part on the right looks like it holds on the filler panel
ant7377- G3GM Addict

- Street Cred : 36
 Re: 1975 Monte Carlo
Fishgrinder wrote:Took a day off on friday so I got a long weekend to work on the car. Put in a new generator with an internal regulator, and it functions properly.
Speaking of the headliner, it had sagged pretty bad since my last stretching. The glue probably lost its strength when I heated it. So it was out with the spray on glue again to redo it in the relevant spots. Was still holding up good when I left today.
Finally changed to 275/60 BFG
copy cat..........hehe
1973 454 MONTE- Donating Member

- Street Cred : 36
 Re: 1975 Monte Carlo
1973 454 MONTE wrote:
copy cat..........hehe
Learned from the best
Fishgrinder- G3GM Member

- Street Cred : 4
 Re: 1975 Monte Carlo
Easy with the copycat labeling, lol!
FG if you want those wheels to shine, Mother's aluminum polish and the Mother's ball will clean them up quick. Might not be quite as shiny as Chris', but my investment was way less. Mine looked about as bad as yours BTW. Here they are now.
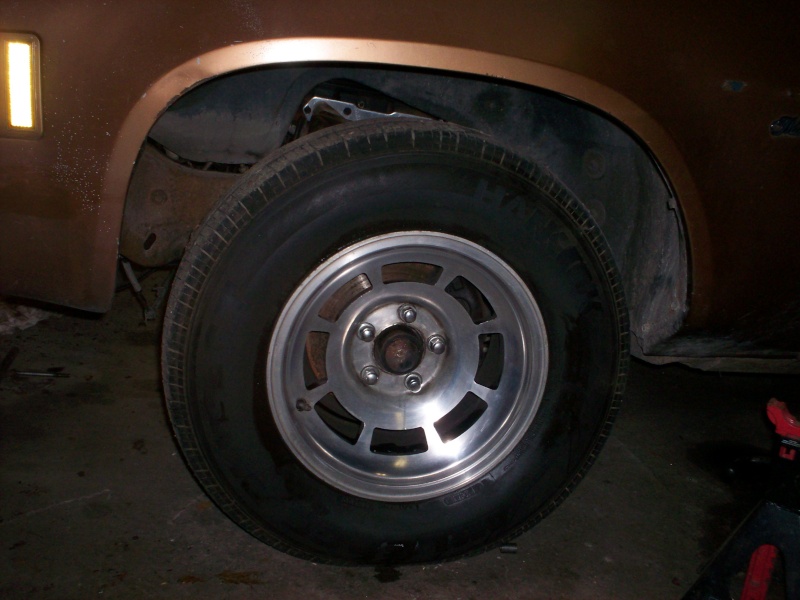
FG if you want those wheels to shine, Mother's aluminum polish and the Mother's ball will clean them up quick. Might not be quite as shiny as Chris', but my investment was way less. Mine looked about as bad as yours BTW. Here they are now.


The Dude- Management

- Street Cred : 48
 Re: 1975 Monte Carlo
As a matter of fact I have the Mother's polish and a power cone in my car 
Depends If I get the time to do it. There is probably not much more than 1 month left with drivable conditions for this "kind" of car here. So my main priority is to get it approved.
This must have been the fastet summer ever..
Depends If I get the time to do it. There is probably not much more than 1 month left with drivable conditions for this "kind" of car here. So my main priority is to get it approved.
This must have been the fastet summer ever..
Fishgrinder- G3GM Member

- Street Cred : 4
 Re: 1975 Monte Carlo
Fishgrinder wrote:As a matter of fact I have the Mother's polish and a power cone in my car
Depends If I get the time to do it. There is probably not much more than 1 month left with drivable conditions for this "kind" of car here. So my main priority is to get it approved.
This must have been the fastet summer ever..
I know what you mean...the summer just flew by. It's too bad you can't get more time over there. We can generally get through most of November w/out a problem but old man winter is right around the corner.

77mali- Donating Member

- Street Cred : 62
 Re: 1975 Monte Carlo
Bumper or motor mount, rubber strip mount for bumper rubber, inner rear fender, and headlight Bucket to fender spacer ?
BTW car is looking great Grinder came together really nice love the color and white seats
BTW car is looking great Grinder came together really nice love the color and white seats
___________________________________________
1977 Chevelle SE x2
One Mild original
one Wild NON original
Anthony

Limey SE- Management

- Street Cred : 98
 Re: 1975 Monte Carlo
Got the stuff I ordered from MonteMania last tuesday, so this weekend it was the last big effort to get the car finished.
Made a copy of the old door felt I had

Then installed the door panels
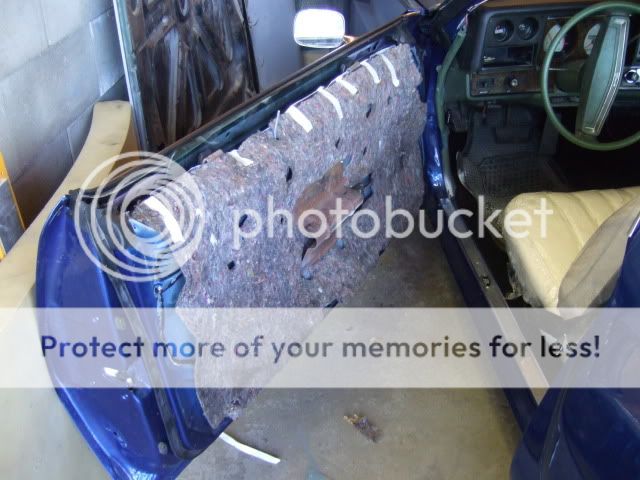
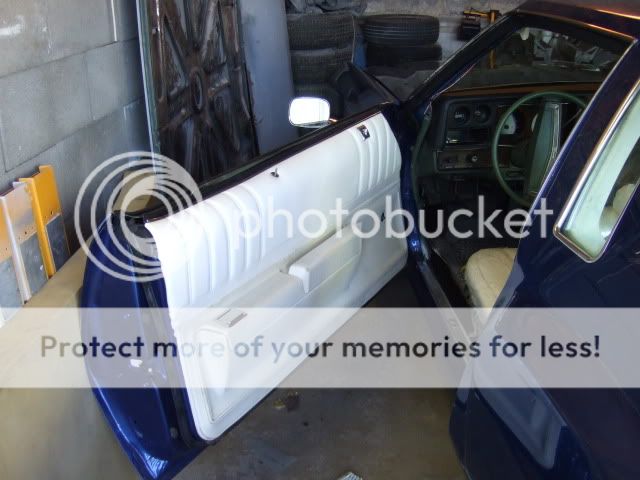
Spent hours adjusting the windows, and I think they came out allright. However, I get a small gap right beneath were the arrow is pointing on both sides. It is about the size of a pencil, which easily can pass through it. Is this the design, or have I messed something up? Seems to be caused by the roof rail gasket bending inwards to the attachment points.

Today I had the car inspected in order to get it registered, and it got 0 faults Then I went for the first "long" drive up to the place where I live. This is a distance of 80 miles, and it worked perfectly. Very tight through the cornes. However the noise inside got kind of annoying after half an hour. This is both wind noise which I suspect is increased by this gaps I wrote about, but also that deep bass sound from the engine.
So I actually put on a set of noise cancellation head phones the last hour of the drive
Turns out the upholstery guy put my headrests on the wrong way. I thought this was an east fix, by loosening the brackets and pulling the rests out of the seat backs. But no. Turns out they are actually stitched in ;(. I'll get him to fix this, it messes up the seat belt clip which goes on the head rest.
Anyone know if it's simple to just take the back pieces of the bench out? Not very keen on taking the whole bench out again...
Made a copy of the old door felt I had

Then installed the door panels


Spent hours adjusting the windows, and I think they came out allright. However, I get a small gap right beneath were the arrow is pointing on both sides. It is about the size of a pencil, which easily can pass through it. Is this the design, or have I messed something up? Seems to be caused by the roof rail gasket bending inwards to the attachment points.

Today I had the car inspected in order to get it registered, and it got 0 faults
So I actually put on a set of noise cancellation head phones the last hour of the drive
Turns out the upholstery guy put my headrests on the wrong way. I thought this was an east fix, by loosening the brackets and pulling the rests out of the seat backs. But no. Turns out they are actually stitched in ;(. I'll get him to fix this, it messes up the seat belt clip which goes on the head rest.
Anyone know if it's simple to just take the back pieces of the bench out? Not very keen on taking the whole bench out again...
Fishgrinder- G3GM Member

- Street Cred : 4
 Re: 1975 Monte Carlo
Can you repost a "zoomed out" picture on the gap? I can't make out what it is I'm looking at or looking for. I'll try & compare to my drivers door that is still complete & on the car.

77mali- Donating Member

- Street Cred : 62
 Re: 1975 Monte Carlo
77mali wrote:Can you repost a "zoomed out" picture on the gap? I can't make out what it is I'm looking at or looking for. I'll try & compare to my drivers door that is still complete & on the car.
Hope these make more sense
Right behind the tip of the whisker here.


Gap is there with window all the way up.
Fishgrinder- G3GM Member

- Street Cred : 4
Page 6 of 11 •  1, 2, 3 ... 5, 6, 7 ... 9, 10, 11
G3GM :: Media :: G3 Project Pictures
Page 6 of 11
Permissions in this forum:
You cannot reply to topics in this forum|
|
|


» Roll Call and Car showcase
» Central Texas Noob
» Welcome Keith Seymore
» Wanted: Front park lamp assemblies
» 75 Hurst Olds T-tpos
» G3 Chevy rims- help ID these
» 75 el camino project.
» Have had a few questions
» vinyl top removal