Hawk03 Redo
+20
Mcarlo77
thatfnthing
REVINKEVIN / Mr. 600+HP
Limey SE
Podor
fasrnur
Damon23
77ElClassic
Roadcaptain S3
77mali
dynchel
Wallyuph
impalamonte
driveit
Tom77
Darkcalling1
w451973
Brainstain
1973 454 MONTE
JiMi_DRiX
24 posters
G3GM :: Media :: G3 Project Pictures
Page 3 of 7
Page 3 of 7 •  1, 2, 3, 4, 5, 6, 7
 Re: Hawk03 Redo
thatfnthing wrote:Ditto, it's coming along.
I wouldn't worry about the front ride height yet -- you still have a lot more weight to put back on it like the hood and front bumper, so it will drop a little more yet. Get it all back together first, then see if it's too high.
yea would have to agree on this you have a lot of weight to put back on yet and also get the front end off the dollies, it throws the look off a little bit.

Limey SE- Management

- Street Cred : 98
 Re: Hawk03 Redo
Limey, I have to say I lol every time I see your current avatar.

dynchel- Donating Member

- Street Cred : 40
 Re: Hawk03 Redo
dynchel wrote:Limey, I have to say I lol every time I see your current avatar.
x2, Limey, it's your best one yet!

thatfnthing- Donating Member

- Street Cred : 65
 Re: Hawk03 Redo
thatfnthing wrote:dynchel wrote:Limey, I have to say I lol every time I see your current avatar.
x2, Limey, it's your best one yet!
Thanks Guys LOL feeling like that a lot lately with the cold weather my bones just cant take it anymore, I think that in the next two years we will be in the south.

Limey SE- Management

- Street Cred : 98
 Re: Hawk03 Redo
Thanks guys, makes sense to hold off on the stance until its complete - sometimes I get a head of myself...The car is still in Iowa, I won't get back until xmas to work on it next. I'm not going to bring it out to Indy until I can drive it and make sure everything is sound and I don't have any major mechanical issues.

Hawk03- G3GM Enthusiast

- Street Cred : 18
 Re: Hawk03 Redo
I knew things were going somewhat too smoothly, I tried bleeding the brakes for the first time and it was a disaster. There were leaks at a few different junctions so I will have to fix it. I'm thinking about having the shop take care of it when it is in for exhaust and a couple of other things but won't be for a few months. I painted the tubes of the headers over the holiday, I didn't take much time to do it (I know they don't look the best) or even pull them off of the car. I used Eastwood header paint and a brush and it seemed to go on good. If the mood strikes me or if I need to take the headers off then I will have them redone but until then, I think this will work.
I'll need to bolt a seat down and once the brakes and exhaust are hooked up I will be able to take it for a test drive but that won't be until spring. Its getting closer and that is always a good sign.
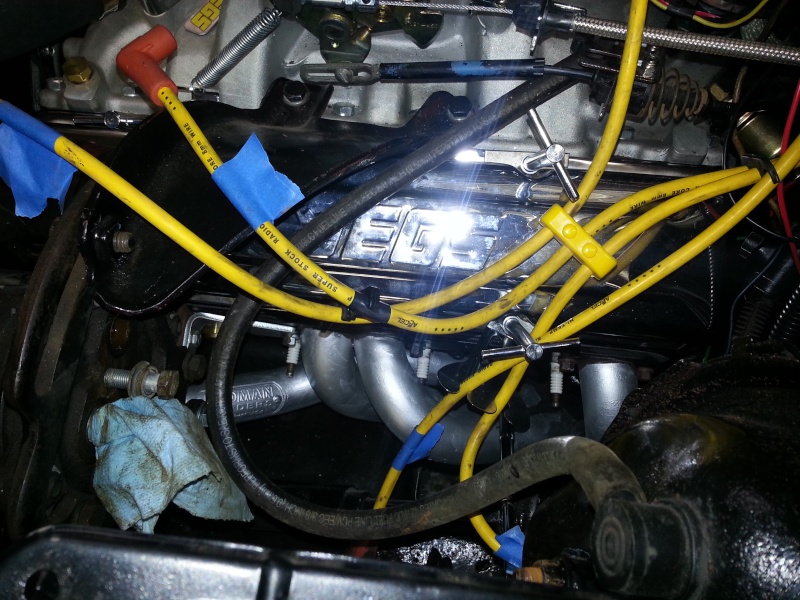

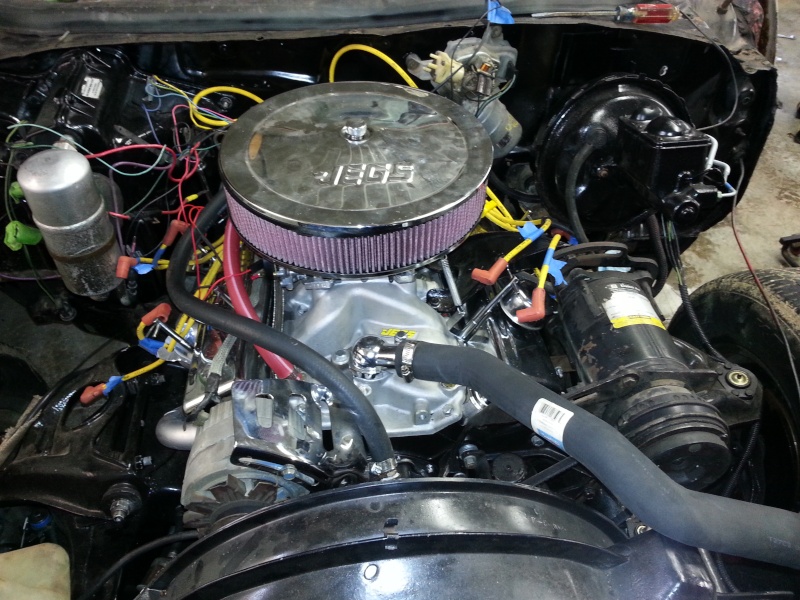
Once things are buttoned up I will make sure the engine bay is a little neater.
I'll need to bolt a seat down and once the brakes and exhaust are hooked up I will be able to take it for a test drive but that won't be until spring. Its getting closer and that is always a good sign.


Once things are buttoned up I will make sure the engine bay is a little neater.

Hawk03- G3GM Enthusiast

- Street Cred : 18
 Re: Hawk03 Redo
This might sounds nuts to some but here's what I've done re: brake bleeding. The manuals all show that you should bleed each wheel on its own (BULL CRAP). I did them all together & here’s how.
Get some 3/8" OD (which has 1/4” ID) clear plastic tubing from your local hardware store or home supply. There are also black plastic T fittings (that are specific for use with this clear tubing) that will connect the various lengths that you will need to cut & then re-connect. Also there are small black plastic clips that will hold the tubing onto the bleeder screws as well as the fittings.
I ran two lengths between the rear wheels & connected those to a T fitting and then ran another longer length down towards the front wheels. I also ran two more lengths from each of the front wheels and made the final connection to a 4 way plastic connector. You have to use the clips mentioned everywhere that the tubing connects to a fitting and the bleeders- make sure they’re nice & tight. It will help if you have a slight downward flow from the rear to the front of the car- nothing too drastic but just enough to have gravity lend you a hand.
The extra port on the four way connector will be your connection for your hand operated brake bleeder tool- that you can get at any auto parts supply, harbor freight, etc.
All you need to do after that is make sure the master cylinder never falls below 2/3 full. Have a friend help & keep checking & adding to the level of brake fluid as you pump. Also-Make sure you get the correct fluid for the car. You will see the brake fluid flow through the tubing and make its way through the pump and into the pumps reservoir and you will also see any bubbles (air) going through the lines. (You may have to empty the pump reservoir a few times- depending on how much air you’ve got in the system). Have your buddy pop inside the car after you use about half of a new bottle of brake fluid and pump the brakes as well to feel for pedal resistance. Keep going until the pedal feels firm and the master cylinder is full. Tighten your bleeder screws, remove the tubes & done.
I’ll try and get a picture of what it all looks like for you. It takes a while to set up but in my opinion- well worth the effort. I wasted half a day doing it how the manual says with no luck at all.
I should add also that all this is assuming your master cylinder has been bench bled (if new or went dry), your proportioning valve is working properly and nothing is wrong with any brake lines/connections or bleeder valves.
77mali- Donating Member

- Street Cred : 62
 Re: Hawk03 Redo
Interesting method, Paul! I assume we're talking a suction bleeder here, yes?

thatfnthing- Donating Member

- Street Cred : 65
 Re: Hawk03 Redo
This is the tool I used. The price on the link is high. Got mine for like $30.00
http://shop.advanceautoparts.com/p/mityvac-automotive-tune-up-and-brake-bleeding-kit-mitmv8000/22973736-P?searchTerm=brake+bleeder+tool
http://shop.advanceautoparts.com/p/mityvac-automotive-tune-up-and-brake-bleeding-kit-mitmv8000/22973736-P?searchTerm=brake+bleeder+tool

77mali- Donating Member

- Street Cred : 62
 Re: Hawk03 Redo
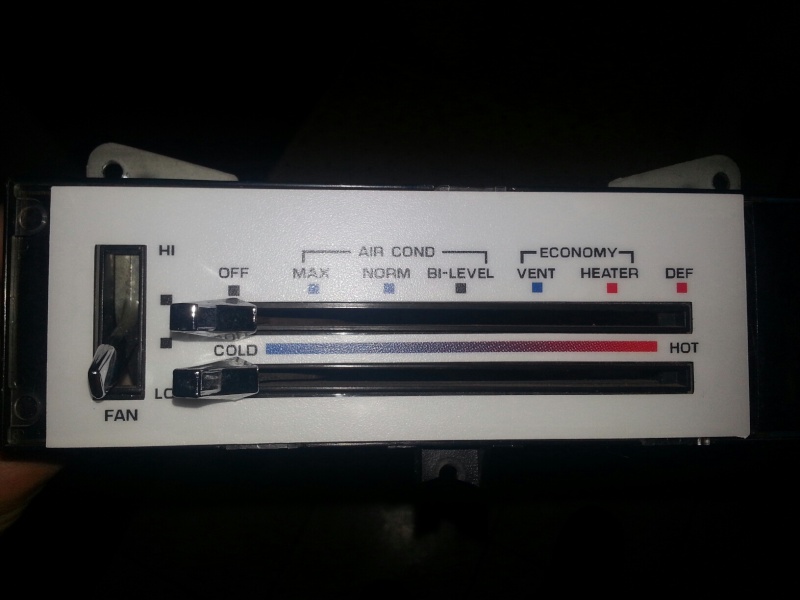
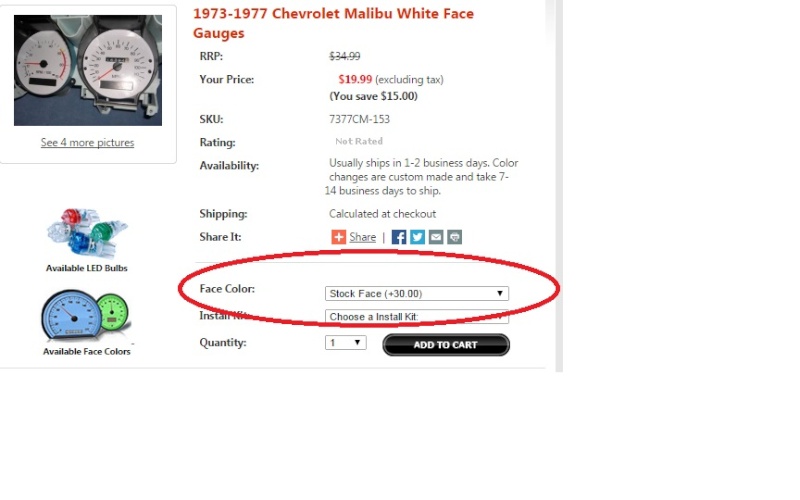
I've stuck on the HVAC overlay, it was really easy and looks good. It seems like it is made out of different material than what is used for the other gauges, these feel more durable. I tried to take the knobs off and insert a white piece of paper behind the plastic but I couldn't get the knobs off and didn't want to try too hard and break the plastic.


Hawk03- G3GM Enthusiast

- Street Cred : 18
 Re: Hawk03 Redo
They do make a nice product. Wish they'd do them in the original colors also.

77mali- Donating Member

- Street Cred : 62
 Re: Hawk03 Redo
I think they do or can, I haven't asked them but you do have an option to change the color to Stock Face in a drop down menu on the page. Although it adds $30 to the price. The HVAC face doesn't have an option for a stock face though.


Hawk03- G3GM Enthusiast

- Street Cred : 18
 Re: Hawk03 Redo
They weren't doing that before. Thanks for that! That means I can reface & keep my 120 mph speedo & sell the nice 100 I got with my Tach. Bless you!!! LOL

77mali- Donating Member

- Street Cred : 62
 Re: Hawk03 Redo
A few pics from the weekend. Its nice to see it with a front end.
'74 front end on
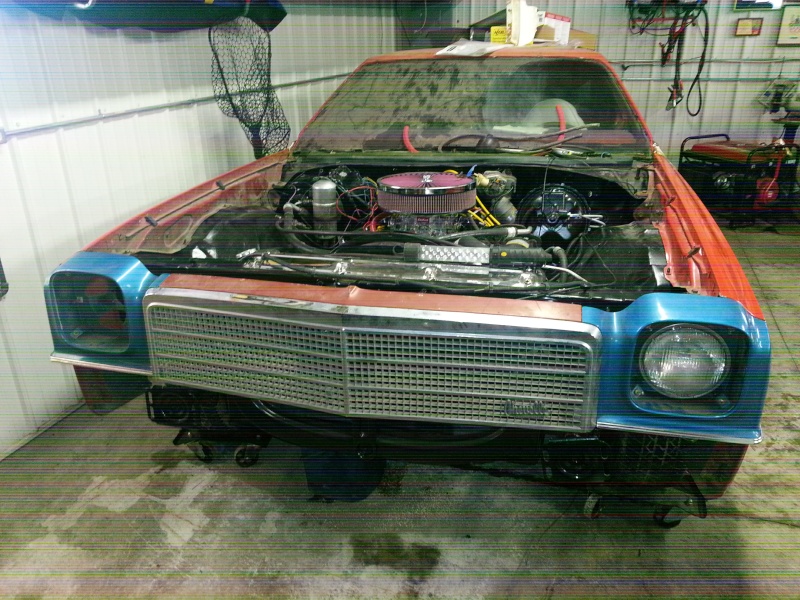
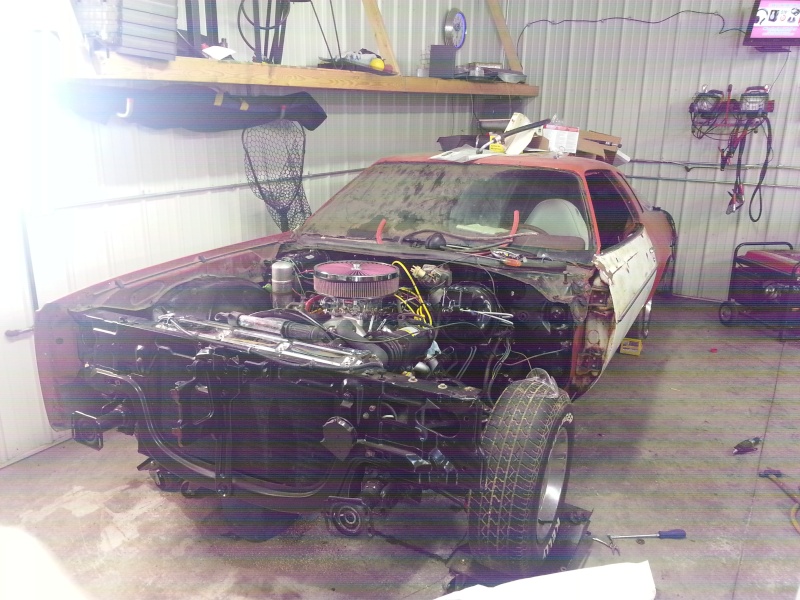
Gotta love the multiple colors.

Dash with bezel and new steering wheel.

'74 front end on


Gotta love the multiple colors.

Dash with bezel and new steering wheel.


Hawk03- G3GM Enthusiast

- Street Cred : 18
 Re: Hawk03 Redo
Red white & blue, very patriotic. Nice work, I like the '74 "face"

dynchel- Donating Member

- Street Cred : 40
 Re: Hawk03 Redo
DEAR GAWD GET THAT CAMARO LOGO OFF THE STEERING WHEEL BEFORE THE CAR EXPLODES!!!

Roadcaptain S3- Donating Member

- Street Cred : 26
 Re: Hawk03 Redo
dynchel wrote:Red white & blue, very patriotic. Nice work, I like the '74 "face"
Thanks, hopefully I'll be able to drive it by the 4th of July.
Roadcaptain wrote:
Ha, it will in due time. Its one of those things I'll get to when the interior is getting updated. I'm excited about what is going to go where the radio goes, I will post pics when its complete in a few months.

Hawk03- G3GM Enthusiast

- Street Cred : 18
 Re: Hawk03 Redo
No offense but I like the Camaro flags & badges from the 70's. Peep's use 'Vette stuff all the time too- rims, steering wheels, etc. If it's Chevy & period correct it's all good for me man. 
BTW- Red, White, Blue and Maroon???
BTW- Red, White, Blue and Maroon???

77mali- Donating Member

- Street Cred : 62
 Re: Hawk03 Redo
Now I'm thinking I should have put on the black drivers side fender...

Hawk03- G3GM Enthusiast

- Street Cred : 18
 Re: Hawk03 Redo
Don't sweat it bro, they'll be jealous when it's done...
What color will it be then?
What color will it be then?

Roadcaptain S3- Donating Member

- Street Cred : 26
 Re: Hawk03 Redo
I'm not, its not the first time its been more than 5 colors but that was about 18 years ago.
I think I am going with a darker red than what the drivers side fender is, which was the original color I painted the first time around and I think the factory color. I haven't started looking at any samples, I didn't want to get ahead of myself too much. I want to put it together and get some miles on it and see if there are any mechanical adjustments that need to be made before it goes in for paint.
I think I am going with a darker red than what the drivers side fender is, which was the original color I painted the first time around and I think the factory color. I haven't started looking at any samples, I didn't want to get ahead of myself too much. I want to put it together and get some miles on it and see if there are any mechanical adjustments that need to be made before it goes in for paint.
Last edited by Hawk03 on Wed Feb 11, 2015 4:41 pm; edited 1 time in total

Hawk03- G3GM Enthusiast

- Street Cred : 18
 Re: Hawk03 Redo
Hawk03 wrote:Now I'm thinking I should have put on the black drivers side fender...
LOL- there was maroon though, right or are my eyes going?
There was a real nice Red in the Pontiac Line, don't know what they call it.


77mali- Donating Member

- Street Cred : 62
 Re: Hawk03 Redo
77mali wrote:Hawk03 wrote:Now I'm thinking I should have put on the black drivers side fender...
LOL- there was maroon though, right or are my eyes going?
There was a real nice Red in the Pontiac Line, don't know what they call it.
Thanks for pic that is a nice color. There is maroon, two shades of it. The header panel is a different color than the passenger side fender which is also a maroon - not sure if the body is the same as the color as the either one. The hood and the trunk lid are the same color as the driver side fender so at least there will be some flow to it. Its a mish-mash of body parts from several different cars and the hood and trunk are the only body parts going on from my original car.

Hawk03- G3GM Enthusiast

- Street Cred : 18
Page 3 of 7 •  1, 2, 3, 4, 5, 6, 7
G3GM :: Media :: G3 Project Pictures
Page 3 of 7
Permissions in this forum:
You cannot reply to topics in this forum|
|
|


» Roll Call and Car showcase
» Central Texas Noob
» Welcome Keith Seymore
» Wanted: Front park lamp assemblies
» 75 Hurst Olds T-tpos
» G3 Chevy rims- help ID these
» 75 el camino project.
» Have had a few questions
» vinyl top removal