Update :1973 Monte Carlo Body off frame resto. Now with LS!
+24
Iggy
Hawk03
thatfnthing
76 Malibu
REVINKEVIN / Mr. 600+HP
Zaptiah
fasrnur
TW Monte
Hs1973
ant7377
Damon23
Circuit Rider
77mali
99B4C
75Pontiac-Pride
77cruiser
Dinomyte
marks454ss
driveit
bitterfitter
pila
Joe73
dynchel
1973montec
28 posters
G3GM :: Media :: G3 Project Pictures
Page 4 of 6
Page 4 of 6 •  1, 2, 3, 4, 5, 6
 Re: Update :1973 Monte Carlo Body off frame resto. Now with LS!
Some new equipment this year. I think we all have been waiting out the weather to get back "at it".
This year I decided to add a methanol system to cool the intake charge from my supercharger. I did entertain an intercooler. And it would have been cool to see a portion of big honkin' 5 " wide piece of pretty aluminum hanging below the radiator support on the front side.....But , IM RUNNING OUT OF ROOM...it seems. A couple of reasons I didn't intercool , room for all the piping and room for the intercooler as I have my front bumper tucked in. Also , within my research , intercooler could restrict air flow to the intake thus reducing boost and potential heat sink. Methanol will cool my intake charge up to 120 degrees and will require maint.(replenishment of the liquid in tank). But now I can reduce the retard I was running to prevent pre-detonation. I'm sure some opinions will be voiced between both options. Price for booth intercooler and associated parts and methanol kit was mostly the same money.
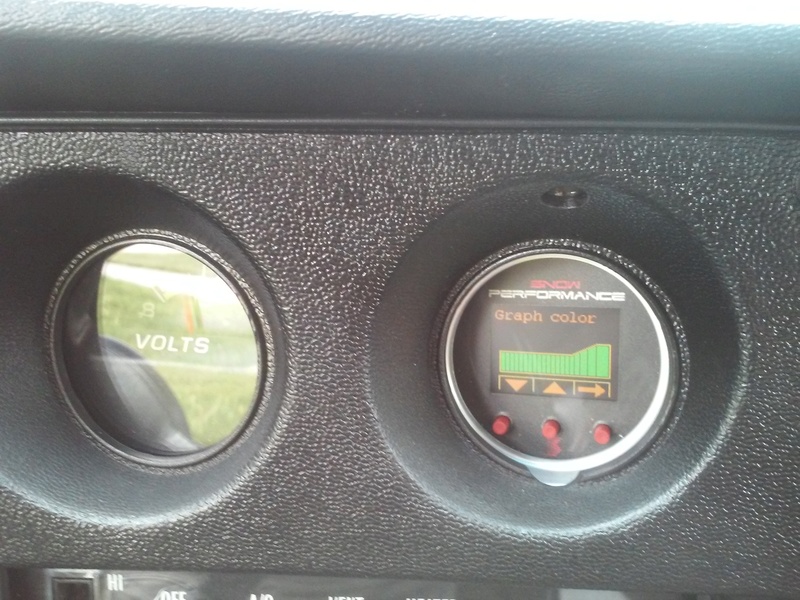
Below are some pictures finished product. I installed the unit in the trunk . I have a controller that I installed in the dash in the position where the factory clock use to be. The controller has telemetry for fluid level in the tank , amount of boost produced , parameters to set injection start .
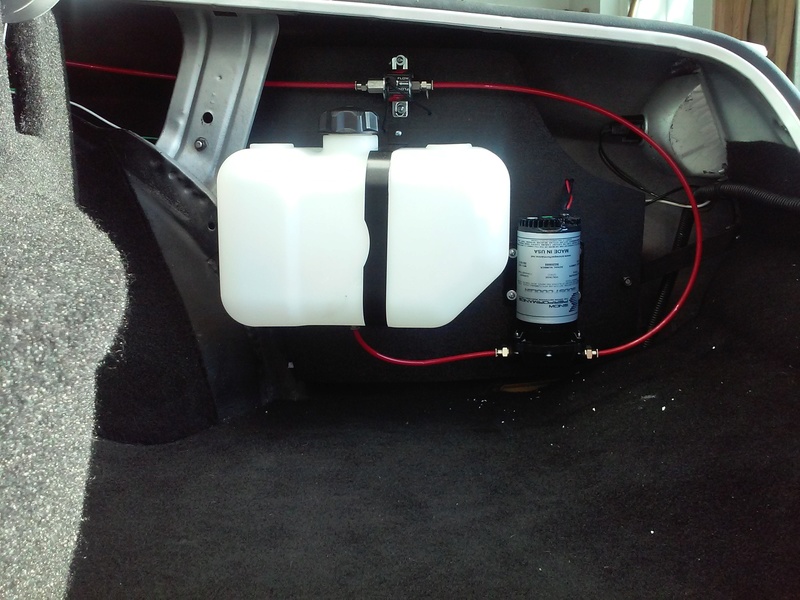
All equipment was installed onto a piece of quarter inch ABS board. Made a couple of brackets from old gas tank strap to hold it in place. Painted them. All wiring is loomed on the back side with a quick connection through a weatherpak connection as is the connection behind my dash for the controller.
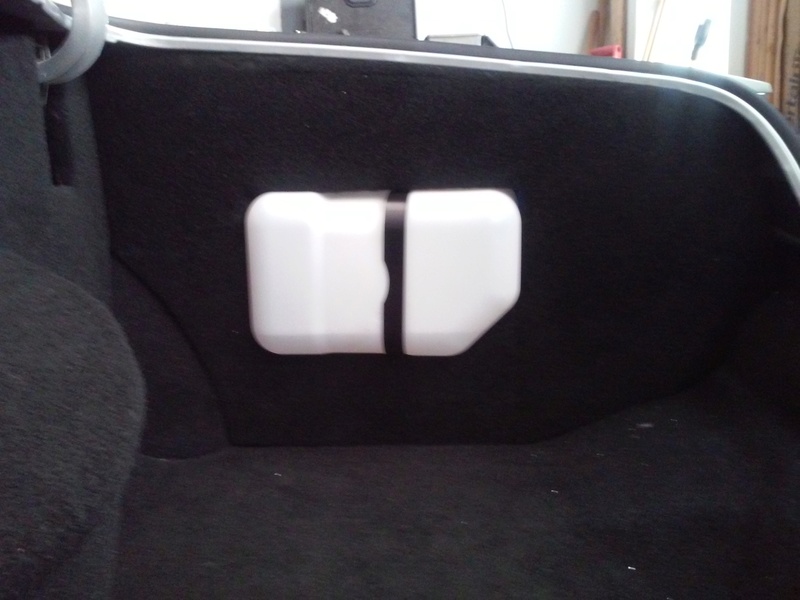
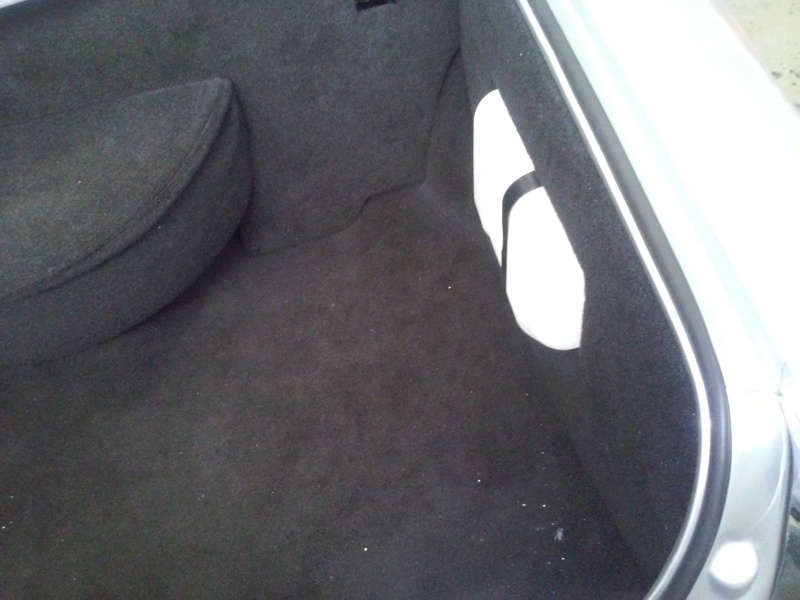
Had to cut a hole in my trunk enclosure that I made last year as the container is 2.5 gallons. I could have as well installed the supplied 3 quart unit...but I wanted more capacity.
This year I decided to add a methanol system to cool the intake charge from my supercharger. I did entertain an intercooler. And it would have been cool to see a portion of big honkin' 5 " wide piece of pretty aluminum hanging below the radiator support on the front side.....But , IM RUNNING OUT OF ROOM...it seems. A couple of reasons I didn't intercool , room for all the piping and room for the intercooler as I have my front bumper tucked in. Also , within my research , intercooler could restrict air flow to the intake thus reducing boost and potential heat sink. Methanol will cool my intake charge up to 120 degrees and will require maint.(replenishment of the liquid in tank). But now I can reduce the retard I was running to prevent pre-detonation. I'm sure some opinions will be voiced between both options. Price for booth intercooler and associated parts and methanol kit was mostly the same money.
Below are some pictures finished product. I installed the unit in the trunk . I have a controller that I installed in the dash in the position where the factory clock use to be. The controller has telemetry for fluid level in the tank , amount of boost produced , parameters to set injection start .

All equipment was installed onto a piece of quarter inch ABS board. Made a couple of brackets from old gas tank strap to hold it in place. Painted them. All wiring is loomed on the back side with a quick connection through a weatherpak connection as is the connection behind my dash for the controller.


Had to cut a hole in my trunk enclosure that I made last year as the container is 2.5 gallons. I could have as well installed the supplied 3 quart unit...but I wanted more capacity.

impalamonte- G3GM Enthusiast

- Street Cred : 18
anthonyalessi74 likes this post
 Re: Update :1973 Monte Carlo Body off frame resto. Now with LS!
As always, sir, you do impressive and professional work!

thatfnthing- Donating Member

- Street Cred : 65
 Re: Update :1973 Monte Carlo Body off frame resto. Now with LS!
FOLLOW TOM POUPA AKA GHOSTRIDER to the Dakota Illinois Car show June 2nd I WOULD BE HONORED TO HAVE your car there
___________________________________________
1977 Chevelle SE x2
One Mild original
one Wild NON original
Anthony

Limey SE- Management

- Street Cred : 98
 Re: Update :1973 Monte Carlo Body off frame resto. Now with LS!
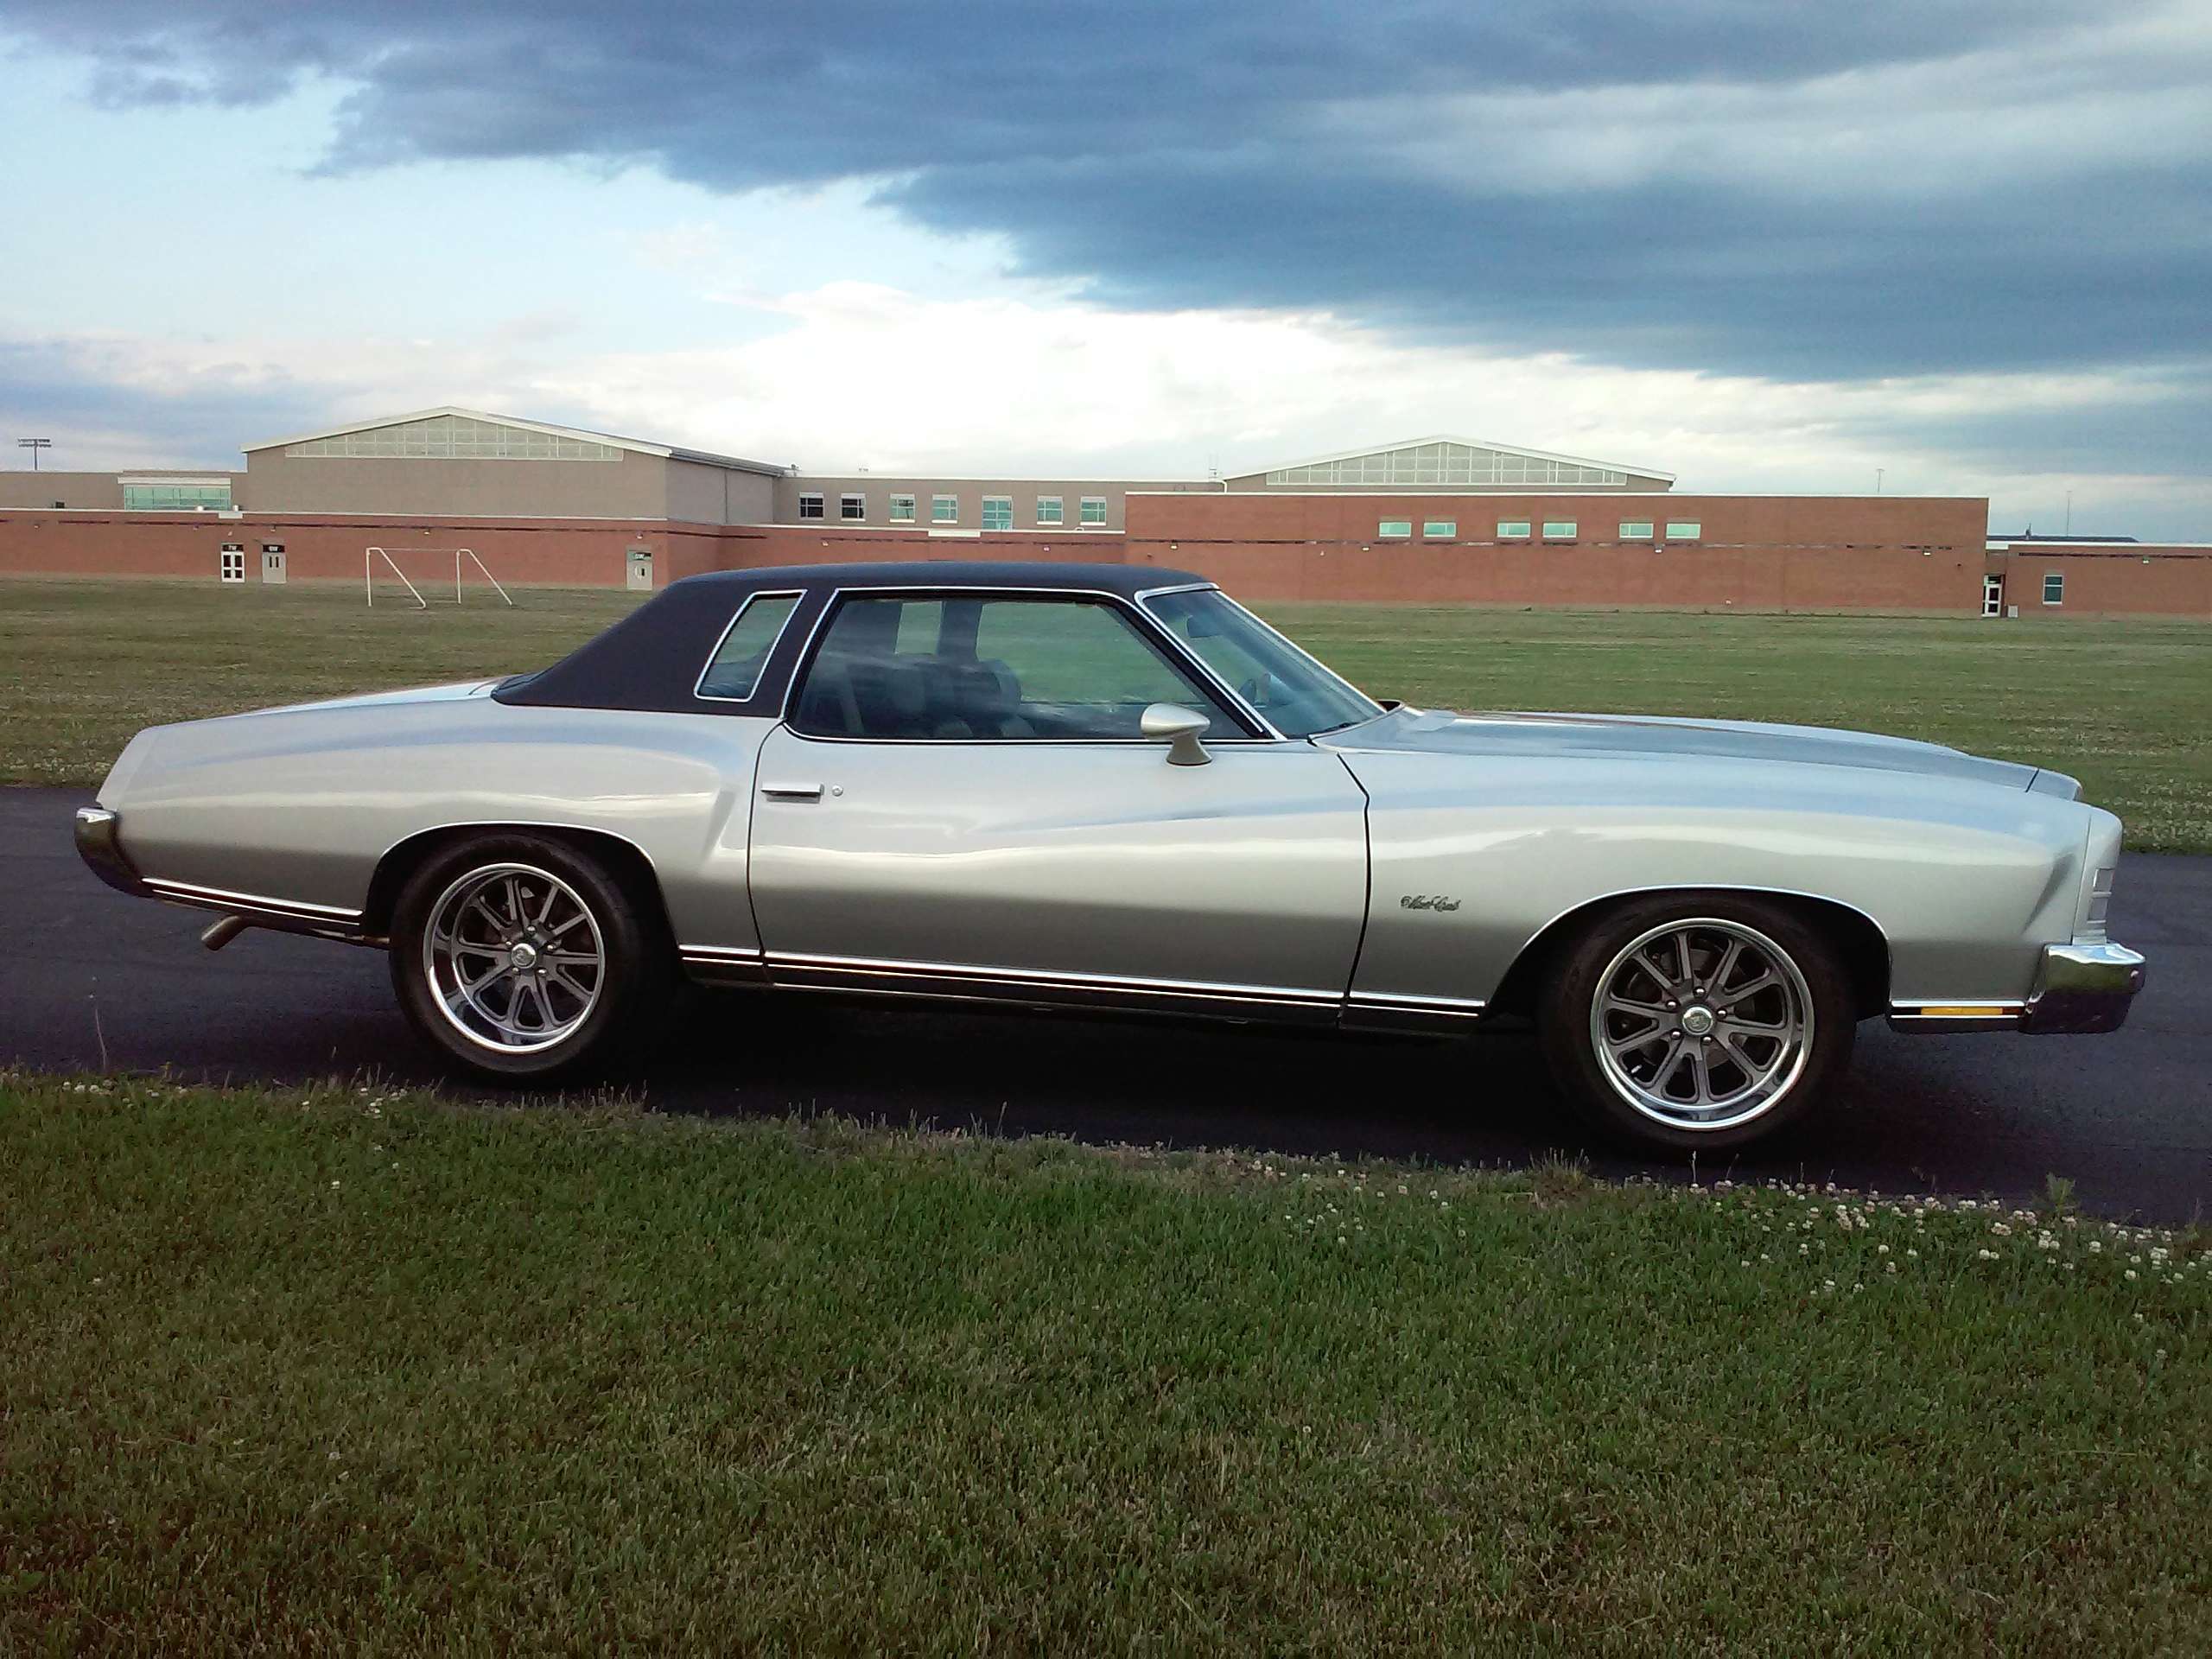
Hi all in G3 land. Been working for the last several weekends to get the car "road" ready for big miles.
Among the other things I had done to get it ready...mechanically myself. I opted this year to have a new vinyl roof professionally installed. I done the job myself in 2001. I made some rookie mistakes not being familiar with all the ins and outs of their profession. I think most of us are much like "practicing" doctors. They are still considered practicing.... after 20 years of service.
We are constantly learning !
Also , hard to decipher in this pic from yesterday. I installed 295/ 45 's on the rear. Rear spring compressed , I have 3/8" clearance between the sidewall and fender lip.


impalamonte- G3GM Enthusiast

- Street Cred : 18
anthonyalessi74 and TW Monte like this post
 Re: Update :1973 Monte Carlo Body off frame resto. Now with LS!
Damn that looks sweet sir!

fasrnur- G3GM Enthusiast

- Street Cred : 9
 Re: Update :1973 Monte Carlo Body off frame resto. Now with LS!
Looking good as always!

thatfnthing- Donating Member

- Street Cred : 65
 Re: Update :1973 Monte Carlo Body off frame resto. Now with LS!
Thanks for the compliments guys !

impalamonte- G3GM Enthusiast

- Street Cred : 18
 Re: Update :1973 Monte Carlo Body off frame resto. Now with LS!
Hi guys ,
Last Dec. 2017 I ordered a Delphi 670 steering box ( 12.7:1) . Aug. 2018 , I still didn't have it as there was a back order issue as the manufacturer was having trouble getting parts from a vendor. All the major outlets to get it could not guarantee delivery if ordered. I went to the Street Rod Nationals in Louisville in Aug. and Borgeson Steering was there. I noticed on the table being advertised a part# 800130 for 1965 and up GM. This is a new steering box internals / externals. It had been in development for 2 years before the release April 2018 and was created in response to demand. I had read enough posts in other forums about the hit and miss performance of rebuilt boxes and after reading enough , I knew it wasn't the route I wanted to go. Mainly , because the user's of rebuilt units were saying the rebuilt unit was not any better than what they had taken off. AND , we all know of that vague steering feeling on our cars. Drift...etc., moving the steering wheel and the car not responding.
I purchased the unit from JEGS with the rag joint for less $500.00 ( this also includes the O-ring to inverted flare adapters included in the box). I wanted to have some miles behind me before I reported my experience. THIS IS BY FAR ONE OF THE BEST EXPENSES I HAVE OUTLAYED. This steering box tightens the whole driving experience! NO MORE moving the steering wheel an 1" and no response ! The feedback is truly a difference and driving is exceedingly more pleasurable. My frontend has been rebuilt with all new parts for years and this was the last piece to bring it all together.
http://www.borgeson.com/xcart/product.php?productid=1792&cat=0&featured=Y

impalamonte- G3GM Enthusiast

- Street Cred : 18
 Re: Update :1973 Monte Carlo Body off frame resto. Now with LS!
Holy cowbell what a build. Maybe when I'm in Indy next week I see this on the road  absolutely beautiful car.
Zaptiah- G3GM Member

- Street Cred : 2
 Re: Update :1973 Monte Carlo Body off frame resto. Now with LS!
impalamonte wrote:Hi guys ,
Last Dec. 2017 I ordered a Delphi 670 steering box ( 12.7:1) . Aug. 2018 , I still didn't have it as there was a back order issue as the manufacturer was having trouble getting parts from a vendor. All the major outlets to get it could not guarantee delivery if ordered. I went to the Street Rod Nationals in Louisville in Aug. and Borgeson Steering was there. I noticed on the table being advertised a part# 800130 for 1965 and up GM. This is a new steering box internals / externals. It had been in development for 2 years before the release April 2018 and was created in response to demand. I had read enough posts in other forums about the hit and miss performance of rebuilt boxes and after reading enough , I knew it wasn't the route I wanted to go. Mainly , because the user's of rebuilt units were saying the rebuilt unit was not any better than what they had taken off. AND , we all know of that vague steering feeling on our cars. Drift...etc., moving the steering wheel and the car not responding.
I purchased the unit from JEGS with the rag joint for less $500.00 ( this also includes the O-ring to inverted flare adapters included in the box). I wanted to have some miles behind me before I reported my experience. THIS IS BY FAR ONE OF THE BEST EXPENSES I HAVE OUTLAYED. This steering box tightens the whole driving experience! NO MORE moving the steering wheel an 1" and no response ! The feedback is truly a difference and driving is exceedingly more pleasurable. My frontend has been rebuilt with all new parts for years and this was the last piece to bring it all together.
http://www.borgeson.com/xcart/product.php?productid=1792&cat=0&featured=Y
What is the difference from the Borgeson unit to the one that CPP offers?
https://www.ebay.com/itm/73-74-75-BUICK-CPP-500-SERIES-QUICK-RATIO-POWER-STEERING-GEAR-BOX/381609106130?epid=1123065642&hash=item58d9acdad2:g:TEQAAOSw3yVZgMlO

g3chevy / Mr Pontiac- Donating Member

- Street Cred : 35
 Re: Update :1973 Monte Carlo Body off frame resto. Now with LS!
That car rocks. You are making me feel bad. Keep it up.

REVINKEVIN / Mr. 600+HP- G3GM Senior Member

- Street Cred : 20
 Re: Update :1973 Monte Carlo Body off frame resto. Now with LS!
Thanks REVINKEVIN !
g3Chevy , I would say absolutely nothing outside of the fact that the one you referenced from CPP is 14:1 RATIO.
Except, the Borgeson , 12.7:1 , meaning fewer turns lock-to-lock ,(approx. 2 1/2 turns).
The Borgeson (800130 ) as well as others now coming to the table are, using rack and pinion valve technology or as a description.... (recirculating ball gears , open centered, rotary type) ...much like the Delphi 670. Most aftermarket manufactures are now duplicating.
I am most sure the CPP you referenced is utilizing the exact same technology. Which is what we want (my opinion) ... a tightened up feel in the car replacing the vagueness.....which I was not a fan.
Actually , if I could somehow integrate a real rack and pinion unit / kit for a 70-81 Camaro ( and they are out there) ....would be great...I just cant justify the $3000.00 kit to do it !!

impalamonte- G3GM Enthusiast

- Street Cred : 18
 Re: Update :1973 Monte Carlo Body off frame resto. Now with LS!
impalamonte wrote:Actually , if I could somehow integrate a real rack and pinion unit / kit for a 70-81 Camaro ( and they are out there) ....would be great...I just cant justify the $3000.00 kit to do it !!
Unless you are auto-crossing, that hardly seems worth it.

thatfnthing- Donating Member

- Street Cred : 65
 Re: Update :1973 Monte Carlo Body off frame resto. Now with LS!
impalamonte wrote:Thanks REVINKEVIN !
g3Chevy , I would say absolutely nothing outside of the fact that the one you referenced from CPP is 14:1 RATIO.
Except, the Borgeson , 12.7:1 , meaning fewer turns lock-to-lock ,(approx. 2 1/2 turns).
The Borgeson (800130 ) as well as others now coming to the table are, using rack and pinion valve technology or as a description.... (recirculating ball gears , open centered, rotary type) ...much like the Delphi 670. Most aftermarket manufactures are now duplicating.
I am most sure the CPP you referenced is utilizing the exact same technology. Which is what we want (my opinion) ... a tightened up feel in the car replacing the vagueness.....which I was not a fan.
Actually , if I could somehow integrate a real rack and pinion unit / kit for a 70-81 Camaro ( and they are out there) ....would be great...I just cant justify the $3000.00 kit to do it !!
Thanks for the feedback ImpalaMonte! I bought one of the CPP units a while back for my 87 El Camino and have not gotten around to getting it installed. I'm thinking it will be an improvement over the original steering box for sure. Btw, your Monte looks slicker than owl snot! It should be in SuperChevy magazine.

g3chevy / Mr Pontiac- Donating Member

- Street Cred : 35
 Re: Update :1973 Monte Carlo Body off frame resto. Now with LS!
WOW !! Thanks for the compliment g3Chevy !!

impalamonte- G3GM Enthusiast

- Street Cred : 18
 Re: Update :1973 Monte Carlo Body off frame resto. Now with LS!
The 1973 Monte is my favorite of all the years they were made. I've recently went through your post from the very beginning to truly appreciate the time, effort and money you've put into your car. Everything was obviously done with great thought to achieve these results. This is serious motivation for the rest of us. Thanks for sharing all the details of your build. It truly does warrant a spread in one of the car magazines.

g3chevy / Mr Pontiac- Donating Member

- Street Cred : 35
 Re: Update :1973 Monte Carlo Body off frame resto. Now with LS!
Hey. I just pulled a g3chevy and went through the entire thread. You started this in August 2014. Wow. It takes so much time and work to get a car to this level. It always amazes me that they built your car in a couple of days when it was new. We should all pool our money and buy factory and build these cars all day long. Of course all of our new 2020 G3's would come with the LSX454, od transmissions, and real brakes...

REVINKEVIN / Mr. 600+HP- G3GM Senior Member

- Street Cred : 20
 Re: Update :1973 Monte Carlo Body off frame resto. Now with LS!
REVINKEVIN wrote:. It always amazes me that they built your car in a couple of days when it was new. We should all pool our money and buy factory and build these cars all day long. Of course all of our new 2020 G3's would come with the LSX454, od transmissions, and real brakes...
IM IN FOR SURE
___________________________________________
1977 Chevelle SE x2
One Mild original
one Wild NON original
Anthony

Limey SE- Management

- Street Cred : 98

g3chevy / Mr Pontiac- Donating Member

- Street Cred : 35
 Re: Update :1973 Monte Carlo Body off frame resto. Now with LS!
Hey guys, I'm in !! Can we add the LSA engine as a check box for "option" on the RPO order form?

impalamonte- G3GM Enthusiast

- Street Cred : 18
 Re: Update :1973 Monte Carlo Body off frame resto. Now with LS!
Hey guys.....been busy this spring here.
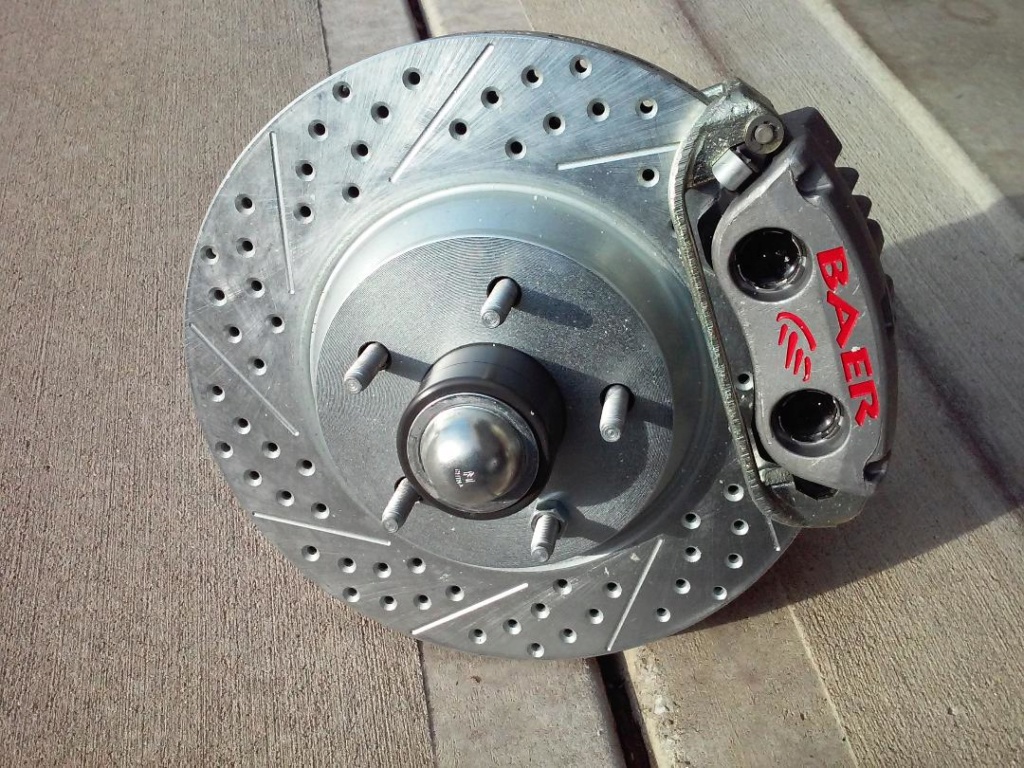
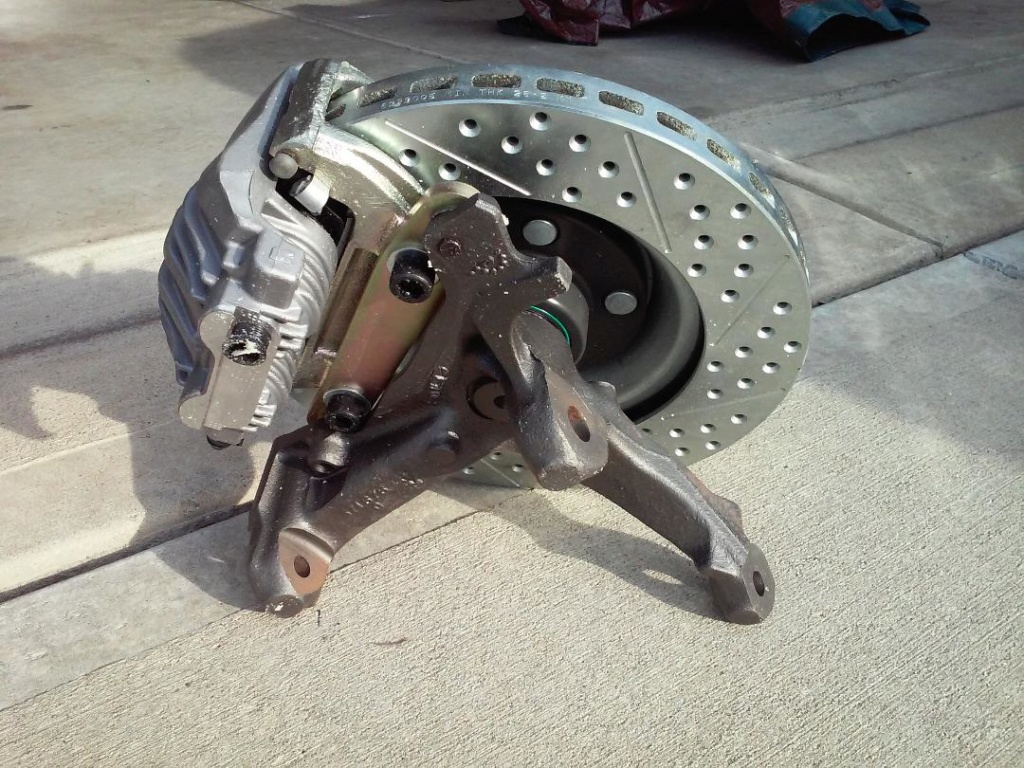
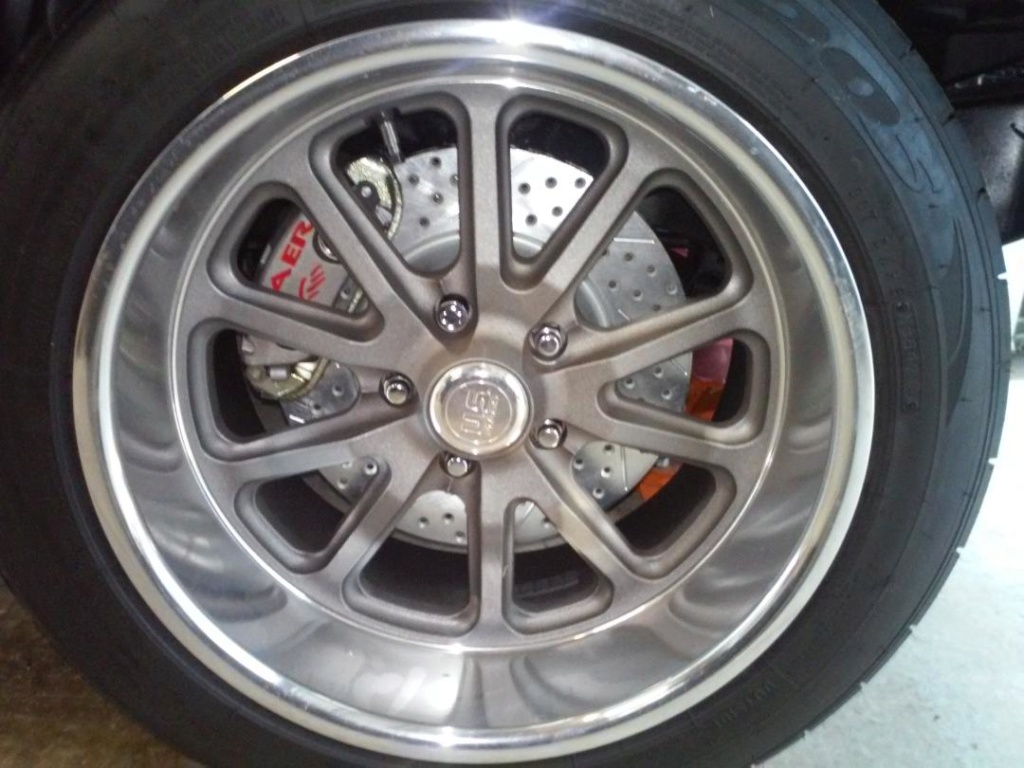
I sold my B-body spindle set up in favor of bigger brakes. I happened on this vintage Baer 13" set up. Never installed and in the boxes from 2005.
It wasn't even on my " punch" list of things I wanted to do. But, at the price...couldn't pass it up. Is it overkill....maybe...probably! As with any addition....it cant just be the spindle / brake set up and done. No , had to go to a master cylinder with 1" bore as I have increased piston area / volume and had to increase line pressure to get the same pedal feel I had before. With the 1 1/8" master cylinder , I had to jump on the brake pedal to get it stopped.
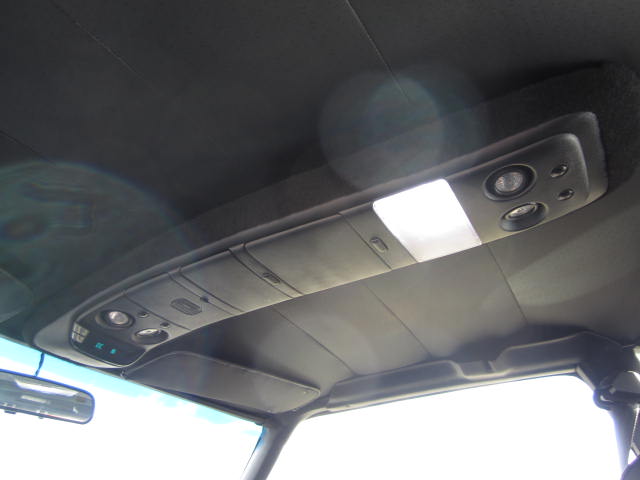
Also installed an overhead console. ( this idea came from "thatfnthing") Many years ago....just now got around to it.
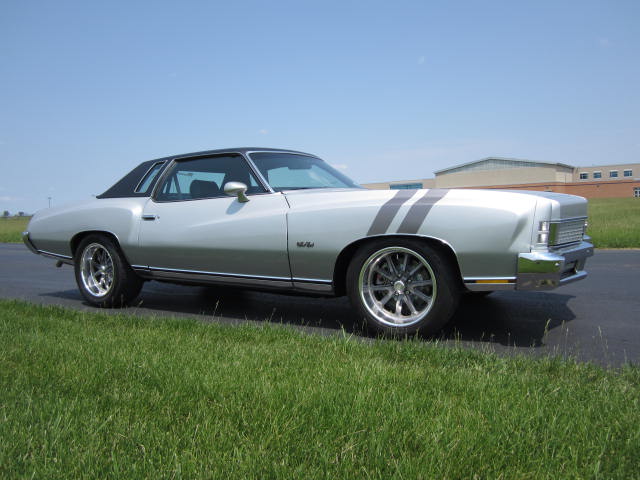
Thought I would try to mix it up a little. I painted these on with peel-able paint. But , I think I will remove them. The paint lines are just not crisp after removing the tape. Cant have that ! I kind of like it though !!
I sold my B-body spindle set up in favor of bigger brakes. I happened on this vintage Baer 13" set up. Never installed and in the boxes from 2005.
It wasn't even on my " punch" list of things I wanted to do. But, at the price...couldn't pass it up. Is it overkill....maybe...probably! As with any addition....it cant just be the spindle / brake set up and done. No , had to go to a master cylinder with 1" bore as I have increased piston area / volume and had to increase line pressure to get the same pedal feel I had before. With the 1 1/8" master cylinder , I had to jump on the brake pedal to get it stopped.


Also installed an overhead console. ( this idea came from "thatfnthing") Many years ago....just now got around to it.

Thought I would try to mix it up a little. I painted these on with peel-able paint. But , I think I will remove them. The paint lines are just not crisp after removing the tape. Cant have that ! I kind of like it though !!


impalamonte- G3GM Enthusiast

- Street Cred : 18
anthonyalessi74 likes this post
 Re: Update :1973 Monte Carlo Body off frame resto. Now with LS!
Wow, that looks really great! Those wheels work really well with your Monte. Very nice car. 


76 Malibu- G3GM Member

- Street Cred : 2
 Re: Update :1973 Monte Carlo Body off frame resto. Now with LS!
impalamonte wrote:Also installed an overhead console. ( this idea came from "thatfnthing") Many years ago....just now got around to it.
As always, top notch work! Did it give you any trouble?
And personally, I like the stripes. But 1) aren't they supposed to lean backward to give the impression of speed, and 2) did you continue them on the hood? How does that look?

thatfnthing- Donating Member

- Street Cred : 65
 Re: Update :1973 Monte Carlo Body off frame resto. Now with LS!
Thanks "thatfnthing"
No trouble installing the overhead console. The front screw went into the locating hole for the factory installed map light.
In the rear , I made a paper template and transferred the hole location for the dome light onto the topside of the overhead console...then made a spacer to make up the difference.
For the stripes , think C5 or C6 Vette and how the factory installed those. And don't forget the fender hash stripes on the can am cars of the 60's.
I had them wrapping up and over the fender and you could see the tops and sides ( because the fenders are higher than the hood at that location on our cars) of them from the driver's seat. They did not go across the hood. I had to remove them though. Peel-able paint is not tape " friendly" . No matter how delicately I tried to remove the tape , it still developed "not crisp" division line between the stripe and the car. It looked horrible.
I may try to find some vinyl stripes to apply. But at this time I can not find someone making it in metallic gunmetal or metallic graphite in color.

impalamonte- G3GM Enthusiast

- Street Cred : 18
 Re: Update :1973 Monte Carlo Body off frame resto. Now with LS!
Hi fellow G3er’s ,
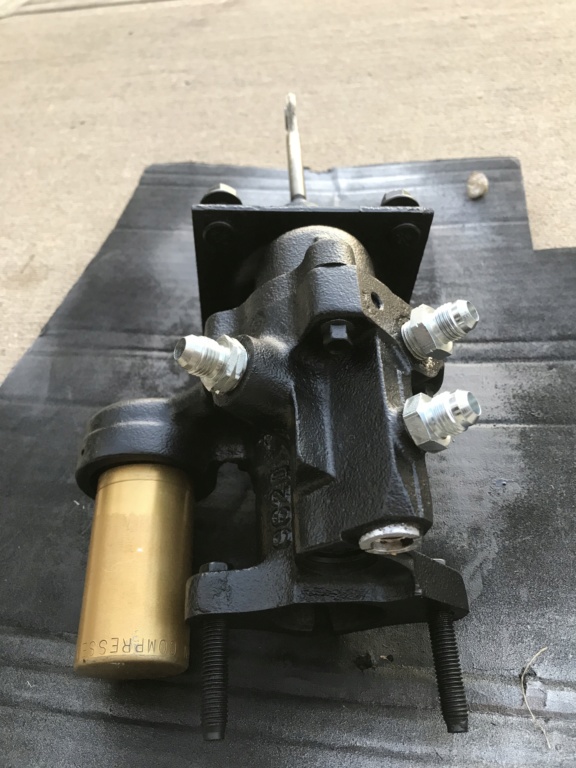
After the Power Tour….wanting to tackle a new project… I got to reading about the GM hydro-boost and decided….Im going do this retro- fit. I targeted my search to GM vehicles pre-2002 as that is what the rebuild kits suggest. First of all , what a difference in braking! This is the ticket for our 4000lb. range cars when it come to additional braking feel.
I went to the junkyard and found a year 2000 G2500 full size ¾ ton van and extracted the unit from it. Reason being , it already has the flat plate that attaches to the firewall so no need to remove the plate from the unit as with those from an Astro Van and then having to make or order aftermarket flat plate “ to make it work” on our cars. I do believe the full size pick-ups in the 2500 and 3500 variants work as well having the flat plate. For that matter , you could order one from Rock Auto already rebuilt for mid – eighties Oldsmobile 98’s with the Diesel option. And other GM offerings as well and according to what you want to spend for the rebuilt unit. As an example , I saw some for those mid-eighties diesel Old’s units in the sub $150.00 range ..no core needed!
But , before I knew that , bought the rebuild a kit and rebuilt the unit on my bench. Approx 4 hours in the rebuild. Not hard as there is a ton of information on the web. No special tools. I decided to install mine upside down to hide the hydraulic lines. Or make them a somewhat less noticeable. A little more expense for the lines involved if going with this option. Factory lines can be used from mid-eighties GM diesel powered passenger cars too and cheaply to get up and running if installing in the factory orientation for less than $50.00.
I removed my vacuum booster and had to grind the rivets off it to harvest the bracket that is between the vacuum booster and firewall. This allowed me to continue to use my stainless brake lines to the master cylinder in their original length without altering. And puts the brake rod “straight in” to the brake pedal to prevent binding , just like with the factory vacuum booster. Also , during my “discovery” phase of the retro I found out that with the bracket attached to the factory vacuum booster and bracket attached to the hydro-boost unit….there is less than a 1/16 of an inch of difference to the front edge of the eyelet on the brake rods. So , same lengths…or close enough!
With this I got to thinking that I may not need to cut off the end of the brake rod on the hydro-boost and re-thread it to install an adjustable brake pedal clevis like I have read about on many do-it-yourself pages. After measuring , remeasuring. I went to the McMaster Carr catalog and found a hardened drill bushing ( part # 8491A364 ) to fill the void between the difference in size of the brake rod eyelet on the hydro boost as compared to the factory vacuum booster. The tolerances are spot on with drill bushing!
Most likely on any of the installs with the purchase of a late model unit as your base for hydro-boost, AN fittings will have to be used to connect your lines. I took my hydro boost unit along with the factory lines to a local shop so they could fit me up and make a couple of new lines. And I’m sorry guys , I do not have all the sizes for the fittings I used…and at the shop the guy said….” It will take too long to write up the ticket so…how about $80.00 for the lines and fittings”. Well OK!!! But again , all this information is on the net.
Also , for my set up , I did not run a “TEE” the return line. I ran a dedicated return to my PS reservoir from the Hydro-boost bypass port. For my power steering cooler , I retrieved a cooler from a mid 2000 Chevrolet truck. It is installed ahead of the core support on the driver's side on the truck. I installed in the same orientation on my core support and it is a "factory" looking fit. The hard lines on the cooler make a 90 degree turn towards the steering box...just like it "should" be there.
I was not willing to pay , from what I have seen , approx.. $650.00 range for “kits” to get into a hydro-boost. Here is a breakdown of my costs.
$32.00 , junkyard hydroboost
$15.00 Junkyard power steering cooler from mid 2000 Chevrolet truck. ( optional , but advised )
$25.00 Rebuild kit for Hydro.
$25.00 in line filter
$80.00 hoses and fittings ( 14 fittings , 2 hoses made)
$30.00 misc
Total :$207.00, and many hours research , install , figuring things out for a clean install.
Below , some pictures:
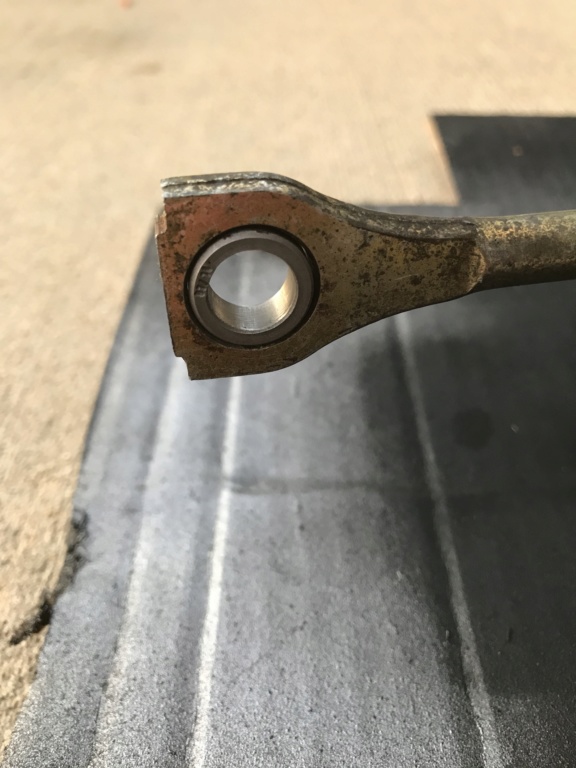
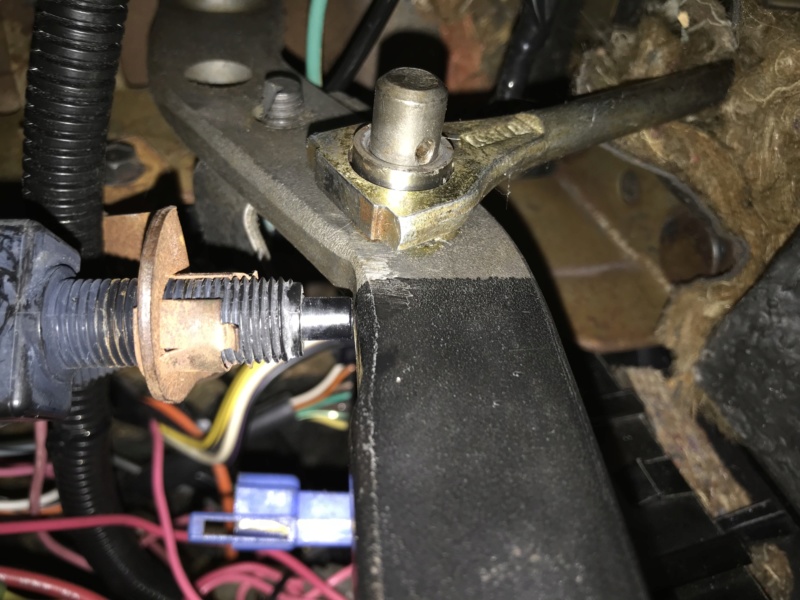
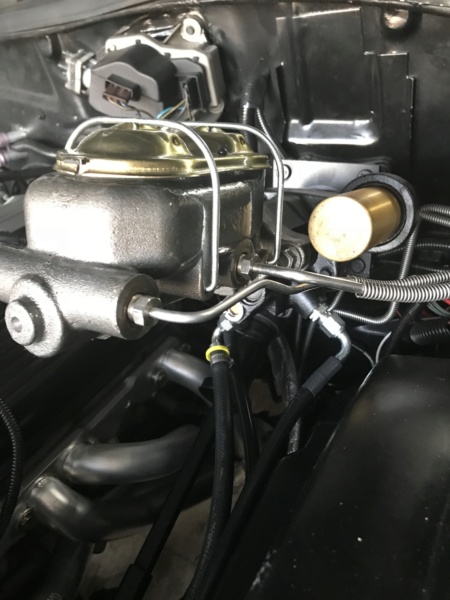
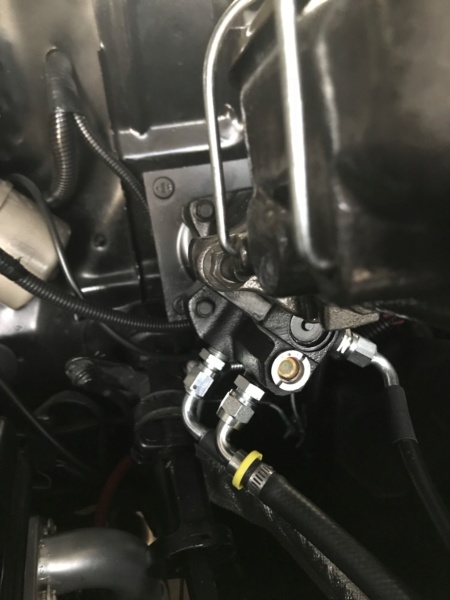


Last edited by impalamonte on Fri Aug 23, 2019 2:23 pm; edited 1 time in total

impalamonte- G3GM Enthusiast

- Street Cred : 18
Page 4 of 6 •  1, 2, 3, 4, 5, 6
 Similar topics
» MOTOR TREND CAR OF THE YEAR-------1973 MONTE CARLO
» A-Body Chevy Monte Carlo Fest
» Submit your rides for a G3 2015 Calendar
» A-Body Chevy Monte Carlo Fest
» Submit your rides for a G3 2015 Calendar
G3GM :: Media :: G3 Project Pictures
Page 4 of 6
Permissions in this forum:
You cannot reply to topics in this forum|
|
|


» Roll Call and Car showcase
» Central Texas Noob
» Welcome Keith Seymore
» Wanted: Front park lamp assemblies
» 75 Hurst Olds T-tpos
» G3 Chevy rims- help ID these
» 75 el camino project.
» Have had a few questions
» vinyl top removal