Update :1973 Monte Carlo Body off frame resto. Now with LS!
+24
Iggy
Hawk03
thatfnthing
76 Malibu
REVINKEVIN / Mr. 600+HP
Zaptiah
fasrnur
TW Monte
Hs1973
ant7377
Damon23
Circuit Rider
77mali
99B4C
75Pontiac-Pride
77cruiser
Dinomyte
marks454ss
driveit
bitterfitter
pila
Joe73
dynchel
1973montec
28 posters
G3GM :: Media :: G3 Project Pictures
Page 5 of 6
Page 5 of 6 •  1, 2, 3, 4, 5, 6
 Re: Update :1973 Monte Carlo Body off frame resto. Now with LS!
Great info on the hydro-boost upgrade! I often wondered why this was becoming so popular. And I have to say the hydro-boost on my GMC Safari works great with little effort. It's a little different feel from the conventional vacuum booster brakes on my other vehicles, but when you step on the pedal, it does its job. If I ever upgrade to bigger/4 wheel discs, this will be on my list of things to do for sure. Thanks for sharing all the details and photos. You rock!

g3chevy / Mr Pontiac- Donating Member

- Street Cred : 35
 Re: Update :1973 Monte Carlo Body off frame resto. Now with LS!
Excellent work -- looks better than a factory job! Do you find there's actually more room to work now with the factory booster gone?

thatfnthing- Donating Member

- Street Cred : 65
 Re: Update :1973 Monte Carlo Body off frame resto. Now with LS!
Thank you g3chevy.
thatfnthing.....I would have to say not really. The hydro boost set up is the same length as with the vacuum booster.
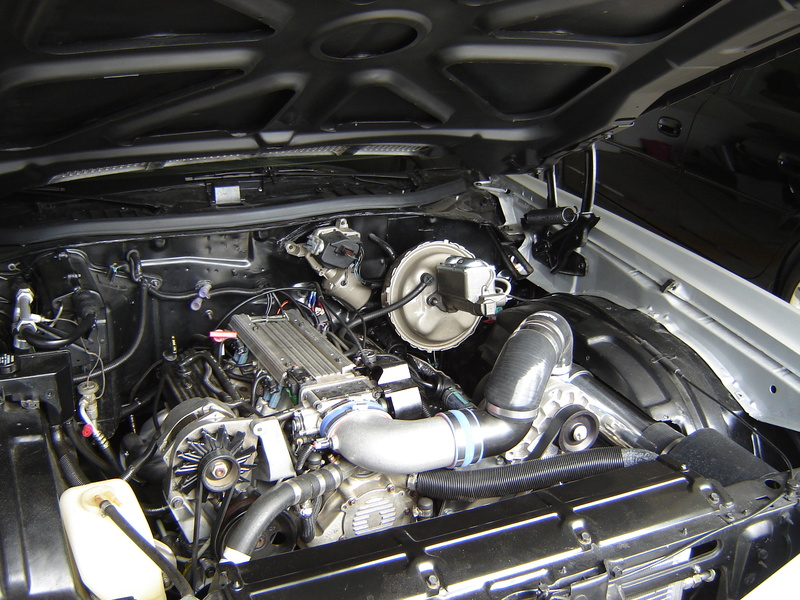
On that side of the car, the Vortech Supercharger set up takes up most of the real-estate in that area.
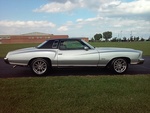
Picture below is before the Hydro-boost conversion and you can everything associated with the SC. The 180 degree piping on the rear of the SC to turn toward the front of the car to the intake..... takes so much room I had to clearance the plastic fender well to get it all in.....

impalamonte- G3GM Enthusiast

- Street Cred : 18
 Re: Update :1973 Monte Carlo Body off frame resto. Now with LS!
Great work as always!

Hawk03- G3GM Enthusiast

- Street Cred : 18
 Re: Update :1973 Monte Carlo Body off frame resto. Now with LS!
Hello G3GM members ,
Long time since I have posted. But , made a big change to my set up. I know the LS is way overdone….but , here goes. We are not seeing a lot of “love” from the aftermarket for our 73-77 A-bodies, but it is seemingly “coming around”. Tons of information / parts out there for Camaro , Chevelle ( pre-73) , Novas, Mustangs though.
So back in winter of 2019 / 2020 , bored and wanting a project I got to watching a lot of You Tubes on LS engines & swapping. Hadn’t thought a lot about it as I was happy with my trustworthy supercharged 93 LT1. But, the tubers made it look easy and power gains were kind of on the “cheap”. So I started looking for a “donor” LS set-up. Not an real LS of course...but LS architecture. Found a 2004 Chevrolet Silverado 2WD with 6.0 / 4l80e. Everything checked out and all the vital signs were good. Drove the vehicle upwards of 200 miles with no hick-ups. Oil pressure on point at roughly 48-52 lbs.
Pulled the motor and trans and parted it out for what I had in it. Minus a couple hundred. Then rebuilt the motor re-ringing for boost and maybe future bigger boost “ improvements”. The usual upgrades: Cam , valvetrain , gaskets ,Stall converter, Stage II HD trans-go kit for the transmission. No machine work.
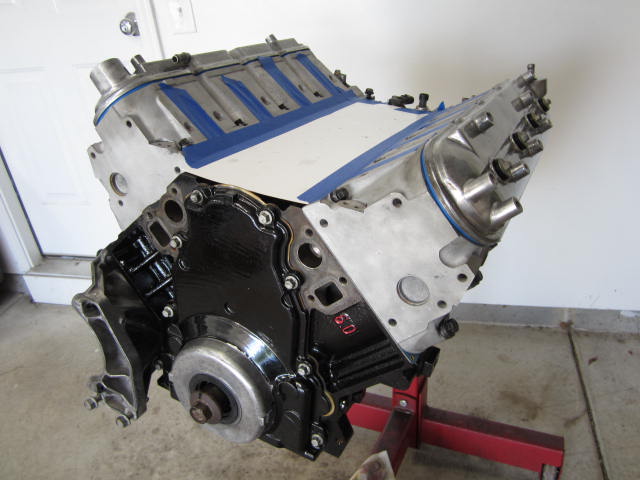
First , let me make a statement . What I had to make it fit for me and my set may not be absolutely what you have to do for yours. For me , trial and error for my needs.
I had to do some altercations to get it in the car. Namely to the crossmember. I used the Dirty Dingo motor mounts as on their web-page it was implied that the motor would fit if the upper passenger side motor mount was butted up against the back of the A/C bracket. I assumed that would allow me to keep my A/C on the bottom lower of the engine with no mods. Not the case for me. Also , my Super Charger is going to reside on the upper passenger side of the motor which would not allow me to use aftermarket A/C brackets for that upper side of the motor as in most retro fits. ( As you know , there is a whole industry now for expensive brackets for that too.) Someone just keeping the air in the original location could use most of my set up and skip the $400.00 A/C brackets!
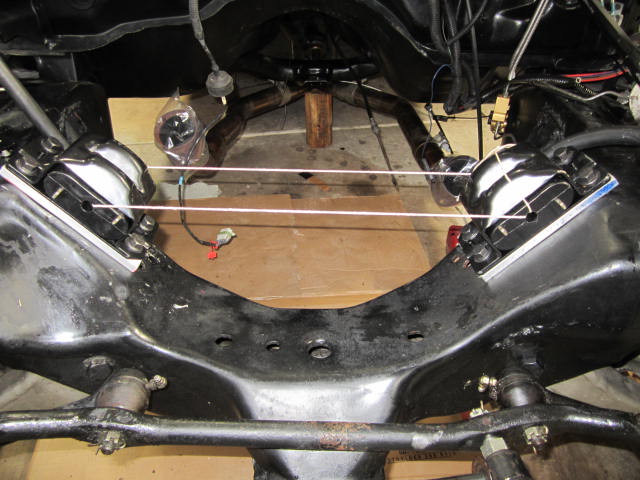
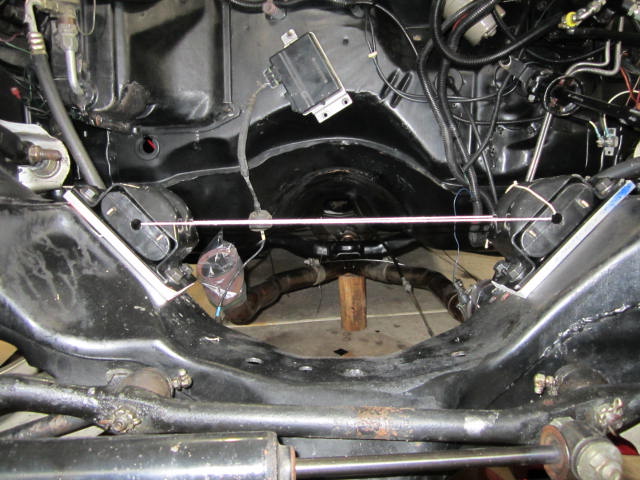
I do not know about other years. But , on the 73 , the motor mount on the passenger side sets lower than the mount on the drivers side. I had to correct that because when I tried to stab the motor in without the modification that I am about to show…the motor listed hard to the passenger side. To correct that issue I had to drill some holes in the frame to correct the “list” to the passenger side.
In the picture below notice the holes outlined in RED. These are the holes I had to drill created from a mirror image of the drivers side.

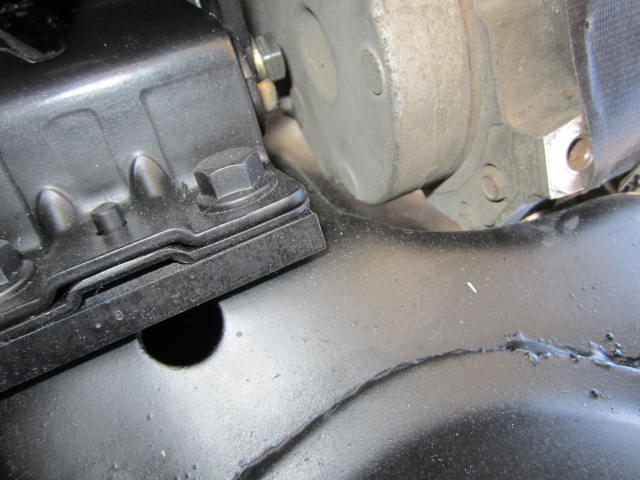
To keep my A/C unit on the bottom passenger side I made spacers from 3/8” aluminum to go under the motor mounts.
The Dirty Dingo mounts do have 2.5” of “slide”. But I wanted the motor as far back in the car as possible and closest to stock mounting position as possible. This created a problem with my A/C compressor. The A/C bracket was not the problem. It cleared with plenty to spare. The A/C unit did interfere with the frame though. I trimmed a “lug” off the A/C compressor and done some clearance work to the side of the A/C housing. I most likely have an 1/8” clear on the bottom and side now.
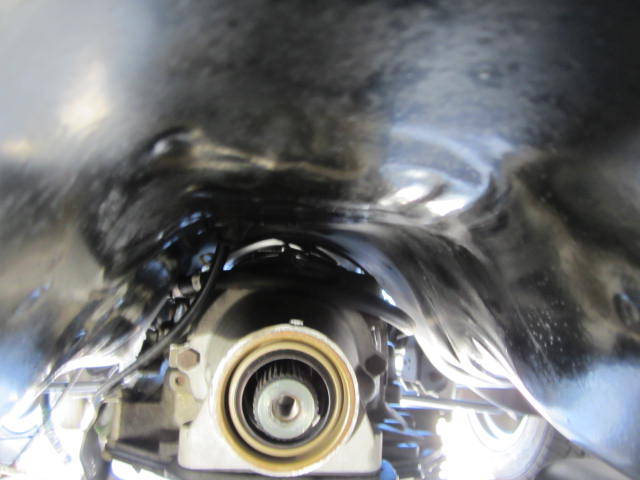
About the transmission. No modifications to the trans tunnel of any sort for my install.
Now onto the trans crossmember. I opted for the G-Force unit specifically for the 4L80e in our cars and an adjustable trans mount with 2.5” of slide as well. This is a beefy unit! But, It does not “just” fit. The crossmember uses the holes in the frame set up for a 400 Turbo. The rear most set. I had to take a grinder to the top of the exhaust cut-outs as they interfered with the bottom of the floor plan. It would not set flush in the frame without doing so. I have some pictures here of the trans in. I don’t know if there is enough pictorial detail here to get the “lay” of things. But here goes. ( As a side note , this “beefier” trans mount had created a lot of problems with the architecture with my E-BRAKE cables for my aftermarket rear disc set-up. It is overcome now , but , what a PITA! ) At the moment ,it seems I have 3.5-4" inches of clearance between the trans fittings and the trans tunnel.
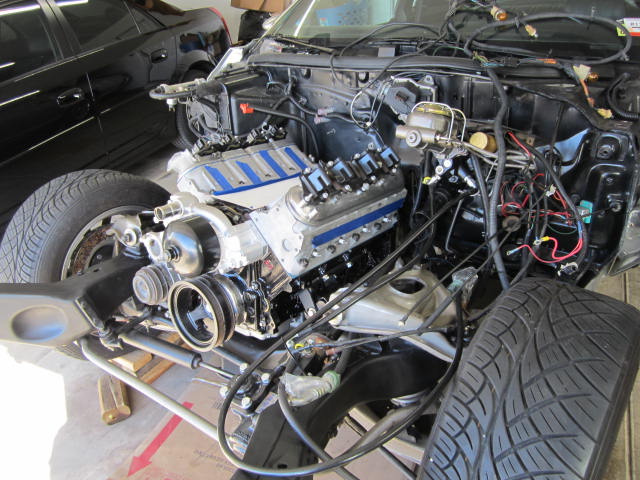
In the chassis. The oil pan I used was the TSP 81075. Dirty Dingo suggested using the Holley 302-3. I only found this out after I called them and noted the interpretation that I could keep the A/C on the bottom of the motor. They did see my point. Dont know if they changed anything on their page though. I haven't looked. And I stayed with the TSP oil pan!
More to come.
Long time since I have posted. But , made a big change to my set up. I know the LS is way overdone….but , here goes. We are not seeing a lot of “love” from the aftermarket for our 73-77 A-bodies, but it is seemingly “coming around”. Tons of information / parts out there for Camaro , Chevelle ( pre-73) , Novas, Mustangs though.
So back in winter of 2019 / 2020 , bored and wanting a project I got to watching a lot of You Tubes on LS engines & swapping. Hadn’t thought a lot about it as I was happy with my trustworthy supercharged 93 LT1. But, the tubers made it look easy and power gains were kind of on the “cheap”. So I started looking for a “donor” LS set-up. Not an real LS of course...but LS architecture. Found a 2004 Chevrolet Silverado 2WD with 6.0 / 4l80e. Everything checked out and all the vital signs were good. Drove the vehicle upwards of 200 miles with no hick-ups. Oil pressure on point at roughly 48-52 lbs.
Pulled the motor and trans and parted it out for what I had in it. Minus a couple hundred. Then rebuilt the motor re-ringing for boost and maybe future bigger boost “ improvements”. The usual upgrades: Cam , valvetrain , gaskets ,Stall converter, Stage II HD trans-go kit for the transmission. No machine work.

First , let me make a statement . What I had to make it fit for me and my set may not be absolutely what you have to do for yours. For me , trial and error for my needs.
I had to do some altercations to get it in the car. Namely to the crossmember. I used the Dirty Dingo motor mounts as on their web-page it was implied that the motor would fit if the upper passenger side motor mount was butted up against the back of the A/C bracket. I assumed that would allow me to keep my A/C on the bottom lower of the engine with no mods. Not the case for me. Also , my Super Charger is going to reside on the upper passenger side of the motor which would not allow me to use aftermarket A/C brackets for that upper side of the motor as in most retro fits. ( As you know , there is a whole industry now for expensive brackets for that too.) Someone just keeping the air in the original location could use most of my set up and skip the $400.00 A/C brackets!
I do not know about other years. But , on the 73 , the motor mount on the passenger side sets lower than the mount on the drivers side. I had to correct that because when I tried to stab the motor in without the modification that I am about to show…the motor listed hard to the passenger side. To correct that issue I had to drill some holes in the frame to correct the “list” to the passenger side.
In the picture below notice the holes outlined in RED. These are the holes I had to drill created from a mirror image of the drivers side.

To keep my A/C unit on the bottom passenger side I made spacers from 3/8” aluminum to go under the motor mounts.


The Dirty Dingo mounts do have 2.5” of “slide”. But I wanted the motor as far back in the car as possible and closest to stock mounting position as possible. This created a problem with my A/C compressor. The A/C bracket was not the problem. It cleared with plenty to spare. The A/C unit did interfere with the frame though. I trimmed a “lug” off the A/C compressor and done some clearance work to the side of the A/C housing. I most likely have an 1/8” clear on the bottom and side now.

About the transmission. No modifications to the trans tunnel of any sort for my install.
Now onto the trans crossmember. I opted for the G-Force unit specifically for the 4L80e in our cars and an adjustable trans mount with 2.5” of slide as well. This is a beefy unit! But, It does not “just” fit. The crossmember uses the holes in the frame set up for a 400 Turbo. The rear most set. I had to take a grinder to the top of the exhaust cut-outs as they interfered with the bottom of the floor plan. It would not set flush in the frame without doing so. I have some pictures here of the trans in. I don’t know if there is enough pictorial detail here to get the “lay” of things. But here goes. ( As a side note , this “beefier” trans mount had created a lot of problems with the architecture with my E-BRAKE cables for my aftermarket rear disc set-up. It is overcome now , but , what a PITA! ) At the moment ,it seems I have 3.5-4" inches of clearance between the trans fittings and the trans tunnel.

In the chassis. The oil pan I used was the TSP 81075. Dirty Dingo suggested using the Holley 302-3. I only found this out after I called them and noted the interpretation that I could keep the A/C on the bottom of the motor. They did see my point. Dont know if they changed anything on their page though. I haven't looked. And I stayed with the TSP oil pan!

More to come.

impalamonte- G3GM Enthusiast

- Street Cred : 18
 Re: Update :1973 Monte Carlo Body off frame resto. Now with LS!
Wow, great update! You've been very busy on the Monte. Looking forward to seeing more pics and info on your build!

g3chevy / Mr Pontiac- Donating Member

- Street Cred : 35
 Re: Update :1973 Monte Carlo Body off frame resto. Now with LS!
Hey. Looking great. You also need a different radiator, if you didn’t mention that already. Have you looked at these guys, link below? They have some good stuff for GM A Bodies. I was working with them when I was going to put my LS7 into my Laguna.
http://www.brphotrods.com/products/73-77%20A%20body%20products/index.html
http://www.brphotrods.com/products/73-77%20A%20body%20products/index.html

REVINKEVIN / Mr. 600+HP- G3GM Senior Member

- Street Cred : 20
 Re: Update :1973 Monte Carlo Body off frame resto. Now with LS!
Hi fellow G3 ers,
See my work getting the engine into the car I posted prior.....its been a while. My last update on the project was back in March.
I resolved I would not post more information....until I got it running. Yesterday , it ran for 20 seconds!! What a retro , and more work to go.
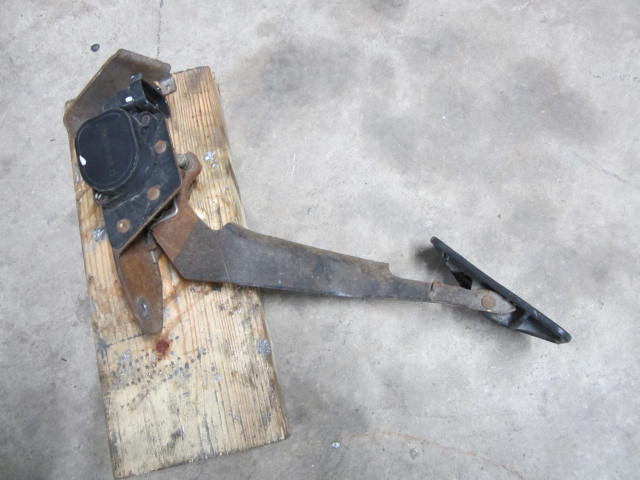
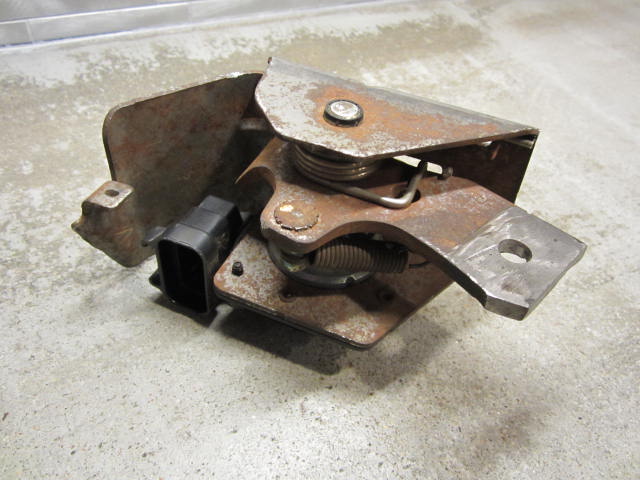
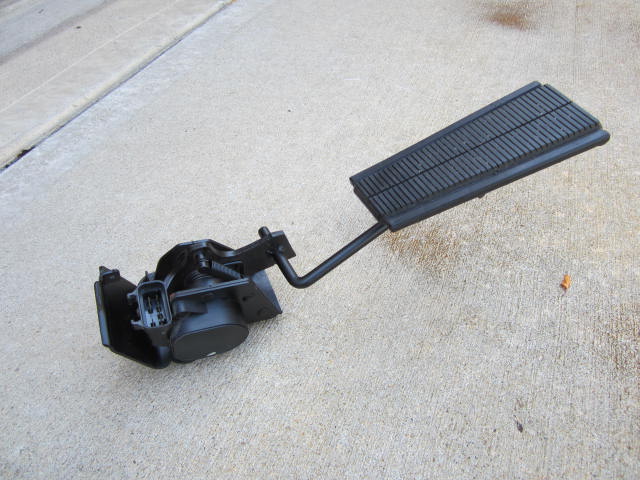
Starting with my hybrid gas pedal and not buying an aftermarket unit that may not look " right" Used the gas pedal I harvested from my donor 2004 Silverado 2500HD. I cut the bottom off of it and the lower portion of my Monte's gas pedal. Drilled a hole and started some trial and error. In the car, I tilted the assembly clockwise about 15 degrees to make it " look" stock. The upper portion of the assembly will not be seen once the A/C ducts and such are reinstalled. Here are some pics.

Now onto the intake. I was not going to spend big dollars for aftermarket intakes that flow no better than the GM truck intakes. I shaved the top of the intake and install a sheet metal cover to clean it up and wrinkle paint finished it. The sheet metal cover is glued with an adhesive called TEROSON in a grid pattern. The product declares a burst strength in the thousands of PSI. I had experimented with the "heat and melting " method of the cut off pieces into the holes left after shaving the top. It did not seem robust enough for a boosted application. After I melted a few holes up....I took a wrench and hit them with not much force. They busted through. Not very comforting. So, made my own!

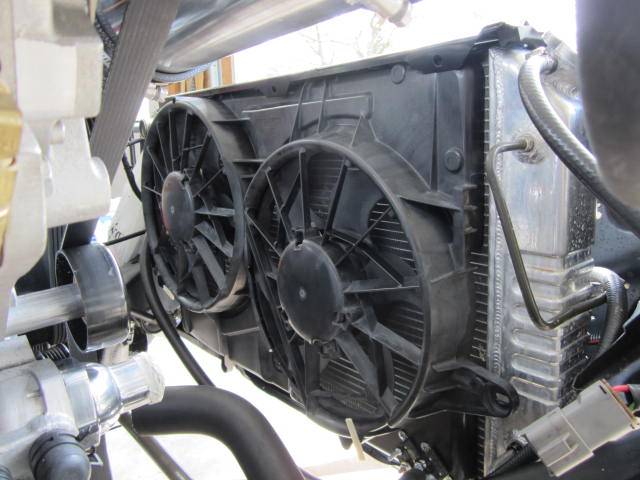
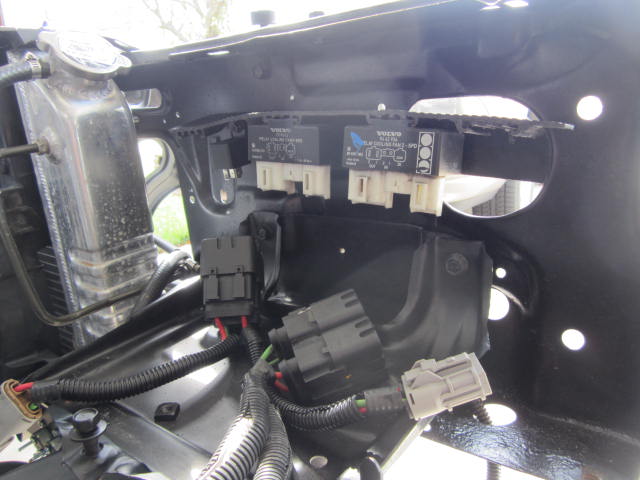
Also wanted to change the electric fans from the units I had from the mid nineties Camaro that I installed to a "cleaner" streamlined thinner set . I went with junkyard dual electric fans from a 2007 Ford Escape. These are two speed fans that will work off the set temperatures within the ECM to trigger operation. Followed up with Series 58 Volvo relays from the late 90's with the circuit breakers and 40amp fuses. I am powering each fan with a separate "bank". Redundant , yes....but reliable. The assembly fits well over the surface area of the radiators core. Again , no reason to spend big dollars for aftermarket " pretty fans".
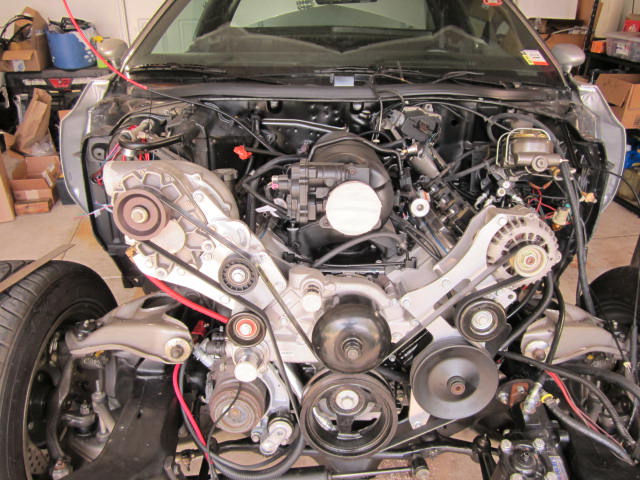
For the belt tensioner I went with a manual system over a spring loaded unit so I could get enough tension to drive the Supercharger without slipping. I purchased a manual set up from LSX innovation for a 2010 and up Camaro as I am using the LS3 water pump. Even after purchasing this unit I had to have the kits spacers machined down to "get in line" with the rest of the serpentine system. And then had to have an extra idler pulley created to route around the lower water pump snout. Also had to figure out how it was going to fit on the Supercharger bracket and it all work together as no holes were available for the manual addition. Trial and error. No extra pics of this...but can be seen on the engine.
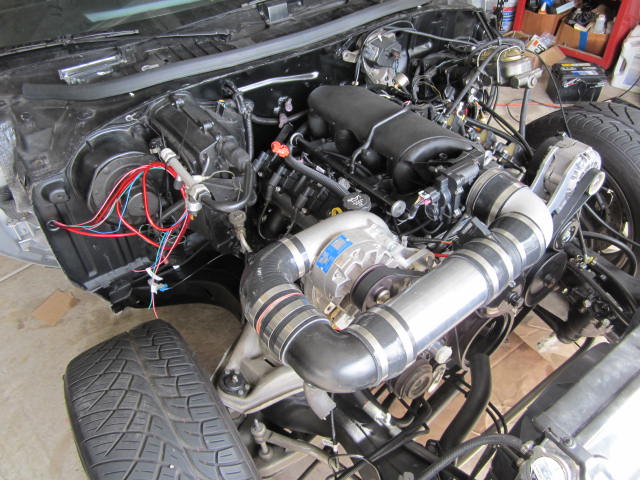

More work to do....and it will never be easier to work on....than it is now with no front end on the car. Re-Assembly starting soon.
Mark
See my work getting the engine into the car I posted prior.....its been a while. My last update on the project was back in March.
I resolved I would not post more information....until I got it running. Yesterday , it ran for 20 seconds!! What a retro , and more work to go.
Starting with my hybrid gas pedal and not buying an aftermarket unit that may not look " right" Used the gas pedal I harvested from my donor 2004 Silverado 2500HD. I cut the bottom off of it and the lower portion of my Monte's gas pedal. Drilled a hole and started some trial and error. In the car, I tilted the assembly clockwise about 15 degrees to make it " look" stock. The upper portion of the assembly will not be seen once the A/C ducts and such are reinstalled. Here are some pics.


Now onto the intake. I was not going to spend big dollars for aftermarket intakes that flow no better than the GM truck intakes. I shaved the top of the intake and install a sheet metal cover to clean it up and wrinkle paint finished it. The sheet metal cover is glued with an adhesive called TEROSON in a grid pattern. The product declares a burst strength in the thousands of PSI. I had experimented with the "heat and melting " method of the cut off pieces into the holes left after shaving the top. It did not seem robust enough for a boosted application. After I melted a few holes up....I took a wrench and hit them with not much force. They busted through. Not very comforting. So, made my own!

Also wanted to change the electric fans from the units I had from the mid nineties Camaro that I installed to a "cleaner" streamlined thinner set . I went with junkyard dual electric fans from a 2007 Ford Escape. These are two speed fans that will work off the set temperatures within the ECM to trigger operation. Followed up with Series 58 Volvo relays from the late 90's with the circuit breakers and 40amp fuses. I am powering each fan with a separate "bank". Redundant , yes....but reliable. The assembly fits well over the surface area of the radiators core. Again , no reason to spend big dollars for aftermarket " pretty fans".


For the belt tensioner I went with a manual system over a spring loaded unit so I could get enough tension to drive the Supercharger without slipping. I purchased a manual set up from LSX innovation for a 2010 and up Camaro as I am using the LS3 water pump. Even after purchasing this unit I had to have the kits spacers machined down to "get in line" with the rest of the serpentine system. And then had to have an extra idler pulley created to route around the lower water pump snout. Also had to figure out how it was going to fit on the Supercharger bracket and it all work together as no holes were available for the manual addition. Trial and error. No extra pics of this...but can be seen on the engine.


More work to do....and it will never be easier to work on....than it is now with no front end on the car. Re-Assembly starting soon.
Mark

impalamonte- G3GM Enthusiast

- Street Cred : 18
Limey SE, g3chevy / Mr Pontiac, TW Monte and fasrnur like this post
 Re: Update :1973 Monte Carlo Body off frame resto. Now with LS!
Dang man, great work. Can't wait to see it all back together.

Hawk03- G3GM Enthusiast

- Street Cred : 18
 Re: Update :1973 Monte Carlo Body off frame resto. Now with LS!
Dang Mark! You got the skills to pay the bills! That Monte is going to be a beast when its done!

g3chevy / Mr Pontiac- Donating Member

- Street Cred : 35
 Re: Update :1973 Monte Carlo Body off frame resto. Now with LS!
Thanks for the comments Hawk , G3chevy/Mr. Pontiac.

impalamonte- G3GM Enthusiast

- Street Cred : 18
 Re: Update :1973 Monte Carlo Body off frame resto. Now with LS!
Great work. I so want to get back to building my car. I looked at this at work today and it got me inspired again. If I could ever finish this job that I’m on I will finish my Laguna and make G3chevy/Olds/Pontiac ride up with me to see your car in person. Your car looks completely awesome. I’m proud to know you.

REVINKEVIN / Mr. 600+HP- G3GM Senior Member

- Street Cred : 20
 Re: Update :1973 Monte Carlo Body off frame resto. Now with LS!
REVINKEVIN / Mr. 600+HP wrote:Great work. I so want to get back to building my car. I looked at this at work today and it got me inspired again. If I could ever finish this job that I’m on I will finish my Laguna and make G3chevy/Olds/Pontiac ride up with me to see your car in person. Your car looks completely awesome. I’m proud to know you.
I'm definitely in for a road trip. Love to see Mark's Monte in person! And I'm still chomping at the bit to help finish your Laguna!

g3chevy / Mr Pontiac- Donating Member

- Street Cred : 35
 Re: Update :1973 Monte Carlo Body off frame resto. Now with LS!
Kevin,
That sounds like a plan !! I didn't know that I was inspiring others. It is much appreciated.
Honestly, this swap has beat me up just a little bit.
That sounds like a plan !! I didn't know that I was inspiring others. It is much appreciated.
Honestly, this swap has beat me up just a little bit.


impalamonte- G3GM Enthusiast

- Street Cred : 18
 Re: Update :1973 Monte Carlo Body off frame resto. Now with LS!
Engine swaps are tuff to do at home. The guy who did some work on my LS7 told me that if they would have built my Camaro like I did in my driveway that they would have charged me $60,000. Ouch! Sometimes DYI comes with some PITA. Here is a picture of an LS7 swap in my driveway. Nothing dangerous going on here.


Here’s a couple of the complete frame swap we did on the Laguna. It was g3chevy/olds/Pontiac/studabaker, 6 retired farmers, and me in a hot a$$ barn in Texas. Now that was 6 hours of thrilling danger.
The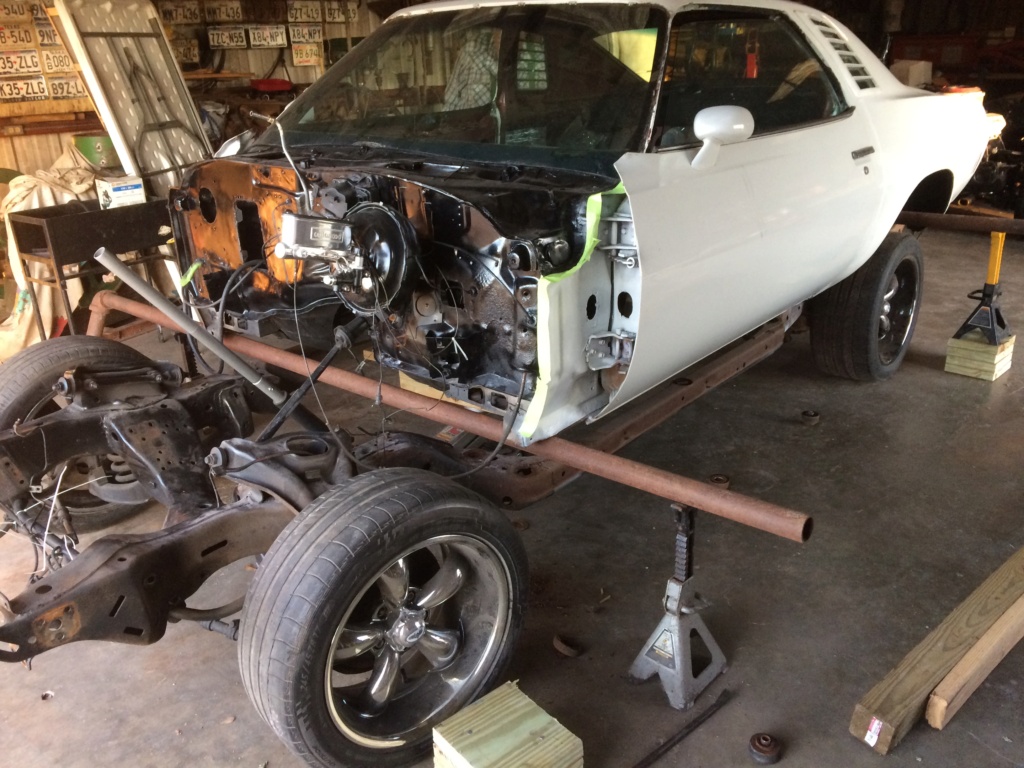


Here’s a couple of the complete frame swap we did on the Laguna. It was g3chevy/olds/Pontiac/studabaker, 6 retired farmers, and me in a hot a$$ barn in Texas. Now that was 6 hours of thrilling danger.
The


REVINKEVIN / Mr. 600+HP- G3GM Senior Member

- Street Cred : 20
 Re: Update :1973 Monte Carlo Body off frame resto. Now with LS!
WOW!!!
Yeah, nothing dangerous goin on there!!
We do what we have to do to continue our hobby and stay within our means.
I fully understand.....no judgement here.
And I kind of deny paying someone else for things I know I can do do own my own.....even with aggravation.
Yeah, nothing dangerous goin on there!!

We do what we have to do to continue our hobby and stay within our means.
I fully understand.....no judgement here.
And I kind of deny paying someone else for things I know I can do do own my own.....even with aggravation.

impalamonte- G3GM Enthusiast

- Street Cred : 18
 Re: Update :1973 Monte Carlo Body off frame resto. Now with LS!
Hey. I might have an excuse to stop by for an hour if a couple of things work out. I am really in-like with a truck for work that’s in Ft Wayne Indiana. If I can get off this crazy job, and he still has it, I might be driving through your town. I don’t know if I can get g3 on an airplane, but who knows.

REVINKEVIN / Mr. 600+HP- G3GM Senior Member

- Street Cred : 20
 Re: Update :1973 Monte Carlo Body off frame resto. Now with LS!
I really like your build, been through this a couple of times, but since my little hospital stay I find that my mind has turned to mush! If alright with you, I may PM you with questions on my own LS swap.

Iggy- G3GM Member

- Street Cred : 15
 Re: Update :1973 Monte Carlo Body off frame resto. Now with LS!
Kevin......just let me know and I will " make the time" for you to drop by if all works out for you.
Iggy ....Yes Sir......that is fine with me.
Iggy ....Yes Sir......that is fine with me.

impalamonte- G3GM Enthusiast

- Street Cred : 18
 Re: Update :1973 Monte Carlo Body off frame resto. Now with LS!
impalamonte wrote:WOW!!!
Yeah, nothing dangerous goin on there!!
We do what we have to do to continue our hobby and stay within our means.
I fully understand.....no judgement here.
And I kind of deny paying someone else for things I know I can do do own my own.....even with aggravation.
I hear ya on that Buddy .... I for one cant wait to see this Done as well as MINE yee whoooo
___________________________________________
1977 Chevelle SE x2
One Mild original
one Wild NON original
Anthony

Limey SE- Management

- Street Cred : 98
 Re: Update :1973 Monte Carlo Body off frame resto. Now with LS!
Hi Guys ,
Been awhile since I posted progress. I had a set back. Major. And to remediate the situation . I had to pull the motor. As you can see , I went to Gen IV rods in my Gen III set up. At the time , Gen III parts were scarce. Hard to believe , but yes. So to meet my "personal deadline" I had to find another way to meet it. Hence , Gen IV rods and floating pistons.
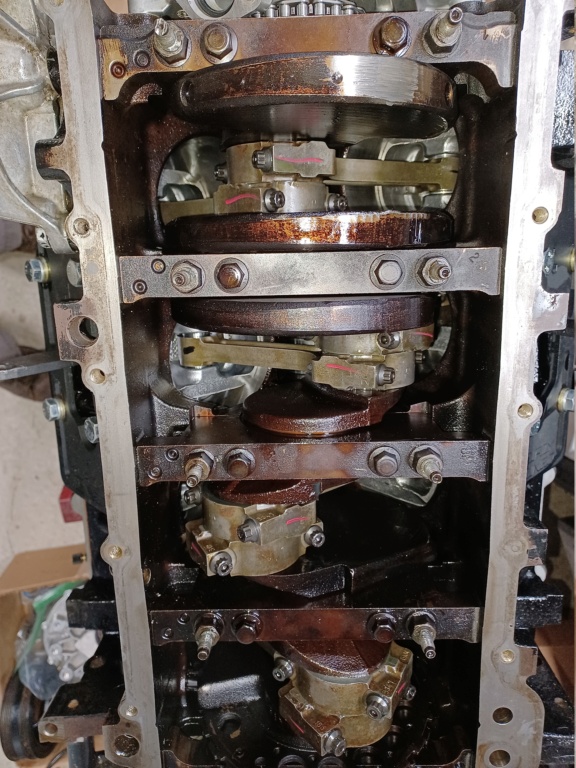
Starting basically from ground zero. A lot of time to get back to "where I was".
Now , moving forward.....here we are. For insurance , before getting on the dyno I purchased new axle shafts for the rear end. Wasnt going to chance the 50 year olds with over 100k. Probably would have been fine....but....its probably over-kill.
Admittedly I focus on the probability of failure and attempt to focus on trouble -free and reliable.

Car was on the dyno as of last Thursday with 6000 PRM pulls.
Hopefully your able to "hear" it a little bit.
https://www.facebook.com/100000108542587/videos/1432350870552046/
Honestly guys , I was scared when the tuner was plowing into it after initial base lines with the Methanol injection included !! After what I had been through previously , my confidence level has somewhat recovered. The Supercharger did not create the "full" capability due to there not being enough "wrap" on the Supercharger pully. So , with that input...it has challenged me to further develope the pulley system that I had to create to just to get Supercharger set up on the engine passenger side top . As all you guys know....we are never finished and in a constant state of improvement. That project will start a later in the season.
Trying to get the rest of the project tied up and ready for the Power Tour!!
Been awhile since I posted progress. I had a set back. Major. And to remediate the situation . I had to pull the motor. As you can see , I went to Gen IV rods in my Gen III set up. At the time , Gen III parts were scarce. Hard to believe , but yes. So to meet my "personal deadline" I had to find another way to meet it. Hence , Gen IV rods and floating pistons.

Starting basically from ground zero. A lot of time to get back to "where I was".
Now , moving forward.....here we are. For insurance , before getting on the dyno I purchased new axle shafts for the rear end. Wasnt going to chance the 50 year olds with over 100k. Probably would have been fine....but....its probably over-kill.
Admittedly I focus on the probability of failure and attempt to focus on trouble -free and reliable.

Car was on the dyno as of last Thursday with 6000 PRM pulls.
Hopefully your able to "hear" it a little bit.
https://www.facebook.com/100000108542587/videos/1432350870552046/
Honestly guys , I was scared when the tuner was plowing into it after initial base lines with the Methanol injection included !! After what I had been through previously , my confidence level has somewhat recovered. The Supercharger did not create the "full" capability due to there not being enough "wrap" on the Supercharger pully. So , with that input...it has challenged me to further develope the pulley system that I had to create to just to get Supercharger set up on the engine passenger side top . As all you guys know....we are never finished and in a constant state of improvement. That project will start a later in the season.
Trying to get the rest of the project tied up and ready for the Power Tour!!

impalamonte- G3GM Enthusiast

- Street Cred : 18
 Re: Update :1973 Monte Carlo Body off frame resto. Now with LS!
That beast sounds nasty! So what happened to the lower end? Looks like the main caps got hot maybe???

g3chevy / Mr Pontiac- Donating Member

- Street Cred : 35
 Re: Update :1973 Monte Carlo Body off frame resto. Now with LS!
Hello G3chevy / Mr. Pontiac,
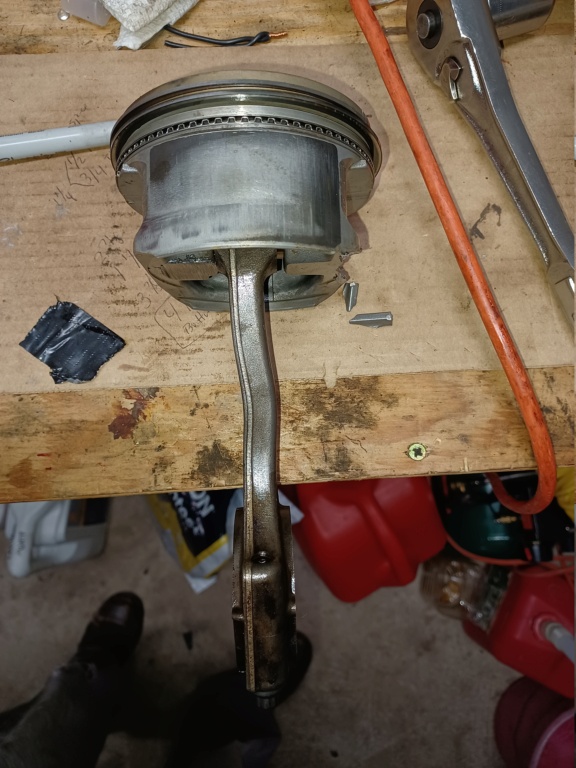
Previously , I had Gen III rods (pictured below) and those were preplaced with the Gen IV that you see (above in the previous post)..... in the block. Note the thicker beam of the GEN IV above.
The Gen IVs were out of another engine.
They went to the machine shop , inspected, cleaned, and the small end had new bushings installed and resized.
The reason I had the "set-back".....fuel injector went "rogue" (Fully OPEN) flooded the cylinder and hydro-locked the engine and in turn...bent a rod. What a PITA!! UGH!!!

Last edited by impalamonte on Tue May 17, 2022 1:11 pm; edited 1 time in total

impalamonte- G3GM Enthusiast

- Street Cred : 18
 Re: Update :1973 Monte Carlo Body off frame resto. Now with LS!
I bet that did not do anything good to the bearings! Hope it is easy to find a replacement rod - I have been waiting three months for a set of Eagle rods for my 6.0 so I can get the rotating assembly balanced - still no delivery date! Glad I am not in a hurry, I can only roll with the flow>

Iggy- G3GM Member

- Street Cred : 15
 Re: Update :1973 Monte Carlo Body off frame resto. Now with LS!
Wow, that got fubared. Seen that happen a couple times in the past. That is not fun. I feel you pain. I've been fighting my 87 El Camino engine issues for the last year and a half. Poorly fitting cast aluminum oil pan on the 400 sbc cause massive leaks. Had to lift the engine and replace the pan and 1 piece gasket. Then it was fuel boiling coming out of the fuel pump on hot days so the carb would flood/run rich. Part of this was due to it did not have a fuel return line from the factory. So then I installed a Holley Sniper. Man, that was a learning curve. Complete new fuel system including the tank, in-tank pump, new efi sending unit, lines, fittings etc. When I started the vehicle for the first time it ran great. Shut it off, started it back up to run a while longer and then it slowly started running like it was starving for fuel. Looked at the fuel pressure gauge mounted at the throttle body and it was reading 20 psi and not the 60 psi it started out with. Then I opened the gas cap and it sucked in air like a shop vac. The check valve on the sending unit was bad out of the box. Dropped the tank, replaced the check valve and all is well....I thought. The fuel pump was so loud after that issue that my wife said "what the hell is that noise" as I'm backing into the garage. So I learned that when an in-tank fuel pump is working too hard to pull fuel, it basically ruins it. So had to drop the tank and install a new fuel pump. Problem solved...until the next issue rears it's ugly head. The rpms would climb to over 2k when it was run for more than 20 minutes every time I drove it. Shut the car off each time, started it back up, and rpms would be normal again...for 20 minutes. Went round and round with the Holley techs until I got someone with some real problem solving skills on the phone. He and I agreed that it had to be a bad IAC valve. They sent me a new one and it was back to what it should be....for a while. Then a couple weeks later the IAC seemed to fail again as I was stuck in traffic. The outside temp being over 90 degrees and the rpms jump to over 2k and it felt like I was power braking it the whole time. Finally got out of traffic and pulled over to shut the engine down. Then started it and it was back to normal once again. Then I discovered that my Tuff Stuff 140 amp alternator was not working which was causing the Sniper EFI to work erratically. So last week I ordered a new 200 amp alternator which I hope will correct this latest issue. Like I said, not fun stuff!

g3chevy / Mr Pontiac- Donating Member

- Street Cred : 35
Page 5 of 6 •  1, 2, 3, 4, 5, 6
 Similar topics
» MOTOR TREND CAR OF THE YEAR-------1973 MONTE CARLO
» A-Body Chevy Monte Carlo Fest
» Submit your rides for a G3 2015 Calendar
» A-Body Chevy Monte Carlo Fest
» Submit your rides for a G3 2015 Calendar
G3GM :: Media :: G3 Project Pictures
Page 5 of 6
Permissions in this forum:
You cannot reply to topics in this forum|
|
|


» Roll Call and Car showcase
» Central Texas Noob
» Welcome Keith Seymore
» Wanted: Front park lamp assemblies
» 75 Hurst Olds T-tpos
» G3 Chevy rims- help ID these
» 75 el camino project.
» Have had a few questions
» vinyl top removal