1973 Chevelle SS, 350, 4spd. build
+41
zucchi
76 Malibu
Joe73
76Chevelle2Tone
S3TPI
Sinister
77camino
Flywheel
crice63
bracketchev1221
73ss
clanceman427
thatfnthing
Limey SE
fasrnur
g3chevy / Mr Pontiac
Roadcaptain S3
Mcarlo77
Hawk03
ant7377
1975 S3
77mali
jerry46765
Jeff-45
1cheapshot
dynchel
JF74chevelle
Tom Kochevar
Hs1973
dine73ss
Damon23
alowerlevel
driveit
chevellelaguna
RossK73
marks454ss
impalamonte
Dinomyte
Wallyuph
BK-75
1973montec
45 posters
G3GM :: Media :: G3 Project Pictures
Page 1 of 17
Page 1 of 17 • 1, 2, 3 ... 9 ... 17 
 1973 Chevelle SS, 350, 4spd. build
Ok, here we go. I took apart my chevelle January of 2013. Took alot of grief about it because it was in nice shape, ran great but I wanted to play with it and change some stuff.
This is what it looked like right before I took her apart. http://www.g3gm.com/t5606-just-some-pics And here is a video of her idling. https://youtu.be/tptiTU9hdJE
Here's the thread when I got the frame back from the sandblaster and sprayed it. Its 2 coats prime, 2 coats paint. Disregard the "hijacked" pics. They were of the Eastwood internal frame nozzle.
http://www.g3gm.com/t6034-frames-back-from-the-sandblaster
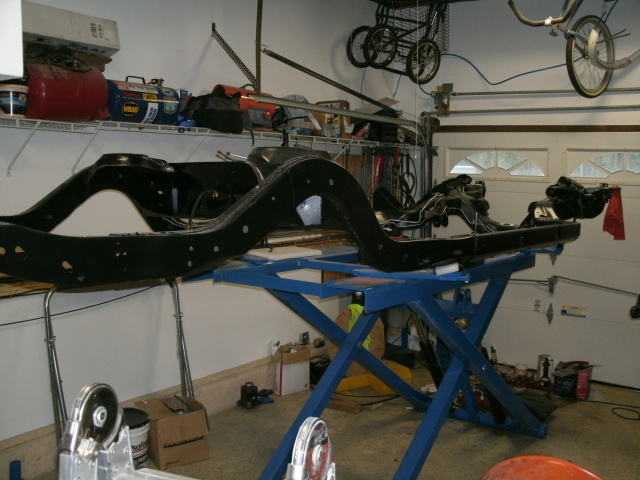
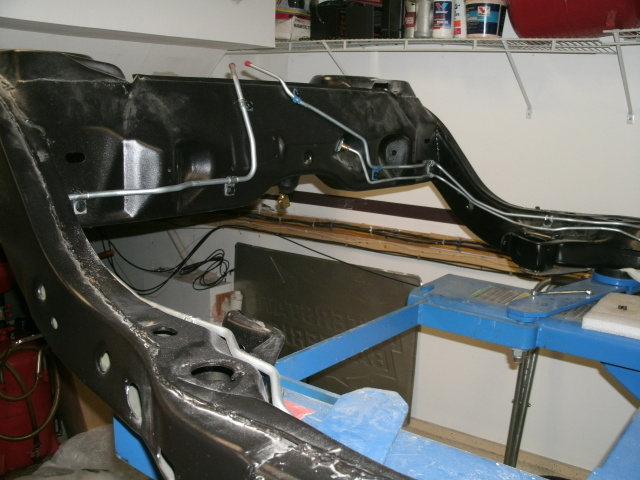
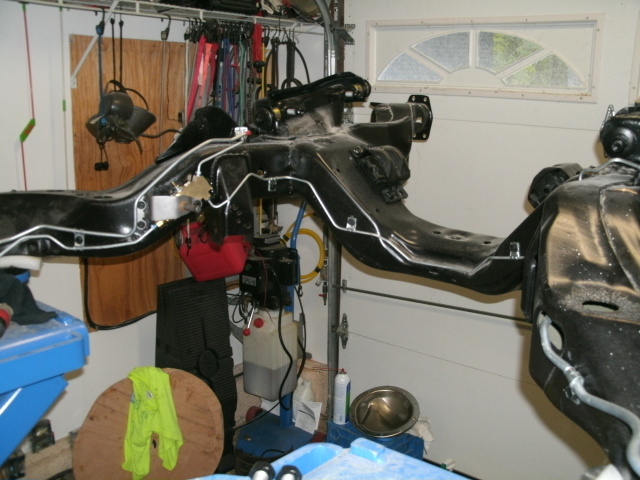
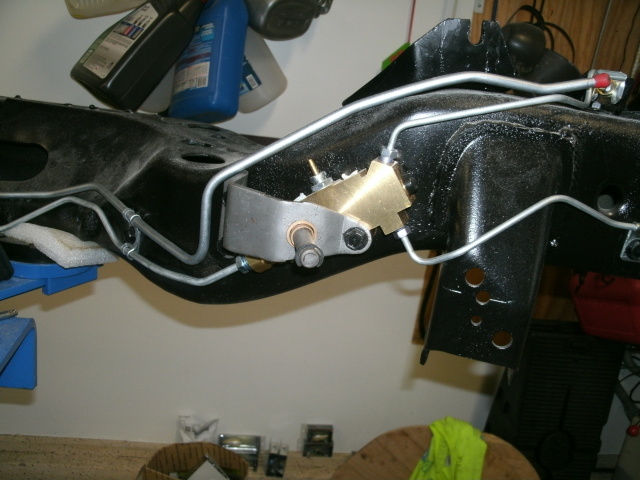
Ok, now we are up to date. Installed all new lines from Inlinetube.com. They consisted of fuel line, vapor line and all brake lines. Including all new factory clips and bolts. New proportioning valve (with proper brake WIRE connection) from inline tube as well. The bracket in front of the prop valve is my factory backdrive for my 4 speed. Please dont mind all the dust on the frame from sitting. LOL All lines, clips and bolts have been sprayed with a high temp flat/matte clear. Just for some added protection.


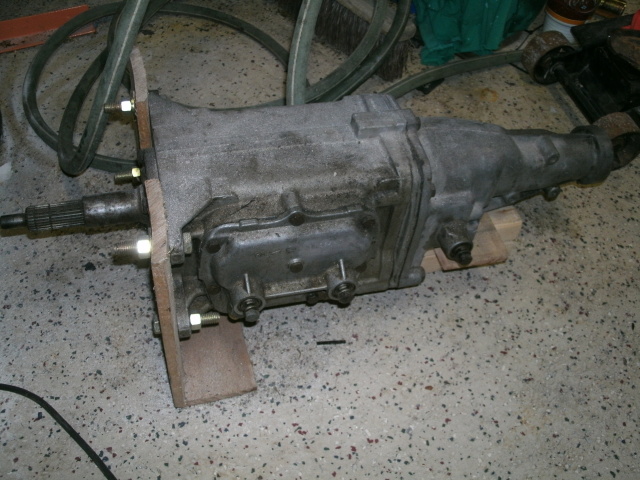
Dug out the original M20 for the build
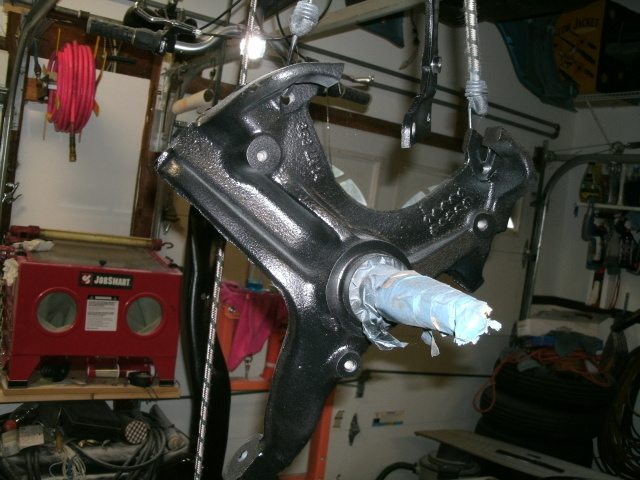
Spindles have been blasted as well
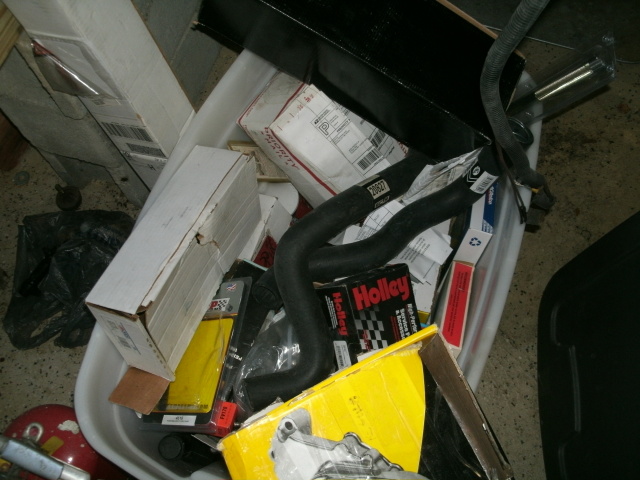
Box of goodies for the car
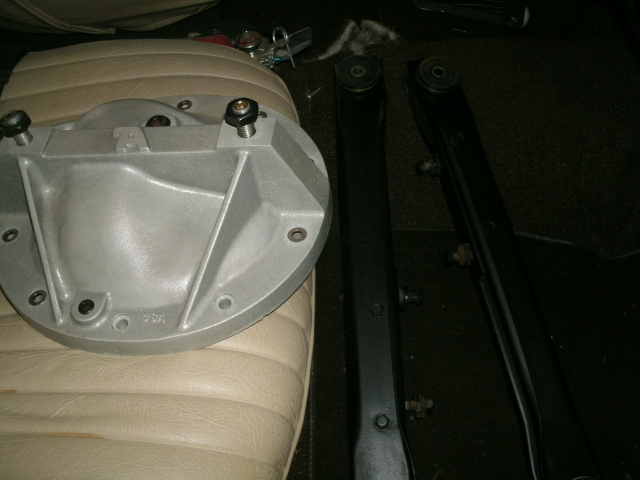
The T/A rear cover thats going on along with the blasted and poly bushed rear arms.
Engine goodies are boxed and awaiting assembly. New crank,, rods, pistons, cam (292 comp), etc. Edelbrock Air Gap is being powdercoated. Bottom end has been balanced. Had less than 5K on the old motor but I wanted to freshen her up. Took alot of grief on that one as well. Turned down a couple of offers to sell the motor. But I'd rather have the original numbers matching, factory 4bbl, factory 4spd. block in my car.
And here's my "blasted some parts today" thread. http://www.g3gm.com/t8583-blasted-some-parts-today
So we should be up to speed now. I have pretty much all my part numbers of items I used or have to use on this build. So if anyone has any questions, fire away. Glad to help anyone out. BTW, front lower control arms, for 73, have (2) different sizes in them. So measure before you buy. Another one of those one year only things.....
This is what it looked like right before I took her apart. http://www.g3gm.com/t5606-just-some-pics And here is a video of her idling. https://youtu.be/tptiTU9hdJE
Here's the thread when I got the frame back from the sandblaster and sprayed it. Its 2 coats prime, 2 coats paint. Disregard the "hijacked" pics. They were of the Eastwood internal frame nozzle.
http://www.g3gm.com/t6034-frames-back-from-the-sandblaster
Ok, now we are up to date. Installed all new lines from Inlinetube.com. They consisted of fuel line, vapor line and all brake lines. Including all new factory clips and bolts. New proportioning valve (with proper brake WIRE connection) from inline tube as well. The bracket in front of the prop valve is my factory backdrive for my 4 speed. Please dont mind all the dust on the frame from sitting. LOL All lines, clips and bolts have been sprayed with a high temp flat/matte clear. Just for some added protection.


Dug out the original M20 for the build

Spindles have been blasted as well

Box of goodies for the car

The T/A rear cover thats going on along with the blasted and poly bushed rear arms.

Engine goodies are boxed and awaiting assembly. New crank,, rods, pistons, cam (292 comp), etc. Edelbrock Air Gap is being powdercoated. Bottom end has been balanced. Had less than 5K on the old motor but I wanted to freshen her up. Took alot of grief on that one as well. Turned down a couple of offers to sell the motor. But I'd rather have the original numbers matching, factory 4bbl, factory 4spd. block in my car.
And here's my "blasted some parts today" thread. http://www.g3gm.com/t8583-blasted-some-parts-today
So we should be up to speed now. I have pretty much all my part numbers of items I used or have to use on this build. So if anyone has any questions, fire away. Glad to help anyone out. BTW, front lower control arms, for 73, have (2) different sizes in them. So measure before you buy. Another one of those one year only things.....

Joe73- Donating Member

- Street Cred : 83
 Re: 1973 Chevelle SS, 350, 4spd. build
Nice! Keep them updates coming.
77mali- Donating Member

- Street Cred : 62
 Re: 1973 Chevelle SS, 350, 4spd. build
Mmmm...boxes of fresh parts! Like being a kid on Christmas all over again! Can't wait to see it back together again!

thatfnthing- Donating Member

- Street Cred : 65
 Re: 1973 Chevelle SS, 350, 4spd. build
Excited to see the build thread, and keep those updates coming!

BK-75- G3GM Member

- Street Cred : 0
 Re: 1973 Chevelle SS, 350, 4spd. build
Ok, got a couple of things done this morning.
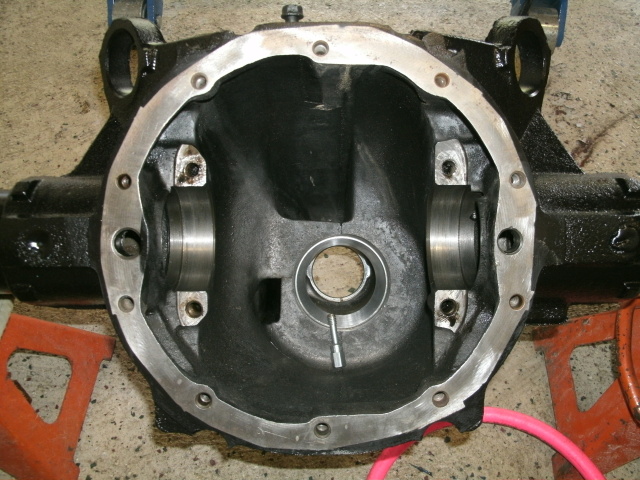
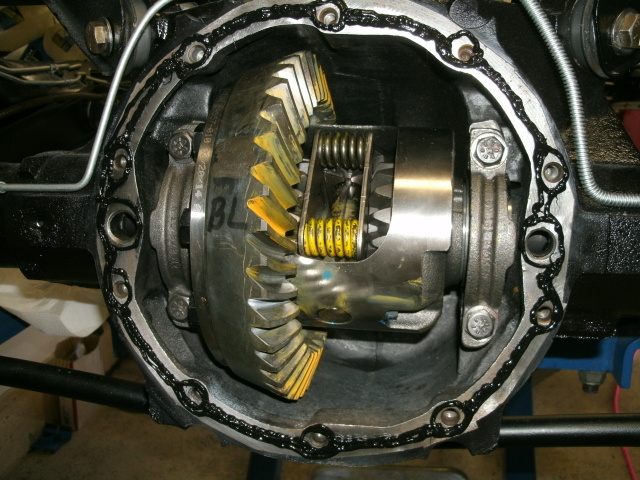
Cleaned out the inside of the rear axle. Tapped out the old races and installed new races. Ran a thread chase (not a tap) through all the bolt holes to make sure they're clean. You can see the chase I used inside the diff. Even the bolt on top that holds the brake hose is done. I was concerned to have perfectly clean rear cover bolts so I have proper tightening for the girdle cover.
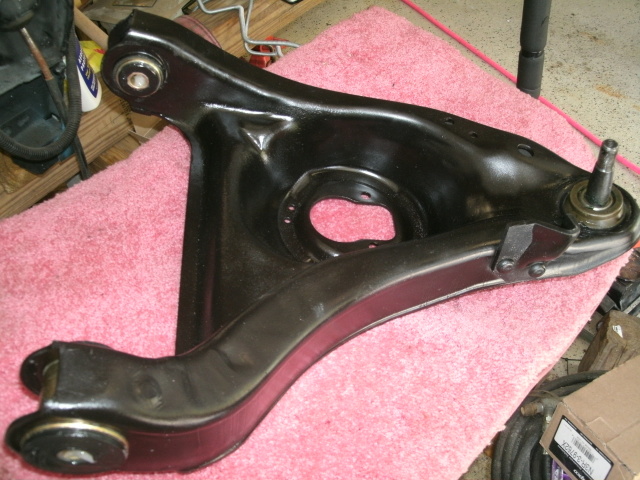
Pressed in new poly bushings and sleeves and new ball joints on the lower arms.
Touched up the Moog 8002 front springs. Ready for install.

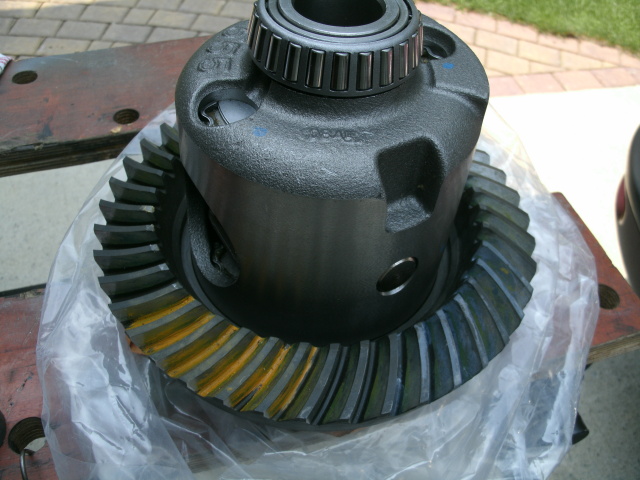
And I bolted up my ring gear to the carrier with loctite. Torqued them at 30 then 65 lbs.
Cleaned up my Competition Engineering drag shocks, ready for install. I'm reusing them because they are fine. Didnt take a pic.
Busy morning but got stuff done. Fun either way.
Cleaned out the inside of the rear axle. Tapped out the old races and installed new races. Ran a thread chase (not a tap) through all the bolt holes to make sure they're clean. You can see the chase I used inside the diff. Even the bolt on top that holds the brake hose is done. I was concerned to have perfectly clean rear cover bolts so I have proper tightening for the girdle cover.

Pressed in new poly bushings and sleeves and new ball joints on the lower arms.

Touched up the Moog 8002 front springs. Ready for install.

And I bolted up my ring gear to the carrier with loctite. Torqued them at 30 then 65 lbs.

Cleaned up my Competition Engineering drag shocks, ready for install. I'm reusing them because they are fine. Didnt take a pic.
Busy morning but got stuff done. Fun either way.

Joe73- Donating Member

- Street Cred : 83
 Re: 1973 Chevelle SS, 350, 4spd. build
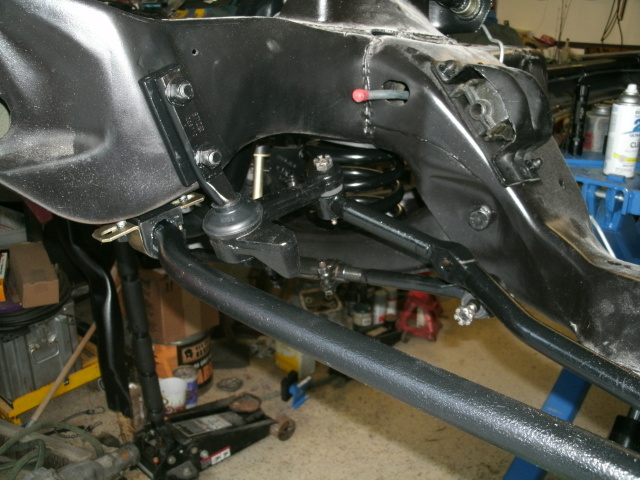
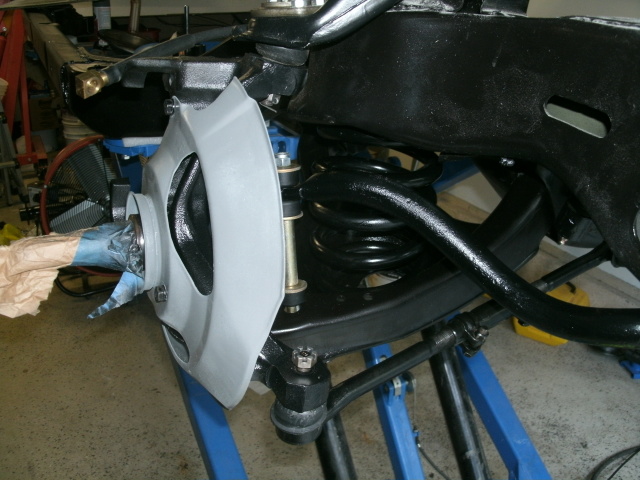
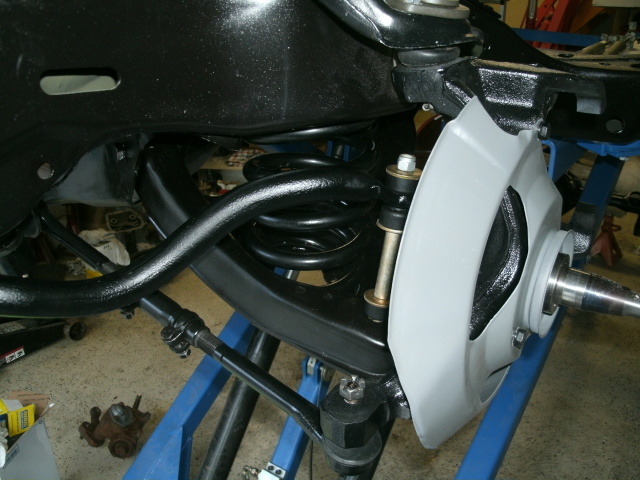
Did some front end work today. Front springs installed. I used the spring compressor through the shock hole trick. Worked out real well. Once compressed enough, put nuts on both ball joints and release some pressure off the spring. Then I hit it with a 1 1/2 lb. rubber mallet to pop them into position.
All front end parts are MOOG. All poly is Energy Suspension. Wanted to use factory chassis mounts for the sway bar but the poly wouldnt fit. So I used the ones that came with the bushings.
Hand cut some nice gaskets for between the rotor backing plate and spindle.
Some pics. Nothing it tightened up.


Joe73- Donating Member

- Street Cred : 83
 Re: 1973 Chevelle SS, 350, 4spd. build
Did you reuse/rehab the springs or are they new? I kinda want to reuse mine- they're still in good shape. Those Moog parts are nice. I'm also planning on using their ball joints, etc., good products.

77mali- Donating Member

- Street Cred : 62
 Re: 1973 Chevelle SS, 350, 4spd. build
Everything is new except for my drag shocks. I'm using Moog springs # 8002 for the front.

Joe73- Donating Member

- Street Cred : 83
 Re: 1973 Chevelle SS, 350, 4spd. build
Ok, banged out a couple more things.
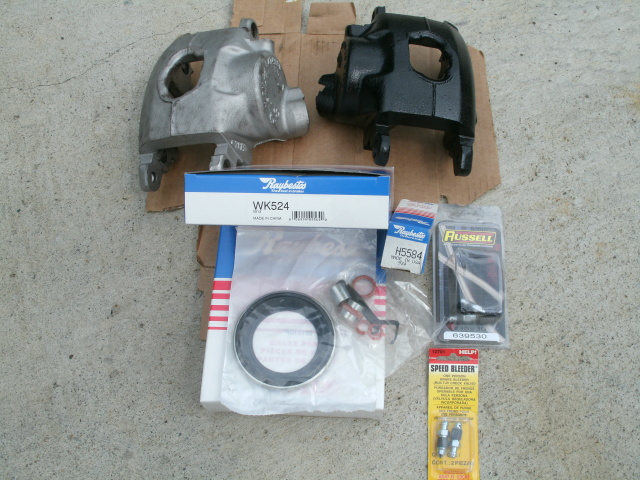
Glass blasted and high temp ceramic painted my front calipers. Then threw a rebuild kit in each one. New seals, sliders, sleeves, etc. Also installed some "self bleeders". I do it to all my vehicles since I like to change my brake fluid every three years like your supposed to. Part numbers for our cars are Rear is Russell 639530 and the fronts are Dorman 12701.
Put the same rotors back on with new seals and greased bearings.
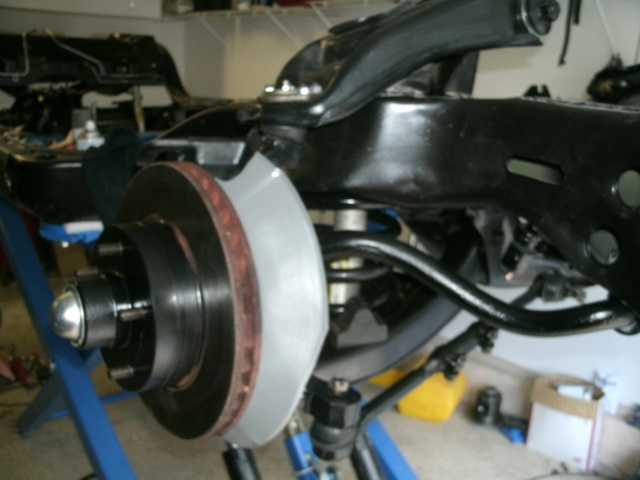

Put the rear housing in after installing the two moog rubber bushing above the diff. Rest of the bushings are all poly. Drag shocks installed. Just have to put on the backing plates and hook up the new brakes lines. You can see the girdle rear cover in the last pic. I had to see what it looked like on there. Just waiting on an extra pinion bearing so I can make a "setup" bearing out of it to measure pinion depth. If anyone is wondering why the blue tape on the springs, its so I know which way they are supposed to face when installed. Service manual states that the top end of the spring must point towards the passenger side of the car. Basically the actual flat cut end of the spring is supposed to be parallel to the center line of the car. So both top pig tails point towards the passenger side. So the tape lets me eyeball it quick and easy. Just FYI.


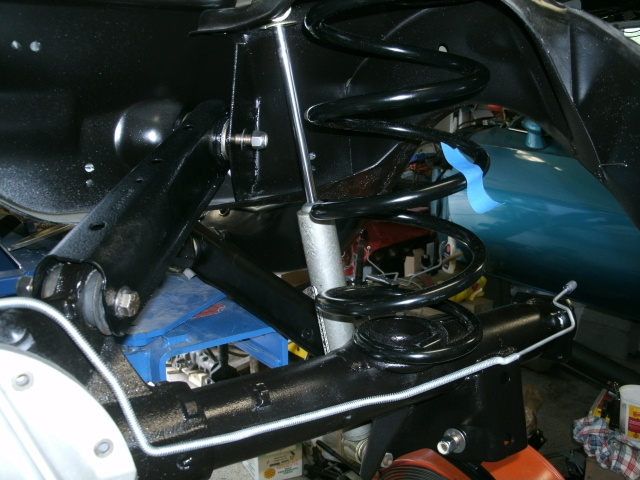
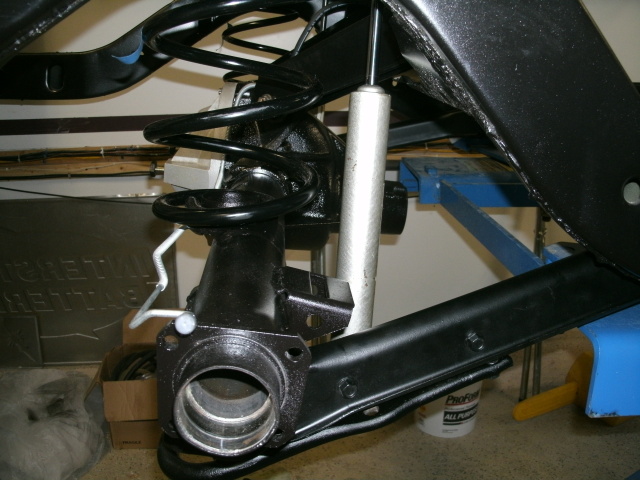
Not much left to do and this chassis will be a roller and get the hell off my lift so I can do some oil changes on the daily drivers. LOL. Then onto the firewall.
Enjoy guys !!!!

Glass blasted and high temp ceramic painted my front calipers. Then threw a rebuild kit in each one. New seals, sliders, sleeves, etc. Also installed some "self bleeders". I do it to all my vehicles since I like to change my brake fluid every three years like your supposed to. Part numbers for our cars are Rear is Russell 639530 and the fronts are Dorman 12701.

Put the same rotors back on with new seals and greased bearings.


Put the rear housing in after installing the two moog rubber bushing above the diff. Rest of the bushings are all poly. Drag shocks installed. Just have to put on the backing plates and hook up the new brakes lines. You can see the girdle rear cover in the last pic. I had to see what it looked like on there. Just waiting on an extra pinion bearing so I can make a "setup" bearing out of it to measure pinion depth. If anyone is wondering why the blue tape on the springs, its so I know which way they are supposed to face when installed. Service manual states that the top end of the spring must point towards the passenger side of the car. Basically the actual flat cut end of the spring is supposed to be parallel to the center line of the car. So both top pig tails point towards the passenger side. So the tape lets me eyeball it quick and easy. Just FYI.


Not much left to do and this chassis will be a roller and get the hell off my lift so I can do some oil changes on the daily drivers. LOL. Then onto the firewall.
Enjoy guys !!!!

Joe73- Donating Member

- Street Cred : 83
 Re: 1973 Chevelle SS, 350, 4spd. build
I didn't know about the spring indexing, I'll have to check (probably correct mine). I see you still have to install the global west support bars also.
dynchel- Donating Member

- Street Cred : 40
 Re: 1973 Chevelle SS, 350, 4spd. build
Looks great. I wish I would have painted some of the suspension parts I put on when I replaced mine. A lot of it was not coated or painted at all and I didn't realize it and they are all rusty looking. Not even a year old yet. Can't wait to see it back together and on the ground.

driveit- Donating Member

- Street Cred : 15
 Re: 1973 Chevelle SS, 350, 4spd. build
Thanks guys. I cant wait to see it on the ground either. But more so, I cant wait to hear the 292 cam. Love the lump of that one.

Joe73- Donating Member

- Street Cred : 83
 Re: 1973 Chevelle SS, 350, 4spd. build
Just got back from the powdercoater. Guy did a nice job. Scattershield is its normal red Lakewood color. Manifold is a gray/silver color similar to corvette rally wheels. I wanted powdercoat "chrome" but since it has to be cleared after color, there is a possibility of staining or a slight discoloring of the clear. So I went this route and I like it. Should match up nice with some aluminum heads.
Dropped off the TA performance Girdle to have it done in the same color as the manifold. Dont want that getting bad looking under the car. Bought some 12 point polished stainless ARP bolts for it as well. I'll post a pick when I get it back.
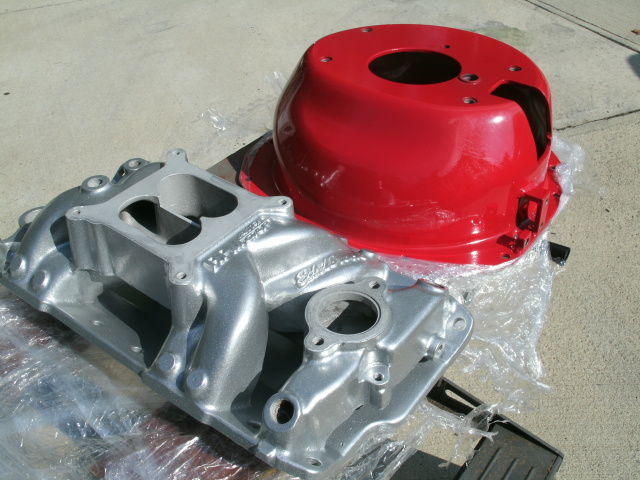
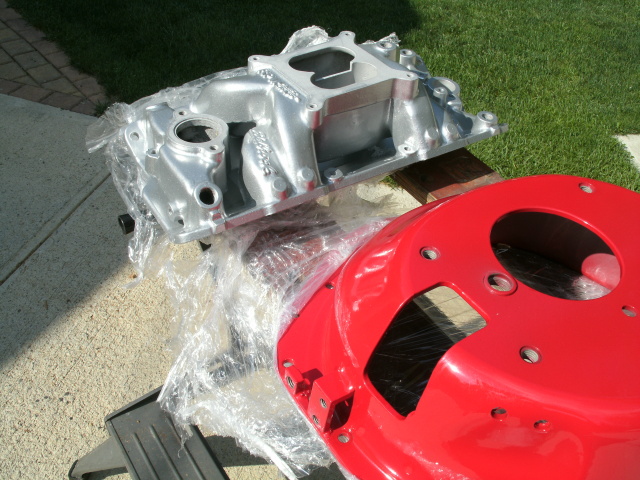
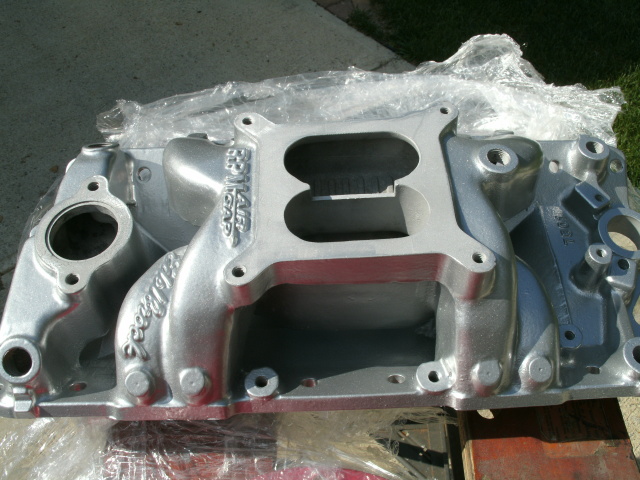
Dropped off the TA performance Girdle to have it done in the same color as the manifold. Dont want that getting bad looking under the car. Bought some 12 point polished stainless ARP bolts for it as well. I'll post a pick when I get it back.


Joe73- Donating Member

- Street Cred : 83
 Re: 1973 Chevelle SS, 350, 4spd. build
Hey Joe it was good seeing you yesterday. The car is coming along great!
ant7377- G3GM Addict

- Street Cred : 36
 Re: 1973 Chevelle SS, 350, 4spd. build
Yes, I was great meeting up and shootin' the breeze. I told paul you would like to meet up with us as well. I'll let you know when.

Joe73- Donating Member

- Street Cred : 83
 Re: 1973 Chevelle SS, 350, 4spd. build
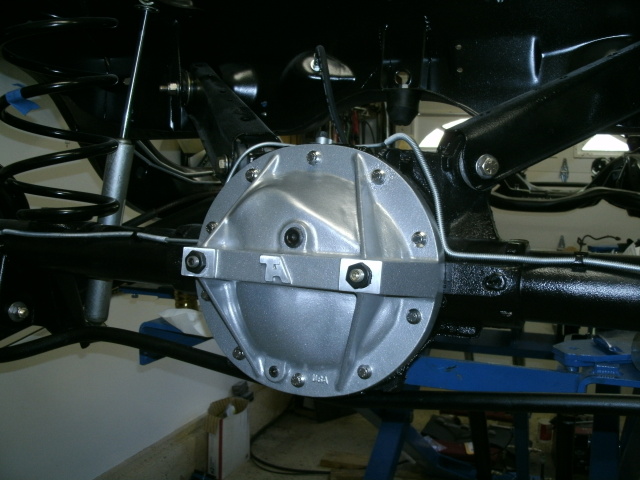
Ok, rear girdle cover back from the powdercoater. Same color as my manifold. It will be installed with 12 pt. stainless ARP bolts.

Sandblasted my engine block because my paint job after hot tanking was chipping.

Engine cleaned with brake cleaner then scrubbed down with wax and grease remover. Then I primed with Duplicolor DE1612 high heat engine primer with ceramic.

Engine painted with Duplicolor DE1607 Chevy Orange-Red. Orange-red is factory for small blocks. Big blocks get regular chevy orange. All primer coats and topcoats were done at 10-15 minute intervals. 2 light coats and then a medium heavy coat for both. Basically 6 coats of paint.
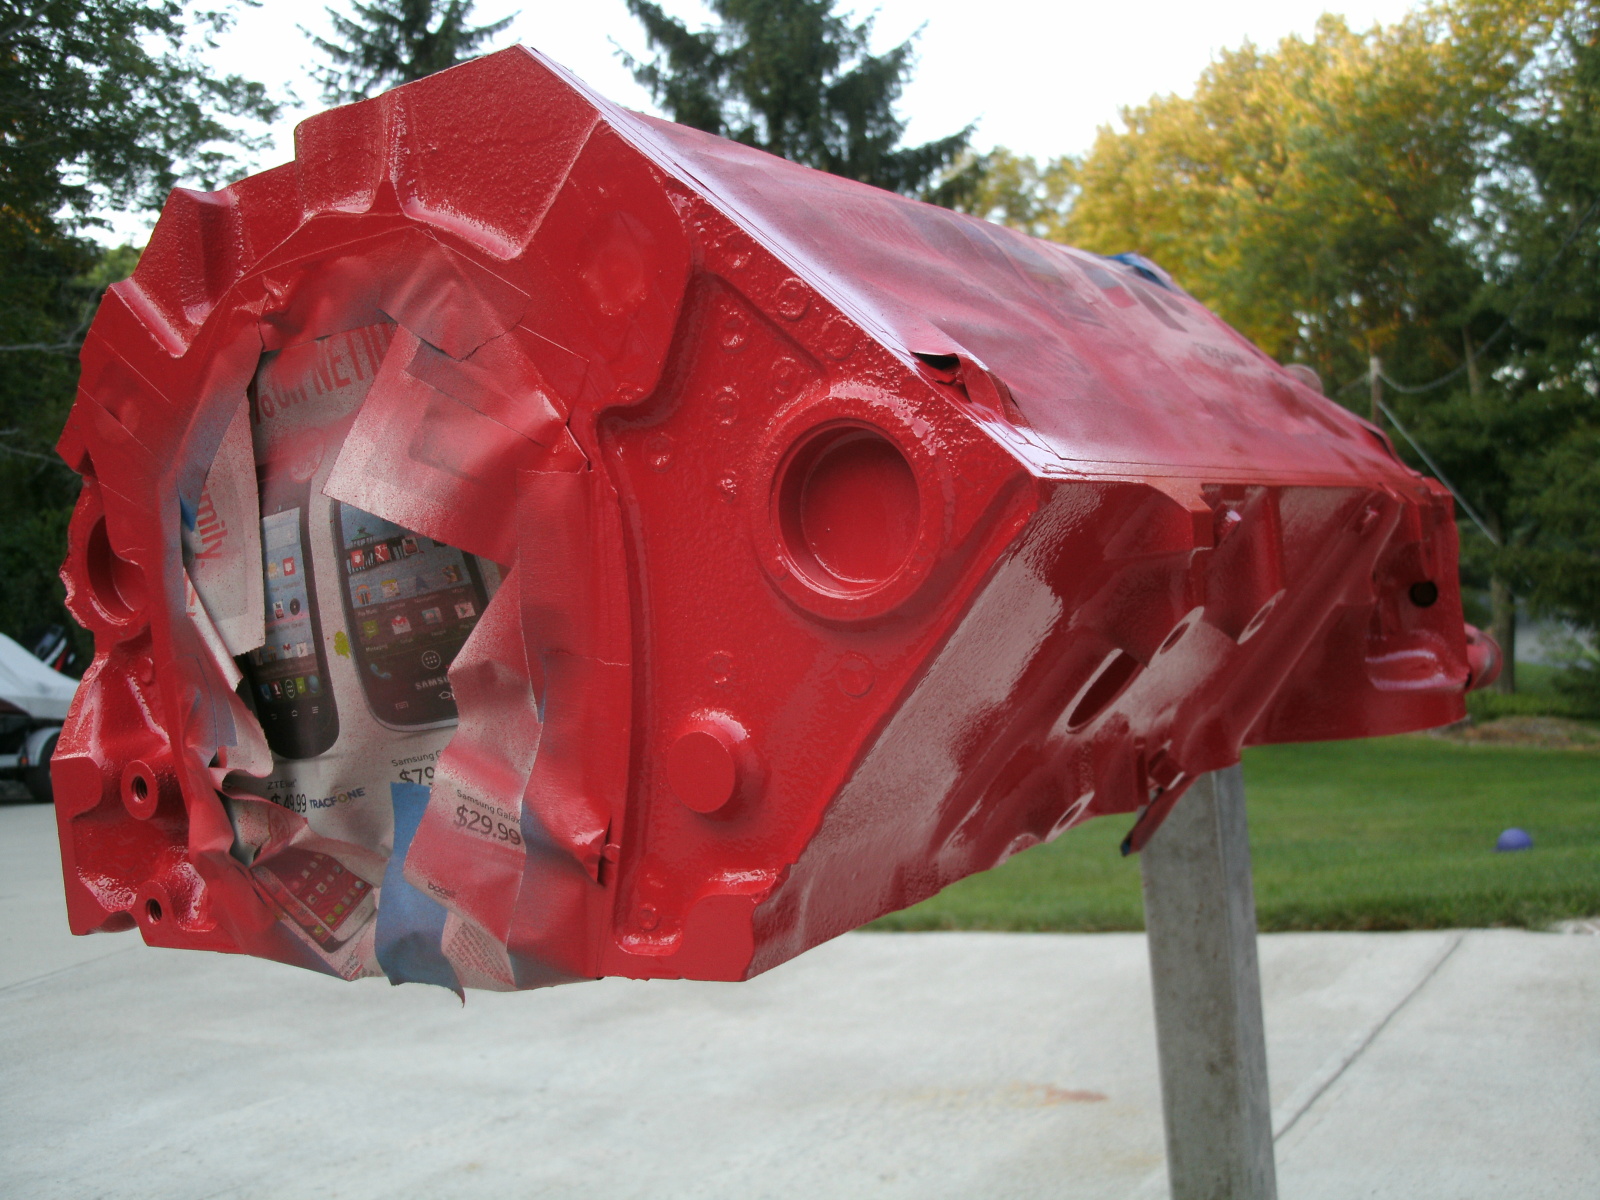

Sandblasted my engine block because my paint job after hot tanking was chipping.

Engine cleaned with brake cleaner then scrubbed down with wax and grease remover. Then I primed with Duplicolor DE1612 high heat engine primer with ceramic.

Engine painted with Duplicolor DE1607 Chevy Orange-Red. Orange-red is factory for small blocks. Big blocks get regular chevy orange. All primer coats and topcoats were done at 10-15 minute intervals. 2 light coats and then a medium heavy coat for both. Basically 6 coats of paint.


Joe73- Donating Member

- Street Cred : 83
 Re: 1973 Chevelle SS, 350, 4spd. build
Just think how much more you could have done today if we hadn't spent two hours blabbing!

77mali- Donating Member

- Street Cred : 62
 Re: 1973 Chevelle SS, 350, 4spd. build
77mali wrote:Just think how much more you could have done today if we hadn't spent two hours blabbing!
LOL. Your right. After you left, I went inside and found the flap disc that came in the mail for me. So next up is making the setup bearing for my pinion.

Joe73- Donating Member

- Street Cred : 83
 Re: 1973 Chevelle SS, 350, 4spd. build
Ok, another update.
Got the rear all put together, Backing plates on, all new brakes installed, new wheel cylinders and spring kit. E-brake cables were reused because I bought them from GM in the 80's so they are like brand new. Wheel seals and pinion seal was coated with some RTV on the outside prior to installing. Just to keep the leak monster away. And a little RTV on the pinion YOKE splines for the same reason. You dont put the RTV on the pinion splines because it will get pushed into the bearing when installing the yoke. And of course loc-tite on the pinion threads and the cross bolt threads.
TA girdle cover is installed. Just FYI, the cover bolts get torqued to 25 ft/lbs. and the cap load bolts get torqued to 5 ft/lbs or 60 inch pounds (same thing). I went with inch pounds because I already had my inch pound torque wrench out for setting pinion bearing load. The cover is powder coated the same as my manifold and the bolts are 1 3/4" long ARP stainless 12 point with washers. Another note on the girdle covers. You have to check the threads in your diff housing. If your threads come all the way to the top of the hole, then you could use 1 1/2" bolts. If the threads dont (mine didnt) then you have to use 1 3/4" bolts. I was also advised to back out the preload bolts a good amount and put some RTV on the threads. So when you preload the caps, the RTV seals the threads and you wont get any oil seepage. I did that and when I preloaded the bolts it left a slight amount of RTV around the outside, so I left it and snugged up the locknut. Should be a good seal in there in case of seepage.
Some pics.

SHE'S A ROLLER !!
Ok, you guys can make fun of my skinnies on back. But the fronts are even skinnier now. LOL


Got the rear all put together, Backing plates on, all new brakes installed, new wheel cylinders and spring kit. E-brake cables were reused because I bought them from GM in the 80's so they are like brand new. Wheel seals and pinion seal was coated with some RTV on the outside prior to installing. Just to keep the leak monster away. And a little RTV on the pinion YOKE splines for the same reason. You dont put the RTV on the pinion splines because it will get pushed into the bearing when installing the yoke. And of course loc-tite on the pinion threads and the cross bolt threads.
TA girdle cover is installed. Just FYI, the cover bolts get torqued to 25 ft/lbs. and the cap load bolts get torqued to 5 ft/lbs or 60 inch pounds (same thing). I went with inch pounds because I already had my inch pound torque wrench out for setting pinion bearing load. The cover is powder coated the same as my manifold and the bolts are 1 3/4" long ARP stainless 12 point with washers. Another note on the girdle covers. You have to check the threads in your diff housing. If your threads come all the way to the top of the hole, then you could use 1 1/2" bolts. If the threads dont (mine didnt) then you have to use 1 3/4" bolts. I was also advised to back out the preload bolts a good amount and put some RTV on the threads. So when you preload the caps, the RTV seals the threads and you wont get any oil seepage. I did that and when I preloaded the bolts it left a slight amount of RTV around the outside, so I left it and snugged up the locknut. Should be a good seal in there in case of seepage.
Some pics.


SHE'S A ROLLER !!
Ok, you guys can make fun of my skinnies on back. But the fronts are even skinnier now. LOL


Joe73- Donating Member

- Street Cred : 83
 Re: 1973 Chevelle SS, 350, 4spd. build
Lookin' good!
I notice your front 'tires' are flat-spotted there -- must have been sitting in one spot too long.
I notice your front 'tires' are flat-spotted there -- must have been sitting in one spot too long.

thatfnthing- Donating Member

- Street Cred : 65
 Re: 1973 Chevelle SS, 350, 4spd. build
thatfnthing wrote:Lookin' good!
I notice your front 'tires' are flat-spotted there -- must have been sitting in one spot too long.
I think that was From a break test. HA

Wallyuph- Donating Member

- Street Cred : 31
 Re: 1973 Chevelle SS, 350, 4spd. build
NICE! Congrats Joe (love the wagon wheel idea btw).

77mali- Donating Member

- Street Cred : 62
 Re: 1973 Chevelle SS, 350, 4spd. build
Thanks guys. Had some ply laying around so i reinvented the wheel. Lol

Joe73- Donating Member

- Street Cred : 83
 Re: 1973 Chevelle SS, 350, 4spd. build
It's looking really good . . .
Dinomyte- Donating Member

- Street Cred : 11
Page 1 of 17 • 1, 2, 3 ... 9 ... 17 
G3GM :: Media :: G3 Project Pictures
Page 1 of 17
Permissions in this forum:
You cannot reply to topics in this forum|
|
|


» Roll Call and Car showcase
» Central Texas Noob
» Welcome Keith Seymore
» Wanted: Front park lamp assemblies
» 75 Hurst Olds T-tpos
» G3 Chevy rims- help ID these
» 75 el camino project.
» Have had a few questions
» vinyl top removal