75 el camino project.
+24
Iggy
impalamonte
73ss
REVINKEVIN / Mr. 600+HP
tgaetto
fasrnur
bigredlaguna
Hawk03
Hs1973
Limey SE
thatfnthing
DaveFury
Joe73
chevellelaguna
Mcarlo77
knightfan26917
77mali
tropdeprojet
dynchel
pila
wunderlich_33
driveit
Dinomyte
JB2wheeler
28 posters
G3GM :: Media :: G3 Project Pictures
Page 7 of 11
Page 7 of 11 •  1, 2, 3 ... 6, 7, 8, 9, 10, 11
 Re: 75 el camino project.
thatfnthing wrote:
Okay, this one has me scratching my head. That's not the thermo switch -- the thermo switch is screwed into the engine block. The problem is I can't find that thing in any of the diagrams, either 73 or 76 (thinking maybe it came after my 73), and I can't find any combo of two browns and a yellow in the same connector. Still looking, but I'm limited to the diagrams and manuals since all of that is gone in my car. Maybe someone else can chime in with what that thing is, but I'll keep looking in the meantime.
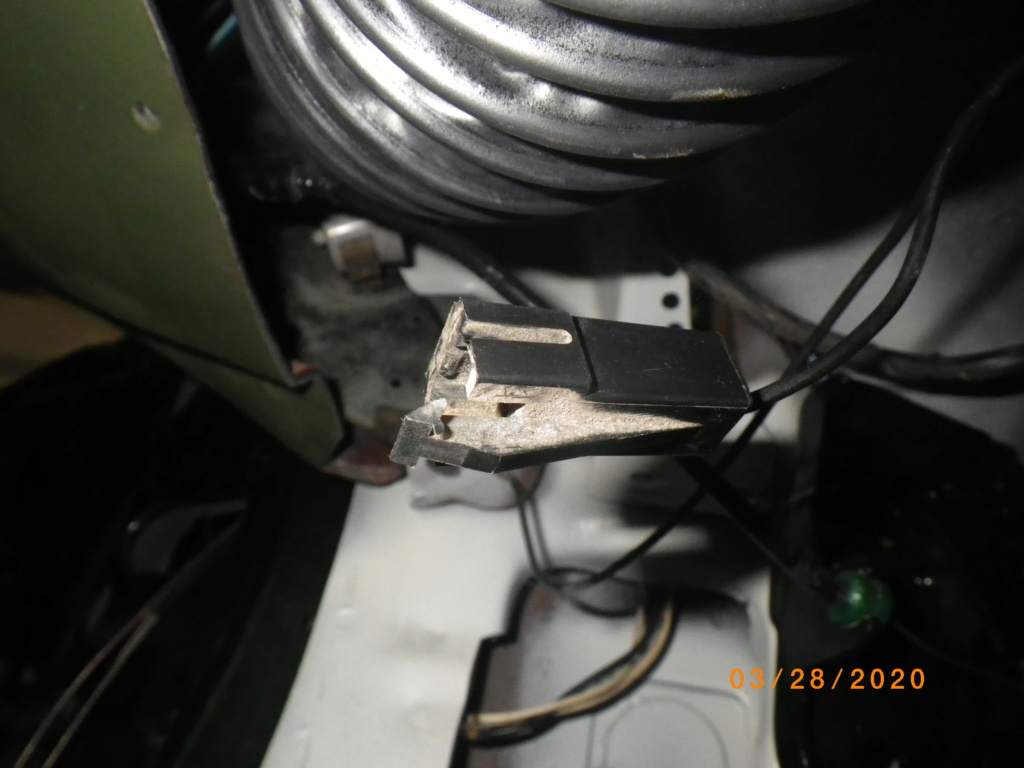
that button has the number ac13cm on the top, doing a little digging it was referred to as a thermo delay switch, someone said it stopped the compressor from turning on if it was too cold like in winter the defrost would kick on the a/c but that stopped it if it was below a certain temp.
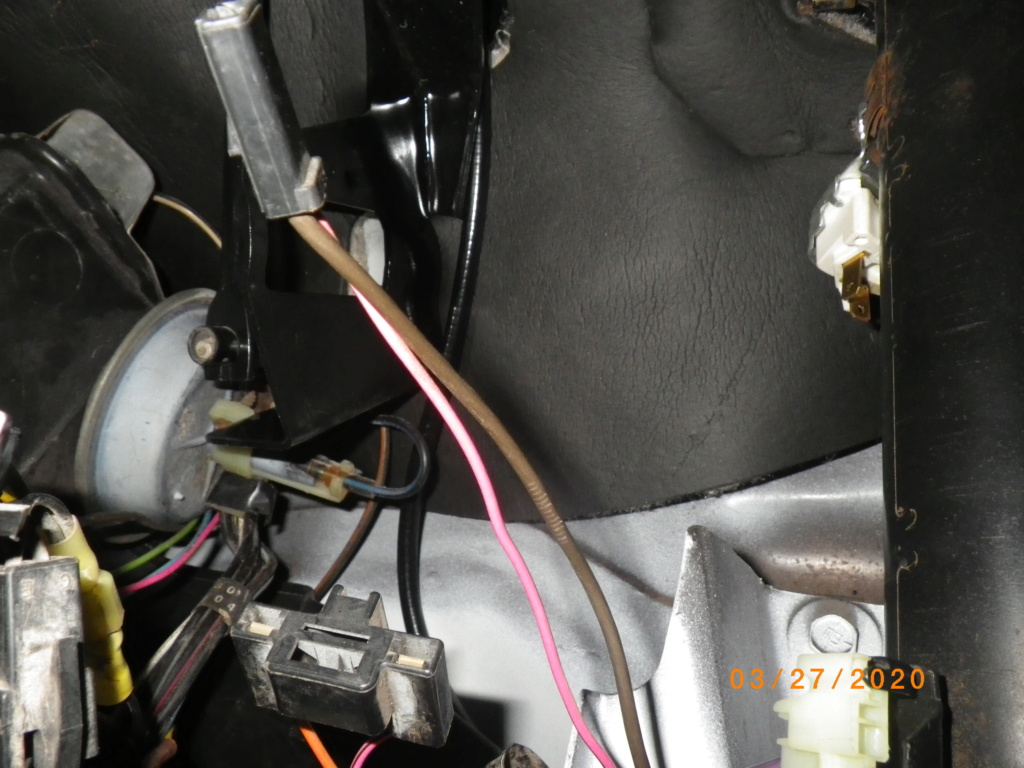
I did figure out where the passenger parking light gets the power, but Im not sure where exactly it runs, seems like it wants to run across the middle of the floor just under where the bench goes, an the black wire next to the black box I'm wondering if its supposed to be the seat belt sensor.

riddick75- G3GM Member

- Street Cred : 6
 Re: 75 el camino project.
not sure if they are supposed to be connected but they fit together and reached so I connected them. once I get power to the car I'll see if anything gets smoked, probably not a good idea but its an idea. so I got the wires figured out. got the carpet in and trimmed, seat in gotta get an updated picture with it all in.

radio in and for the most part wired, the radio has a 12 volt constant feed that I haven't decided if I'm going to use or even need for the radio memory.
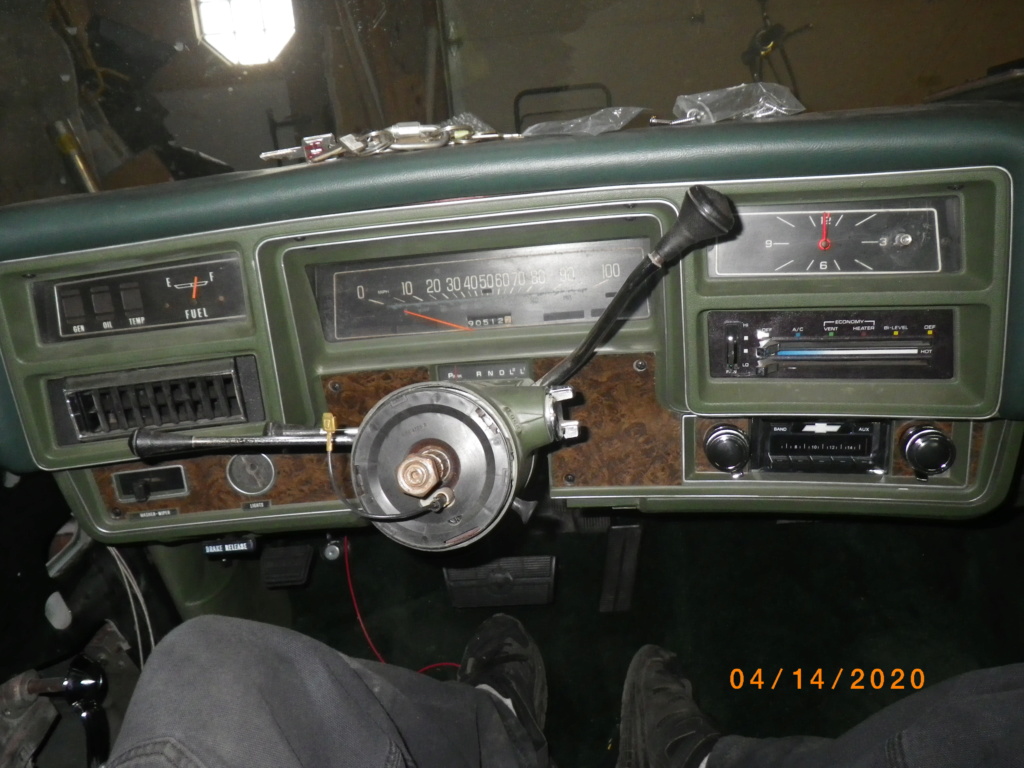
also got the clock knob fixed and it seems to work well

working on getting the windows adjusted to seal...mostly, very tedious, got the passenger to seal beautifully but driver needs more attention, and it also seems like the seals them selves need time to form to the window kinda like a memory foam.

and slowly buffing the whole car from 1500 wet sand

to compound and next will be the final polish


riddick75- G3GM Member

- Street Cred : 6
 Re: 75 el camino project.
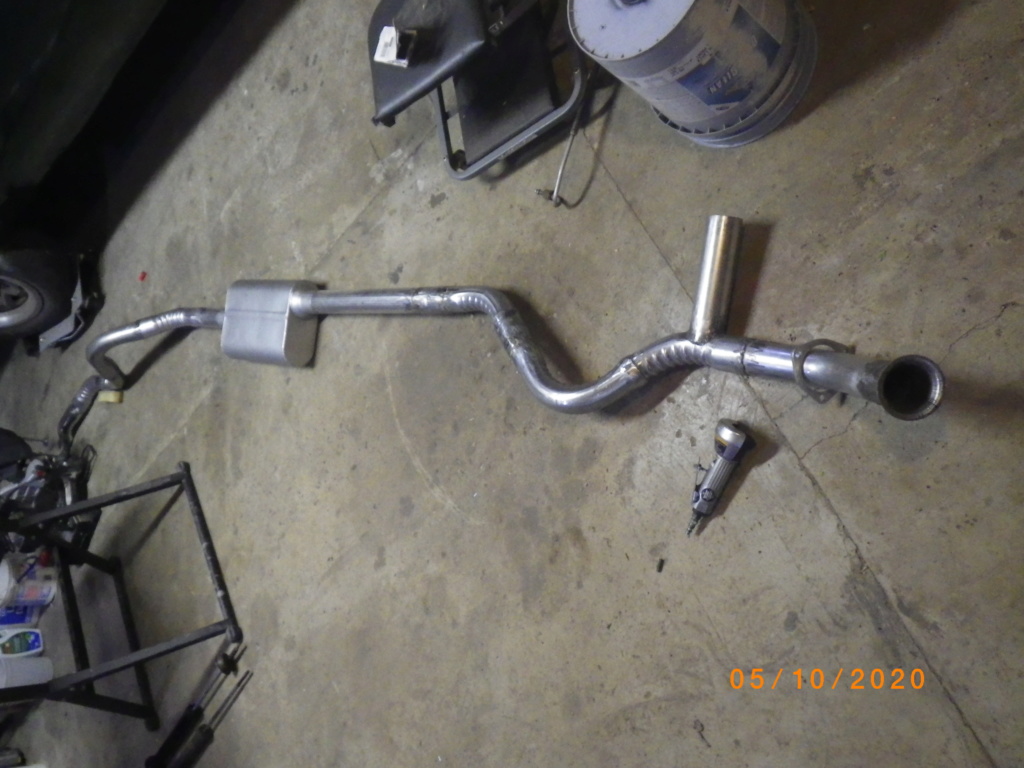
and also been messing with the exhaust, single with headers 2.5 the way through, with a thrush welded muffler
still gotta get hangers and few other things figured out, and saw that most people run it next to the drive shaft, but there isn't really an actual space for it there so I'm debating on if ill move it over with the extra bends or just leave it where it is for now.

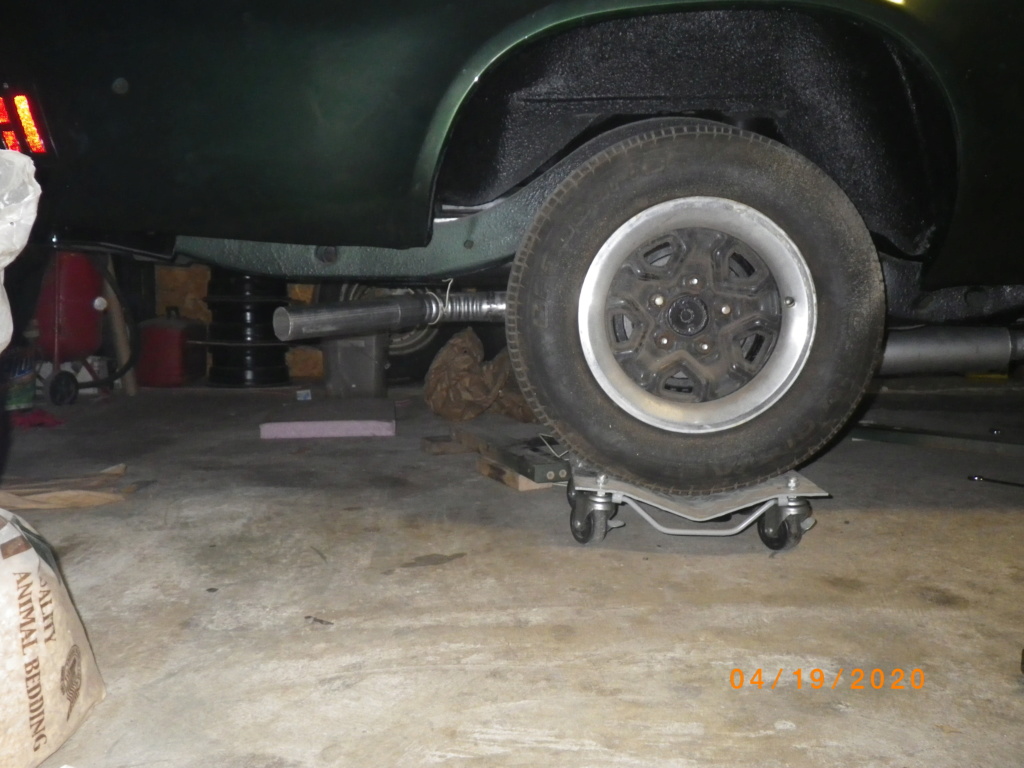
still gotta get hangers and few other things figured out, and saw that most people run it next to the drive shaft, but there isn't really an actual space for it there so I'm debating on if ill move it over with the extra bends or just leave it where it is for now.


Last edited by riddick75 on Wed May 27, 2020 10:59 am; edited 1 time in total

riddick75- G3GM Member

- Street Cred : 6
 Re: 75 el camino project.
Everything is looking good! Door panels are top notch. On your exhaust I noticed that the inlet of your muffler is positioned away from your driveshaft. All the exhaust systems I've done have the inlet closest to the driveshaft to fit up in the pocket of the floorboard for proper clearance. Is that an option on your exhaust? Also, you mentioned the use of headers. Any reason you're not going with dual exhaust to make the most of that power?

g3chevy / Mr Pontiac- Donating Member

- Street Cred : 35
 Re: 75 el camino project.
g3chevy wrote:Everything is looking good! Door panels are top notch. On your exhaust I noticed that the inlet of your muffler is positioned away from your driveshaft. All the exhaust systems I've done have the inlet closest to the driveshaft to fit up in the pocket of the floorboard for proper clearance. Is that an option on your exhaust? Also, you mentioned the use of headers. Any reason you're not going with dual exhaust to make the most of that power?
Yea the exhaust was a first trial, later I bent it next to the drive shaft after seeing a few other peoples cars just haven't gotten the right angle updated. I started that way because when I got the car it had no exhaust past the cross over so it was all guess work.
and basically I didn't do dual exhaust because I couldn't find a double hump cross member at the time, and I'm only running a stock 350 so there really isn't that much power.

riddick75- G3GM Member

- Street Cred : 6
 Re: 75 el camino project.
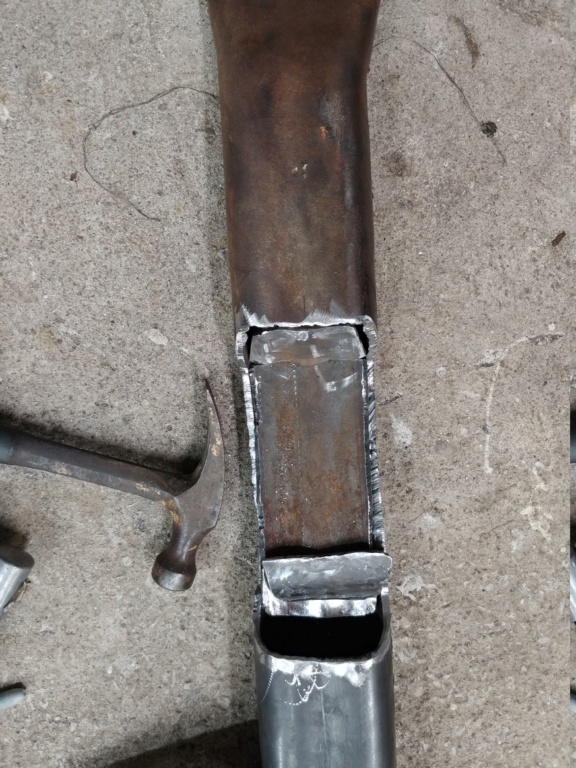
Makes perfect sense. Here's what I did on one of my projects. I notched the crossmember when I added dual exhaust. Just cut out the notch with a cut off wheel and bent the piece I removed and flipped it to fit in the opening. Had to add a piece to fill a gap but it turned out good. I've got an extra dual exhaust crossmember if you need it for $100 plus shipping. Just let me know.


g3chevy / Mr Pontiac- Donating Member

- Street Cred : 35
 Re: 75 el camino project.
thanks for the offer. I may in the future if I decide to change it. and nice vice stand. I got a grinder stand just like it. lol

riddick75- G3GM Member

- Street Cred : 6
 Re: 75 el camino project.
Yeah, the stand for my vice works great. I started with a rotor from one of our g3 A bodies but realized I need a bigger base. So I cut out the center of a rotor off of a 3/4 ton truck and welded the gutted rotor it to the bottom of the smaller rotor. Now its plenty stable. What did you use for a base on your stand?

g3chevy / Mr Pontiac- Donating Member

- Street Cred : 35
 Re: 75 el camino project.
used the rotor off of a 1/2 ton van rotor (basically the same as the camino) for the base and a small car rotor for the top. had a pipe that fit perfectly over the center and inside the other rotor opening. seems to make it plenty heavy for the grinder but If I was going to make one for the vice I would have used a 1 ton drum my buddy had.

riddick75- G3GM Member

- Street Cred : 6
 Re: 75 el camino project.
Yeah, a 1 ton rotor would be ideal for a stand. I'll give that a try next time I build one.

g3chevy / Mr Pontiac- Donating Member

- Street Cred : 35
 Re: 75 el camino project.
got the carb thrown on and starting to hook things up.
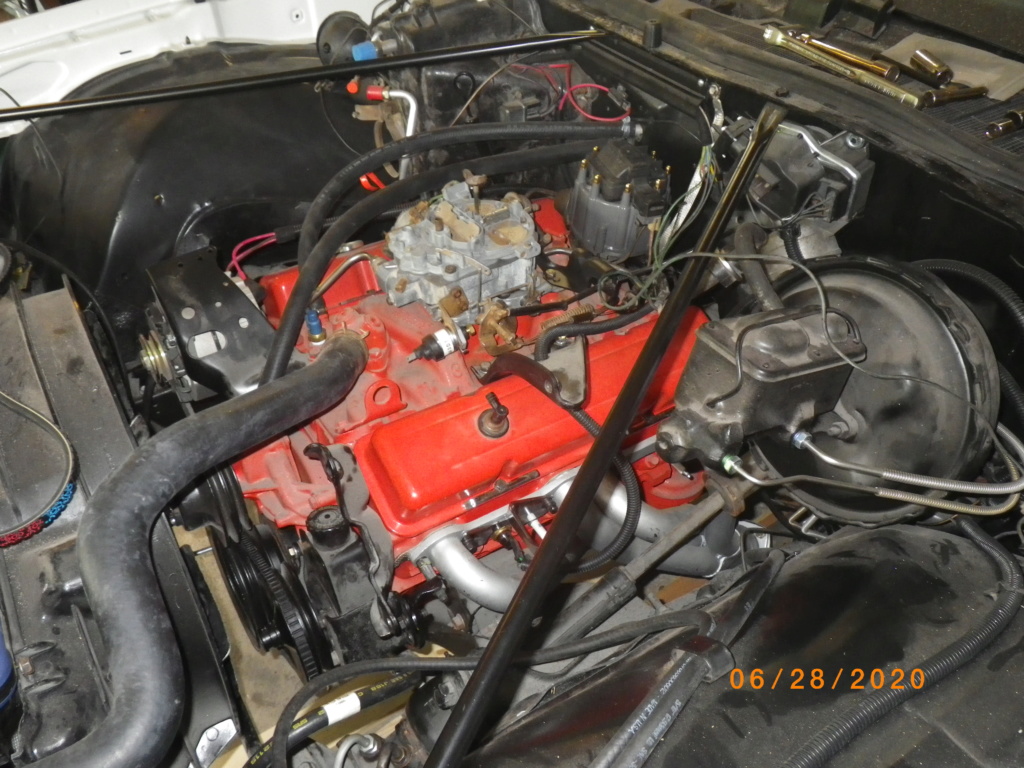
got the kick down cable but trying to figure out how it attaches to the carb and how its mounted. think I'm missing a bracket and the end of the cable but it doesn't look like it was broke or cut or anything. so a little input on what Im missing would be appreciated im running a quadrojet carb and the 350 trans.


got the kick down cable but trying to figure out how it attaches to the carb and how its mounted. think I'm missing a bracket and the end of the cable but it doesn't look like it was broke or cut or anything. so a little input on what Im missing would be appreciated im running a quadrojet carb and the 350 trans.


riddick75- G3GM Member

- Street Cred : 6
 Re: 75 el camino project.
That cable attaches to the pedal arm under the dash.
bigredlaguna- G3GM Senior Member

- Street Cred : 53
 Re: 75 el camino project.

I believe there were differences in the throttle cable mounting brackets for the q-jets. The ones for the auto trans have an extra square hole towards the bottom of it for the kick down cable to go thru. You can't clearly see it in this picture, but this might give you an idea where to look for it. Also if you have a stick carb, and I could be wrong, but it won't have the little nub on it to attach your kick down cable. I hope this is some help to you sir.

fasrnur- G3GM Enthusiast

- Street Cred : 9
 Re: 75 el camino project.
Correct...on your '75, that end of the cable attaches to the pedal arm.
Last edited by Mcarlo77 on Mon Jun 29, 2020 11:50 am; edited 2 times in total
Mcarlo77- Donating Member

- Street Cred : 78
 Re: 75 el camino project.
Im pretty sure the kickdown cable is attached to the trottle pedal under the dash. It goes in at the top of the pedal arm itself. There should be a square hole in the firewall just above the trottle cable. I have had numerus elcaminos and malibus over the years. And i have never seen one with a kickdown cable on the carb like other gm cars have. I could be Wrong and the 76-77 years have a carb mounted cable. But im sure when i say that all the 73-75 i have ever been close to have had the gas pedal mounted kickdown cable. Even my current 75 chevelle has it.

Hs1973- G3GM Enthusiast

- Street Cred : 14
 Re: 75 el camino project.
It will be easy to see if it is a carb or gaspedal mounted version you have. If it is gaspedal mounted, there should be a square hole right above the hole for the trottle cable in the firewall that matches the square on the cable. And a slit in top of the gaspedal arm.
Fasrnur is correct that there is a provision for attaching the cable on the carb at the arrow he made, however it could be the carb is not original to this car. As i Said i have never seen a elco with carb mounted kickdown. I could be Wrong and then i stand corrected.
Fasrnur is correct that there is a provision for attaching the cable on the carb at the arrow he made, however it could be the carb is not original to this car. As i Said i have never seen a elco with carb mounted kickdown. I could be Wrong and then i stand corrected.

Hs1973- G3GM Enthusiast

- Street Cred : 14
 Re: 75 el camino project.
Oh and im prtty sure that type of cable can only be mounted on the gaspedal as there is no provision for a carb mounting on the cable end. But please leet us know what you find when you get it installed

Hs1973- G3GM Enthusiast

- Street Cred : 14
 Re: 75 el camino project.
I think where the confusion lies is that the kick-down cable shown is for a '75 and connects to the pedal arm (I've got a spare just like it that I removed from a donor '75 Laguna). The stud post that Jeff is referring to would be where the kick-down would attach on a '77 (I just confirmed on my factory equipped Qjet '77 Monte)...and, I believe the same would apply to a '76. But, that cable has a completely different end that just slides over the stud. I checked my spare Qjet I removed from the donor '75 and it doesn't have that stud on the throttle linkage arm as shown. Not sure if that means you can just connect your existing cable to the pedal arm and be on your way? Or, you'd need the correct cable to attach to the carb for everything to work correctly? If you go with the latter, Jeff is also correct in that there is a separate bracket with a square hole that needs to be added to secure the cable.
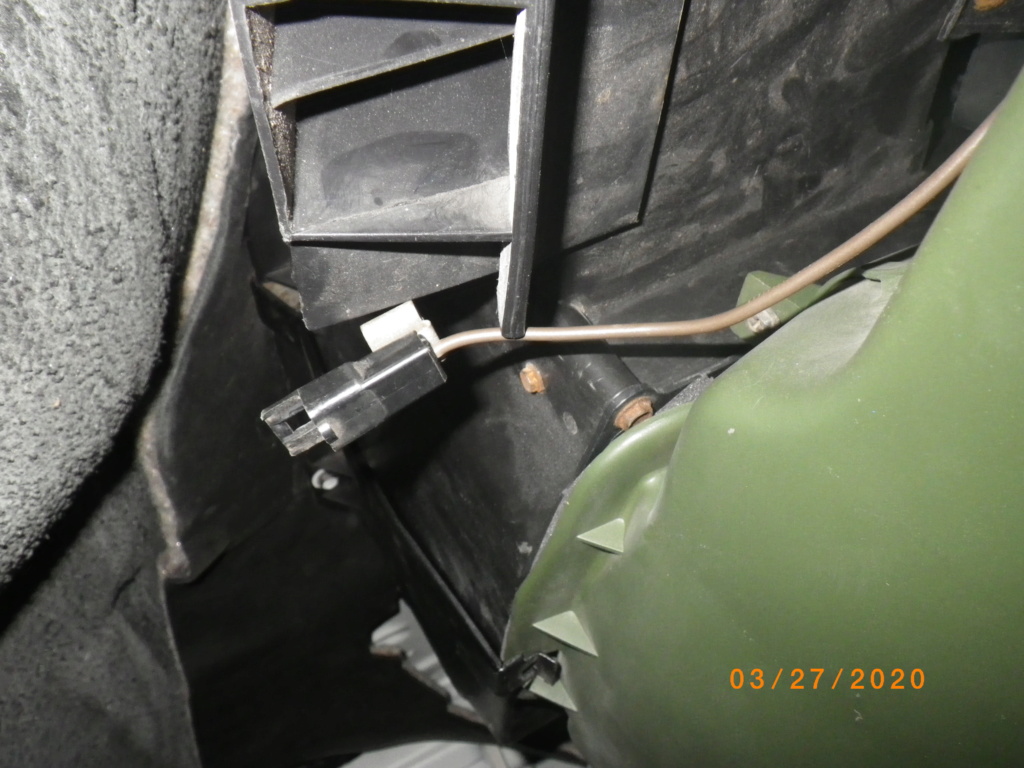
BTW...the one thing I'm not seeing on your existing cable is the white retainer bushing that keeps the cable secured to the pedal arm (see attached photo where I'm pointing to it with a screwdriver). It may still be on your pedal arm...but, I know it has to be removed from the hole the cable passes thru AND from the thin cable wire itself to remove/install the cable (there is a slit in the side of the bushing to allow it to be removed from the cable wire).

BTW...the one thing I'm not seeing on your existing cable is the white retainer bushing that keeps the cable secured to the pedal arm (see attached photo where I'm pointing to it with a screwdriver). It may still be on your pedal arm...but, I know it has to be removed from the hole the cable passes thru AND from the thin cable wire itself to remove/install the cable (there is a slit in the side of the bushing to allow it to be removed from the cable wire).


Mcarlo77- Donating Member

- Street Cred : 78
 Re: 75 el camino project.
I don't remember seeing and extra hole in the firewall or the petal but I'll check tomorrow. it might explain why I don't have any pictures of it on the carb but the guy I bought the car from didn't quite do things correctly. but that would explain the weird cable end.

riddick75- G3GM Member

- Street Cred : 6
Page 7 of 11 •  1, 2, 3 ... 6, 7, 8, 9, 10, 11
 Similar topics
» '74 El Camino "Project Badass"
» MY DAILY DRIVER/PROJECT 73 EL CAMINO SS
» Classic Car Restoration Club: 1977 El Camino Project Car-Overview
» MY DAILY DRIVER/PROJECT 73 EL CAMINO SS
» Classic Car Restoration Club: 1977 El Camino Project Car-Overview
G3GM :: Media :: G3 Project Pictures
Page 7 of 11
Permissions in this forum:
You cannot reply to topics in this forum|
|
|







» Roll Call and Car showcase
» Central Texas Noob
» Welcome Keith Seymore
» Wanted: Front park lamp assemblies
» 75 Hurst Olds T-tpos
» G3 Chevy rims- help ID these
» 75 el camino project.
» Have had a few questions
» vinyl top removal