1977 Chevelle Malibu Classic Progress Photo's aka Mali
+40
pila
dynchel
Mcarlo77
Joe73
driveit
Hawk03
Fishgrinder
1973 454 MONTE
bracketchev1221
Limey SE
chevellelaguna
1973montec
Bruisr
bigredlaguna
jerry46765
BicknellWelding
geoff528
2fat2fly
Jim_Rockford
DiscoMalibu
Brainstain
Laguna Budman
Dubie
74MonteCarlo
JB2wheeler
WyldeBill66
Wallyuph
dragons_lair59
77ElClassic
Dead Man
Graham Perkins
jrb75
chromereverse
Checyxtc
74Guna
texan01
abajc3
JiMi_DRiX
orange Juiced
HDHugger
44 posters
G3GM :: Media :: G3 Project Pictures
Page 25 of 27
Page 25 of 27 •  1 ... 14 ... 24, 25, 26, 27
 Re: 1977 Chevelle Malibu Classic Progress Photo's aka Mali
dynchel wrote:I've always used the air chisel method myself, but what ever works. Are you going to get the arms sandblasted?
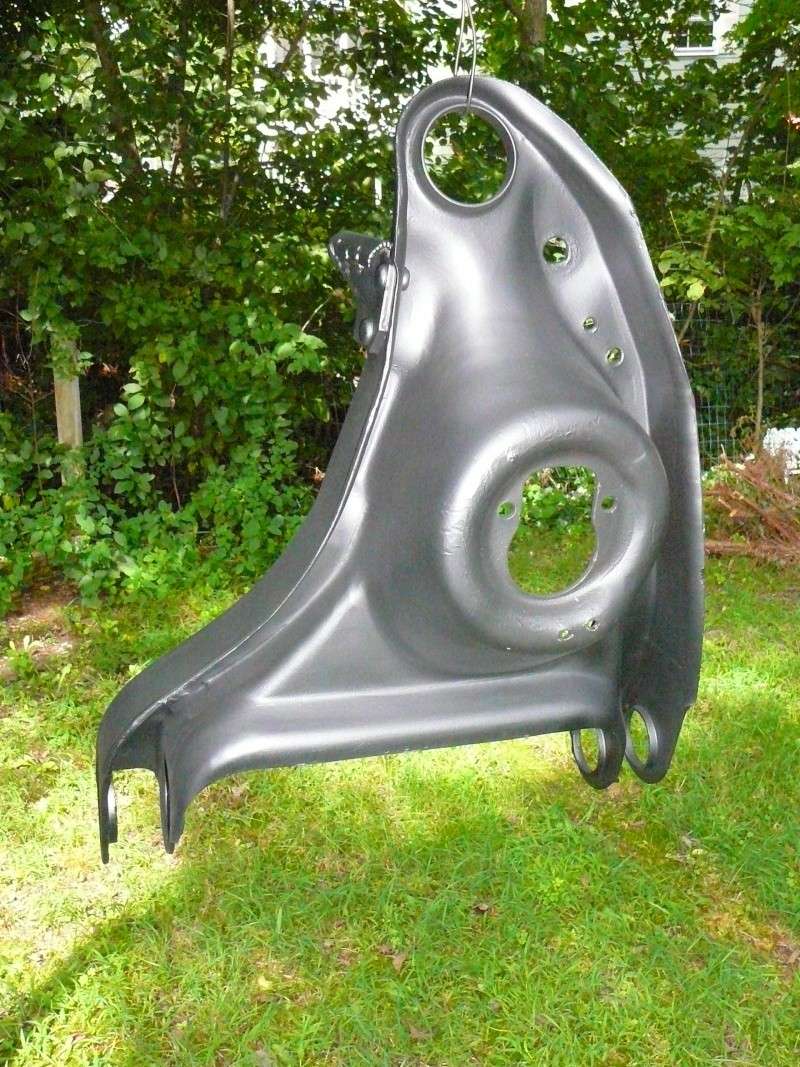
No need, they're in great condition, just using some wire wheels & my drill to remove the grease & surface rust. I did the other one some time ago. (page 19)
"This is Duplicolor flat black enamel over Por 15 & sealed with Duplicolor Acrylic Lacquer clear. (Used flash to get the color closer to what it actually looks like as it looks darker in the shade)."
77mali- Donating Member

- Street Cred : 62
 Re: 1977 Chevelle Malibu Classic Progress Photo's aka Mali
Almost looks like a new one hanging there. Looking good. I wish I had known you could rent those presses when I was doing my front suspension. Keep the updates coming.

driveit- Donating Member

- Street Cred : 15
 Re: 1977 Chevelle Malibu Classic Progress Photo's aka Mali
That's impressive Paul !! 
pila- Donating Member

- Street Cred : 43
 Re: 1977 Chevelle Malibu Classic Progress Photo's aka Mali
Thanks guys. I'm wicked picky...that's part of the reason this is taking such a gosh darn long time. Might as well do it right at this point with everything torn off. I'm killing myself to try & get her driving asap & am spending a lot of time restoring many parts that (to me) are worth restoring vs buying new.
Here's a pic of that same Lower C-Arm with no flash.


Here's a pic of that same Lower C-Arm with no flash.


77mali- Donating Member

- Street Cred : 62
 Re: 1977 Chevelle Malibu Classic Progress Photo's aka Mali
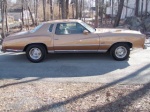
They look really nice Paul. One of these days I going to take mine apart again and redo it and paint it . I did it on my 77 Monte in 1997. I guess its time again.
ant7377- G3GM Addict

- Street Cred : 36
 Re: 1977 Chevelle Malibu Classic Progress Photo's aka Mali
I hope this restoration lasts that long Anthony. In 17 years I'll be to dang old to want to do this again. Maybe by then I can dip into retirement $$ & hire someone or maybe I'll enlist my boys by then?

77mali- Donating Member

- Street Cred : 62
 Re: 1977 Chevelle Malibu Classic Progress Photo's aka Mali
Just buy the damn car almost finished. I think its the best way to go there are so many half done projects out there for sale its worth it unless its something you gotta have. Id say paint is the biggest deal or a least a straight well worked on body.

ant7377- G3GM Addict

- Street Cred : 36
 Re: 1977 Chevelle Malibu Classic Progress Photo's aka Mali
I know it said those were flat black, but I thought that was silver with the flash on for sure. Looks great.

driveit- Donating Member

- Street Cred : 15
 Re: 1977 Chevelle Malibu Classic Progress Photo's aka Mali
Duplicolor has two "Flats". I used their "Ultra flat" on that arm. It does look kind of silver especially w/ the flash and is a very, very low luster. I'm going to paint the other w/ the regular flat & compare- then go with the one I like best.

77mali- Donating Member

- Street Cred : 62
 Re: 1977 Chevelle Malibu Classic Progress Photo's aka Mali
Take pics of everything and post. I just like to see what others are doing.

driveit- Donating Member

- Street Cred : 15
 Re: 1977 Chevelle Malibu Classic Progress Photo's aka Mali
Those look good! I wish I would have painted everything on the front end flat black-I think it looks better than the gloss I have. I'm a little too far along to change it though.

Hawk03- G3GM Enthusiast

- Street Cred : 18
 Re: 1977 Chevelle Malibu Classic Progress Photo's aka Mali
Hawk03 wrote:Those look good! I wish I would have painted everything on the front end flat black-I think it looks better than the gloss I have. I'm a little too far along to change it though.
I agree!! I really like the 2K semi-gloss and satin black from summit racing. That stuff is real tough. My frame is semi and I just sprayed my firewall satin.
Will post pics when I get the booster and wiper motor back on.

Joe73- Donating Member

- Street Cred : 83
 Re: 1977 Chevelle Malibu Classic Progress Photo's aka Mali
Thanks for the compliment. There are 3 coats each of paint and sealer on that control arm, plus the POR-15.
The tough part about flat black is keeping it looking good. I see a lot of "spray-bomb" jobs out there that have used inferior paints & no sealer (clear). They fade pretty quick when exposed to UV's & look like crap after a while. I sealed that arm with a clear lacquer in order to see how it would look and it's ok for suspension & engine bay parts, as there is little to worry about with those types of components & UV light exposure.
If I were to paint the body flat black I would choose something like the Duplicolor Paint Shop "Matte" clear vs. gloss or semi-gloss sealers. The matte finish will keep the flat paint looking good (and flat). I'd probably do at least four coats of each on the body, after 2 coats of primer.

77mali- Donating Member

- Street Cred : 62
 Re: 1977 Chevelle Malibu Classic Progress Photo's aka Mali
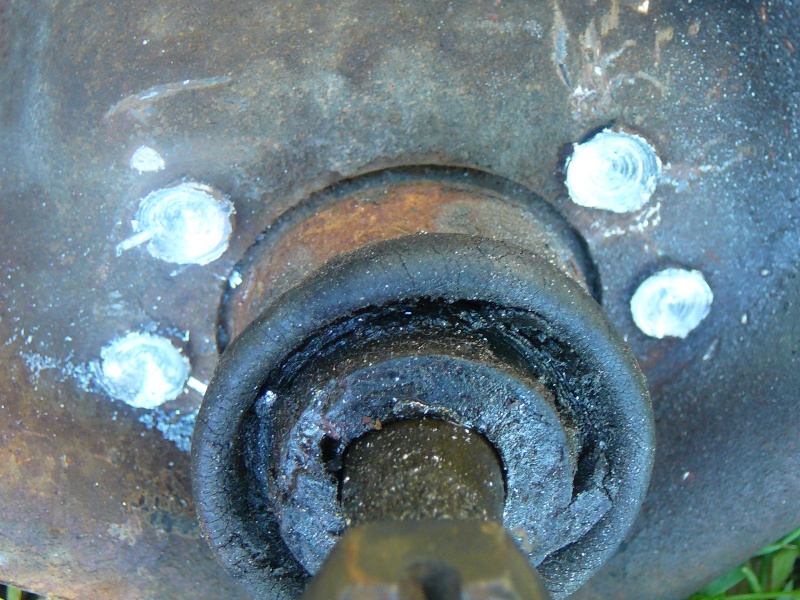
I ended up drilling out the rivets in the upper arms with a few sizes of carbide tipped masonry/concrete drill bits after using the Dremmel & slicing an "X" to center a pilot. Started off with a 1/8" bit for the pilot then 3/16" and finally a 3/8" to drill them almost down to the holes in the arm- being careful to leave a little bit to knock in with a chisel and not drill through the arm as this would change the diameter of the bolt holes. Took about 10-15 minutes per arm & worked like a charm. They practically fell out and only needed a little persuasion with a pointed chisel from my air chisel set by hand with a B F H.


77mali- Donating Member

- Street Cred : 62
 Re: 1977 Chevelle Malibu Classic Progress Photo's aka Mali
OK, what is that picture? lol

driveit- Donating Member

- Street Cred : 15
 Re: 1977 Chevelle Malibu Classic Progress Photo's aka Mali
That's looking up at the ball joint (from the stud end)driveit wrote:OK, what is that picture? lol
dynchel- Donating Member

- Street Cred : 40
 Re: 1977 Chevelle Malibu Classic Progress Photo's aka Mali
I had no idea. I kept trying to guess, but I was way off...

driveit- Donating Member

- Street Cred : 15
 Re: 1977 Chevelle Malibu Classic Progress Photo's aka Mali
Should have been more explicit in the text. Took ideas from everyone's suggestions earlier in the thread & kind of did the best of everything.

77mali- Donating Member

- Street Cred : 62
 Re: 1977 Chevelle Malibu Classic Progress Photo's aka Mali
So many parts ... so little time.
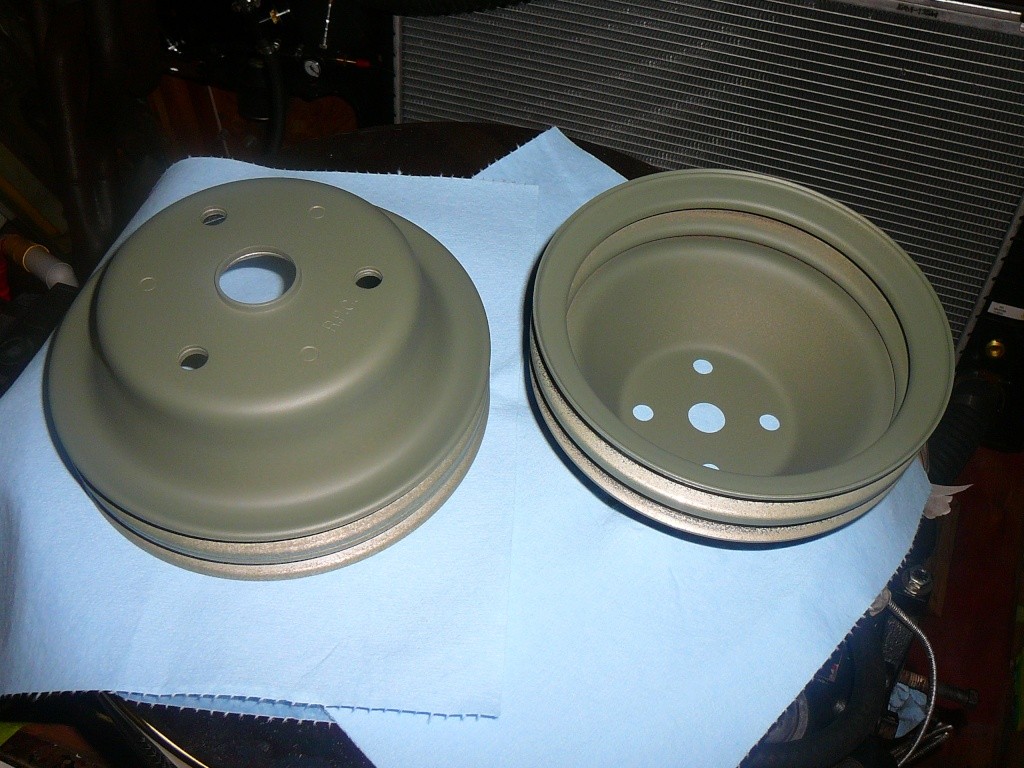
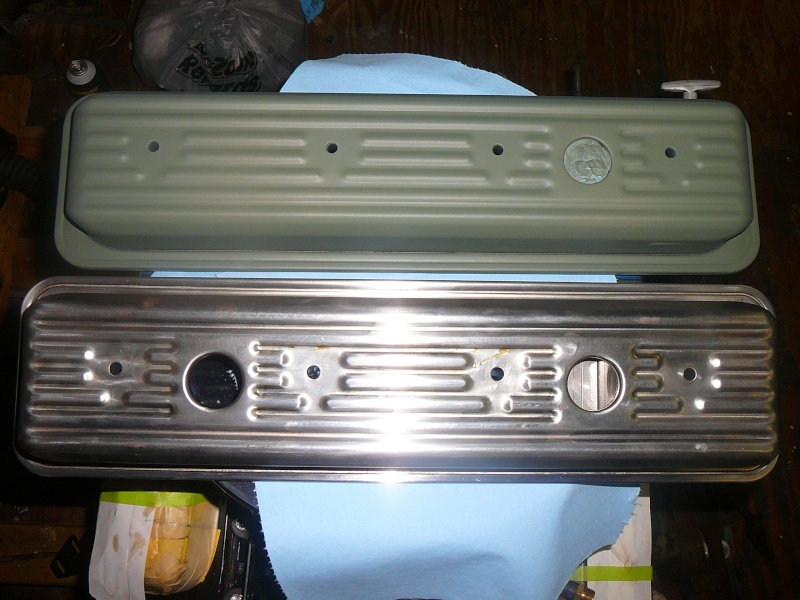
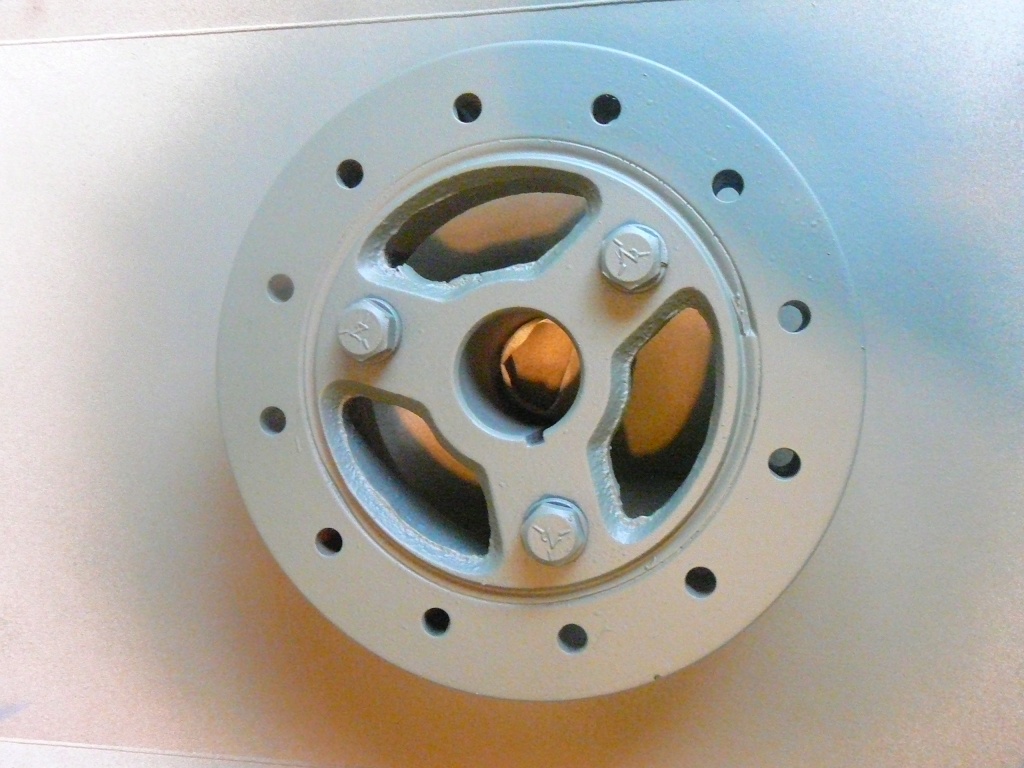
These are new pulleys which have dual slots for multiple belts. They came chromed but have been scuffed and hit with Duplicolor self-etch primer. They'll make it easier to install the A/C, if that day ever comes. Hand sanded my valve covers, which are also new and were already painted & on the motor. They got messed up during break-in, so-back to bare metal & trying again with hopefully better longevity. These parts will be coated with POR 20 (heat resistant) & then get a topcoat of the final color, then clear coated with Duplicolor clear engine enamel. Same thing for the balancer, less the accent color. Leaving that the same as the block.
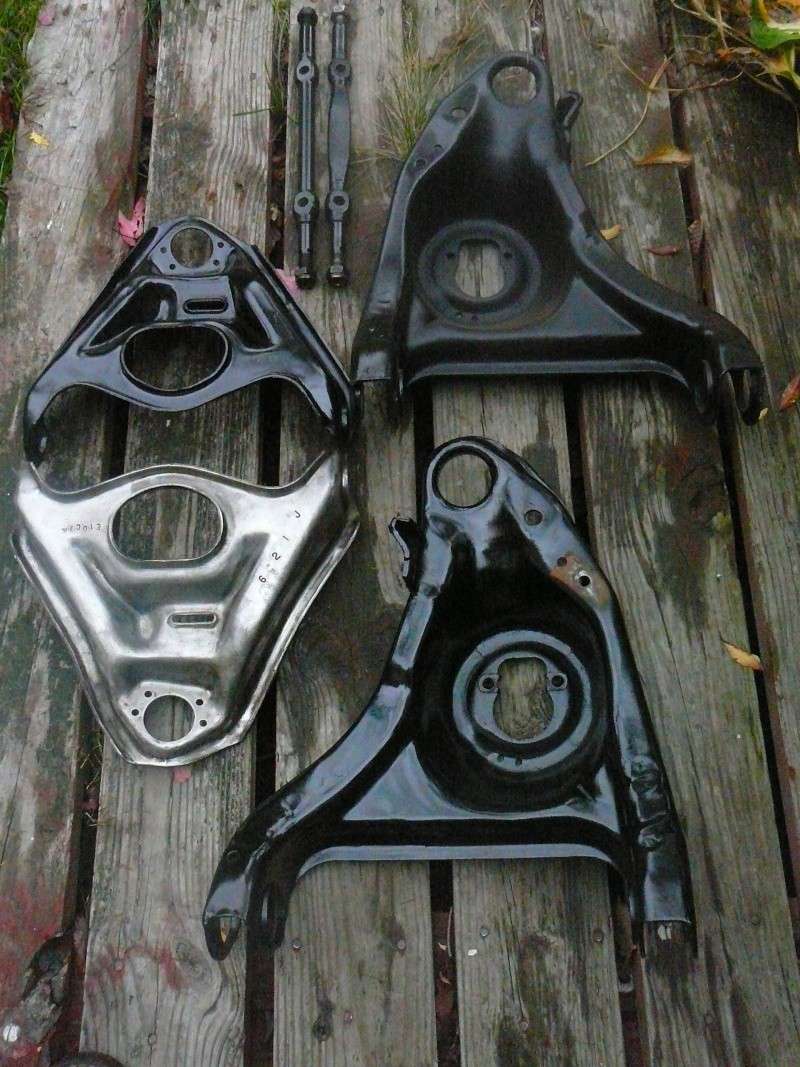
Made some progress also on the control arms & shafts, of course I forgot to take the bump stop off one before hand. Oh well. It's amazing that under all the paint, gunk, rust, etc..there are several ID numbers/date codes all over these things. Pretty cool. Still have one to go and to redo the one from "a long time ago". These were brought down to bare metal and coated with POR15 after treating them with the POR product I used on the Chevelle's roof (last summer?) LOL- it's all kind of blending in at this point time wise! I think I found a topcoat that I like for these parts & the fire-wall. We'll see, I'm going to try it over the upper arm that is done & see what it looks like compared to what I used on the lower arm that I did previously. More to come soon hopefully.
These are new pulleys which have dual slots for multiple belts. They came chromed but have been scuffed and hit with Duplicolor self-etch primer. They'll make it easier to install the A/C, if that day ever comes. Hand sanded my valve covers, which are also new and were already painted & on the motor. They got messed up during break-in, so-back to bare metal & trying again with hopefully better longevity. These parts will be coated with POR 20 (heat resistant) & then get a topcoat of the final color, then clear coated with Duplicolor clear engine enamel. Same thing for the balancer, less the accent color. Leaving that the same as the block.


Made some progress also on the control arms & shafts, of course I forgot to take the bump stop off one before hand. Oh well. It's amazing that under all the paint, gunk, rust, etc..there are several ID numbers/date codes all over these things. Pretty cool. Still have one to go and to redo the one from "a long time ago". These were brought down to bare metal and coated with POR15 after treating them with the POR product I used on the Chevelle's roof (last summer?) LOL- it's all kind of blending in at this point time wise! I think I found a topcoat that I like for these parts & the fire-wall. We'll see, I'm going to try it over the upper arm that is done & see what it looks like compared to what I used on the lower arm that I did previously. More to come soon hopefully.


77mali- Donating Member

- Street Cred : 62
 Re: 1977 Chevelle Malibu Classic Progress Photo's aka Mali
Progress Paul. Every little bit counts! Before you know it it will all be back together!

ant7377- G3GM Addict

- Street Cred : 36
 Re: 1977 Chevelle Malibu Classic Progress Photo's aka Mali
Nice work!!! Gret feeling putting nice clean parts back in that you worked hard on.

Joe73- Donating Member

- Street Cred : 83
 Re: 1977 Chevelle Malibu Classic Progress Photo's aka Mali
You are lookin' good Paul !! 
I use that self-etching primer quite a bit on aircraft parts, so I don't need to fire up a spray gun all the time.
Don't know if they will fit that engine, but I have the AC compressor brackets for the '77 around here if you need them for later etc.....
Bill
I use that self-etching primer quite a bit on aircraft parts, so I don't need to fire up a spray gun all the time.
Don't know if they will fit that engine, but I have the AC compressor brackets for the '77 around here if you need them for later etc.....
Bill
pila- Donating Member

- Street Cred : 43
 Re: 1977 Chevelle Malibu Classic Progress Photo's aka Mali
Thanks for the kind words Guys! More progress today- painted the water-pump, engine pully's, balancer, Alt bracket, fan, harmonic-balancer. Primed 1 control arm & the brake booster for final painting & I also POR-15'd the drive shaft. LOL, busy day! Found a nice flat black engine enamel- looks pretty stellar IMHO. Paint for the arms will be different though, gotta spray w/ my compressor & gun. Might let the rest of the arms sit a while until I redo the engine.
Bill- IDK if those brackets will work either, but please save 'em for now. I have part of the bracket assembly at least. I gotta check- thanks A LOT for the offer!
Bill- IDK if those brackets will work either, but please save 'em for now. I have part of the bracket assembly at least. I gotta check- thanks A LOT for the offer!

77mali- Donating Member

- Street Cred : 62
 Re: 1977 Chevelle Malibu Classic Progress Photo's aka Mali
Lookin' good, Paul! Feels good to clean up and paint rusty parts, huh?!
I've got a question since you mentioned the POR 15. Are you (or, has anyone else on here) coated the inside bottom of the doors? I get some water leakage when it rains and was wondering if that would be a good idea? Or, is it fine to leave as is as long as the drain holes are open and there isn't any crud laying along the bottom that can hold moisture?
I've got a question since you mentioned the POR 15. Are you (or, has anyone else on here) coated the inside bottom of the doors? I get some water leakage when it rains and was wondering if that would be a good idea? Or, is it fine to leave as is as long as the drain holes are open and there isn't any crud laying along the bottom that can hold moisture?
Mcarlo77- Donating Member

- Street Cred : 78
Page 25 of 27 •  1 ... 14 ... 24, 25, 26, 27
 Similar topics
» Clunkers and Classic YouTube build 1977 Malibu Classic
» '77 Chevelle Malibu Classic - Disco Malibu
» 74 Chevelle Malibu Classic 454 with a 4-speed
» '77 Chevelle Malibu Classic - Disco Malibu
» 74 Chevelle Malibu Classic 454 with a 4-speed
G3GM :: Media :: G3 Project Pictures
Page 25 of 27
Permissions in this forum:
You cannot reply to topics in this forum|
|
|


» Roll Call and Car showcase
» Central Texas Noob
» Welcome Keith Seymore
» Wanted: Front park lamp assemblies
» 75 Hurst Olds T-tpos
» G3 Chevy rims- help ID these
» 75 el camino project.
» Have had a few questions
» vinyl top removal