Front control arm interchange
+8
dynchel
pila
Limey SE
Pontichev327
wokrdan AKA BU Balls
Mcarlo77
Tom77
1973montec
12 posters
Page 1 of 4
Page 1 of 4 • 1, 2, 3, 4 
 Front control arm interchange
I do not think I would have a problem, but I thought I would ask. I am starting my front end work on my 1974 and I am replacing all the steering, bushings, ball joints, etc. I have a complete front suspension from a 1976 Laguna in my parts pile. Can I rebuild these upper and lower front arms and just swap them into the 1974 car with no issues? I just hate to rebuild these and find out they are different. I would buy bushings for a '76 not a '74. 
On a side note: Easiest way to remove the mounting shaft from the upper bushings and control arm? Does the metal sleeve come out with the uper bushings or do I need to reuse these?
On a side note: Easiest way to remove the mounting shaft from the upper bushings and control arm? Does the metal sleeve come out with the uper bushings or do I need to reuse these?
bitterfitter- Donating Member

- Street Cred : 9
 Re: Front control arm interchange
my guess is they should be the same.
the guy that did mine used a press.
not sure about sleeves,sorry.
the guy that did mine used a press.
not sure about sleeves,sorry.

1973montec- Donating Member

- Street Cred : 17
 Re: Front control arm interchange
iv'e gotten them out with a air hammer, and lots of pb blaster. if i remember correctly the sleeve stayed on the shaft and had to be removed seperatly. (air hammer also)

dynchel- Donating Member

- Street Cred : 40
 Re: Front control arm interchange
Thanks for the thoughts so far. If anyone has others; just chime in. I am all ears.
bitterfitter- Donating Member

- Street Cred : 9
 Re: Front control arm interchange
I usually clamp them in a vise and air chisel the metal can from the center of the shaft outwards. Never really had a difficult time getting them out. New rubber bushings will come with the cans all complete. Polyurethane usually come with the cans as well.

Joe73- Donating Member

- Street Cred : 83
 Re: Front control arm interchange
I used the crude method, suggested by others.....I burned the rubber bushings out. That made it easy to get apart.
My '75 Elco has '77 Elco front end parts, from the '77 I had to scrap. ( I bought that one new ..snif.. Like you, I did the spare parts, and then swapped them in. I believe the '73 had some differences in bushing diameters, but not sure about that.
My '75 Elco has '77 Elco front end parts, from the '77 I had to scrap. ( I bought that one new ..snif..
pila- Donating Member

- Street Cred : 43
 Re: Front control arm interchange
Yes, 73 has (2) different bushing diameters for the lower arms. So you would have to check what you have before you buy. But for your years, no problems.

Joe73- Donating Member

- Street Cred : 83
 Re: Front control arm interchange
So I took an hour or so but I removed the bushings from the upper and lower front control arms for one side. I have to ask; is it normal for the lower front control arms to have different size bushings for the front and back of the same arm? Also the uppers appear to have different sizes also on the same arm. I do not think this should be. But I took a new bushing and it has a snug fit in one side and is loss in the other side. Measures about a 1/16th of an inch difference. Now What Do I Do? This front arms are from a 1976 Laguna.
bitterfitter- Donating Member

- Street Cred : 9
 Re: Front control arm interchange
I just took a look at rockauto for a 76 laguna and yes they are all different bushings front to rear. Actually rockauto has some trw bushings for only 3 bucks on closeout and some other brand ones on closeout as well. Real cheap for rubber.

Joe73- Donating Member

- Street Cred : 83
 Re: Front control arm interchange
I will take a look. Thanks
bitterfitter- Donating Member

- Street Cred : 9
 Re: Front control arm interchange
I let Brownbomber77 do all the hard work. All I had to do was swap parts. Costs were about the same might want to try him to make your life easier.

Tom77- Donating Member

- Street Cred : 9
 Re: Front control arm interchange
I am one of those people that think the work is the fun part. I work out in the garage because I want to; not because I have to. I wouls hate to have to do this as a living.
bitterfitter- Donating Member

- Street Cred : 9
 Re: Front control arm interchange
bitterfitter wrote:I am one of those people that think the work is the fun part. I work out in the garage because I want to; not because I have to. I wouls hate to have to do this as a living.
I agree, as long as the tools and the time are in plentiful supply. For me lately, it's been finding the time.

thatfnthing- Donating Member

- Street Cred : 65
 Re: Front control arm interchange
Right now, with the snow storm; I can't help but lay under the chevelle on the heated floor and wrench away. Nothing else to do but ski....
bitterfitter- Donating Member

- Street Cred : 9
 Re: Front control arm interchange
bitterfitter wrote:I am one of those people that think the work is the fun part. I work out in the garage because I want to; not because I have to. I wouls hate to have to do this as a living.
Me also but with the constraints of the job and the home life time is the factor. Want to spend the time in it not under it if I can. LOL

Tom77- Donating Member

- Street Cred : 9
 Re: Front control arm interchange
That is true. Time is sometimes harder to find than the money. Usually it is BOTH....
bitterfitter- Donating Member

- Street Cred : 9
 Re: Front control arm interchange
just adding a pic of where I am at:
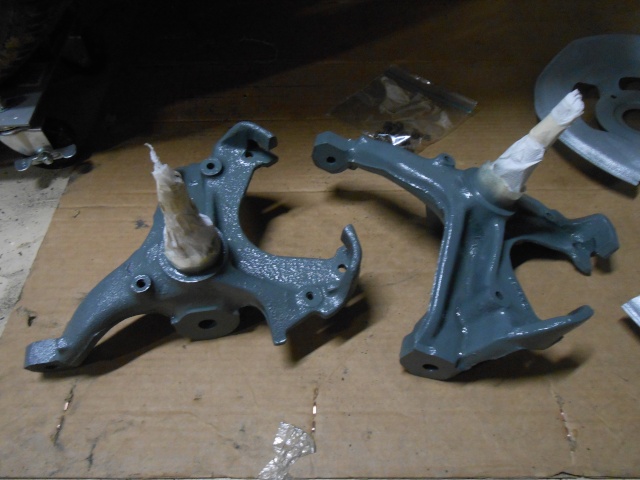 " />spindles are ready
 " />new poly bushings awaite for control arms, sway bar and end links
[img]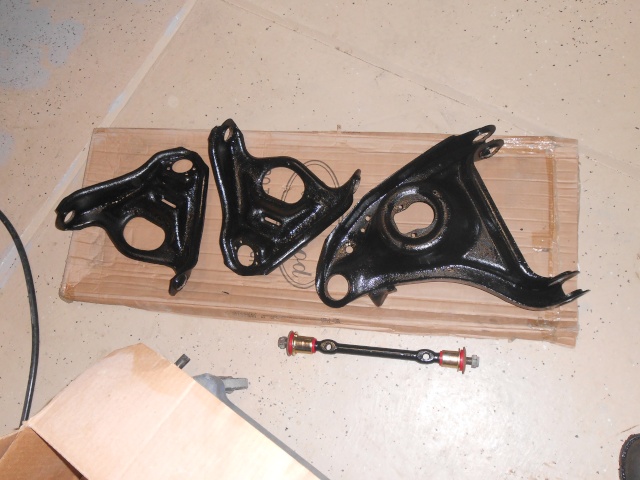 [/img]control arms are ckeaned and painted
 " />spindles are ready
 " />new poly bushings awaite for control arms, sway bar and end links
[img]
 [/img]control arms are ckeaned and painted
bitterfitter- Donating Member

- Street Cred : 9
 Re: Front control arm interchange
What color did you use for the spindles? Looks very similar to the factory silvery blue paint that was still found on some areas of my '75 Laguna spindles once I cleaned the dirt/grease off them.
Mcarlo77- Donating Member

- Street Cred : 78
 Re: Front control arm interchange
It is made by Plasti Kote and it is called Machinery Gray. Instalation of the ball joints and bushings is going well and should be done today. Once the springs arrive next week, I will be swapping everything over.
bitterfitter- Donating Member

- Street Cred : 9
 Re: Front control arm interchange
I swapped my bushings out 2 years ago. If you have an Advance Auto near you, they have a loaner tool that is made for removing/installing the bushings (I highly recommend getting this. It's free and all you have to pay is deposit). On a second note, there should be grease for the bushings. Use some of the grease on the outside of the bushing sleeves when putting them back in, it will make it a hell of a lot easier, and you need to put something between the two pieces of metal that the sleeve goes into to prevent them from bending and pinching together. Last thing, make sure you put the bars that connect the control arm to the frame back in the same spots. (The driver's side one is flat to allow clearance for the steering). Other than that, it should be a simple job. Biggest pain in the A$$ is installing the new bushings. If you do get that tool, I recommend using an impact gun to install them with.

wokrdan AKA BU Balls- G3GM Member

- Street Cred : 2
 Re: Front control arm interchange
Thanks for the tips. I did notice the upper control arm shafts were different so I have them in the correct locations. I also did notice getting the bushings in was pretty tight. What I did was use a flapper sandpaper disc on the end of my die grinder. I cleaned up the holes in the control armd first to make sure they were smooth and round. The ushings seemed to press right in on my shop press. I did the same for the ball joints also. For the temperary spacers, I used differnt size sockets to hold the arms apart. I just found the best size and pushed it in there. I put them in perpendicular and I tapped them out when done.
Now I just need my springs to arrive, and I can install.
Now I just need my springs to arrive, and I can install.
bitterfitter- Donating Member

- Street Cred : 9
 Re: Front control arm interchange
This should have been mentioned earlier, but if you put the bushings in the freezer overnight they contract, and thereforecare easier to install.

dynchel- Donating Member

- Street Cred : 40
 Re: Front control arm interchange
So I had a little time last night, so I decided to get a start on the front end replacement. Car in air, one front tire off and started to compress the spring. PROBLEM: I do not know if anyone else has run into this, but I think the spring compressor is too long. It is the type that goes up the middle of the spring. I put the one set of fingers at the top of the coil; on the first open coil. I placed the other set of fingers on the first open coil from the bottom. As I started to thread the center bolt to compress it went for a little and then became difficult. As the bolt threads up the center, it passes by the first set of fingers at the top and continues up towards the spring pocket. I was still about 1" from starting to compress the spring when the top end of the bolt was bottoming out in the upper spring pocket!
The only way I can figure on trying to get this done would be to put about a 3" long piece of steel pipe between the bottom fingers and the washers on the head of the bolt from the puller. This should space the bolt down about 3" extra inches and allow me to compress it enough. I still need to have enough bolt threads to release the spring safely once out.
Anyone else ever run into this? Who would figure such an easy thing would get so difficult????
bitterfitter- Donating Member

- Street Cred : 9
 Re: Front control arm interchange
If you aren't going to reuse your current springs you could always cut them in two or three pieces (a oxy acedelene torch is best) that will relieve the tension.

dynchel- Donating Member

- Street Cred : 40
Page 1 of 4 • 1, 2, 3, 4 
Page 1 of 4
Permissions in this forum:
You cannot reply to topics in this forum|
|
|


» Roll Call and Car showcase
» Central Texas Noob
» Welcome Keith Seymore
» Wanted: Front park lamp assemblies
» 75 Hurst Olds T-tpos
» G3 Chevy rims- help ID these
» 75 el camino project.
» Have had a few questions
» vinyl top removal