Engine Mount help
+6
DiscoMalibu
jerry46765
77ElClassic
pila
1973 454 MONTE
Sinister
10 posters
G3GM :: G3 Tech :: Engine & Driveline
Page 1 of 2
Page 1 of 2 • 1, 2 
 Engine Mount help
Which bolt(s) do you remove if you want the engine mount sections to stay on the frame & the block? Are they located in the middle between the two? I looked at this yesterday while removing the core & front bumper but can't seem to make sense of it right now... 
I think walking the bumper assembly to the workshop from the driveway may have caused a small embolism in my brain & I can't find the darn Haynes manual...
I think walking the bumper assembly to the workshop from the driveway may have caused a small embolism in my brain & I can't find the darn Haynes manual...

77mali- Donating Member

- Street Cred : 62
 Re: Engine Mount help
these are held on with 3 bolts to the block

which is connected to these with one bolt


which is connected to these with one bolt

1973 454 MONTE- Donating Member

- Street Cred : 36
 Re: Engine Mount help
All Gm is different..in your case just remove the bolt,the engine and clam shells will come right out,the rubber parts stay on the frame.
My Trans Am is the same.
My le mans has the rubber mounts on the engine,the metal clam shells on the frame.
My Trans Am is the same.
My le mans has the rubber mounts on the engine,the metal clam shells on the frame.
Sinister- G3GM Member

- Street Cred : 0
 Re: Engine Mount help
Chris
Is the one bolt that connects the two under the top of that clam shell? In other words, you can't see it looking at it from the top of the engine bay?
How do you get at it? Does it bolt through from the bottom @ the frame rail?
Is the one bolt that connects the two under the top of that clam shell? In other words, you can't see it looking at it from the top of the engine bay?
How do you get at it? Does it bolt through from the bottom @ the frame rail?

77mali- Donating Member

- Street Cred : 62
 Re: Engine Mount help
There's just one long bolt on each side. One usually faces/points forward, because there's no room to get it out the other way, and the other faces aft..backward...I forget which is which...
Take a look with a mirror, or look up from the bottom side, and you will see what I'm describing. Actually they make engine removal & installation easy.
Take a look with a mirror, or look up from the bottom side, and you will see what I'm describing. Actually they make engine removal & installation easy.
pila- Donating Member

- Street Cred : 43
 Re: Engine Mount help
Thanks guy's, appreciate the replies. I'll take a closer look this week.

77mali- Donating Member

- Street Cred : 62
 Re: Engine Mount help
If you look behind the fuel pump you should see a nut. Some mounts have an incased nut mounted to the mount cause it's hard to get a wrench on it.
Last edited by 1973 454 MONTE on Sun May 20, 2012 9:08 pm; edited 1 time in total

1973 454 MONTE- Donating Member

- Street Cred : 36
 Re: Engine Mount help
The head of the bolt is 5/8. Nut is 11/16

1973 454 MONTE- Donating Member

- Street Cred : 36
 Re: Engine Mount help
Some motor mounts have a captive nut,but most just use a nut and bolt.
You'll need a wrench on one side to hold the nut and a socket to remove the long bolt.
You'll need a wrench on one side to hold the nut and a socket to remove the long bolt.

Sinister- G3GM Member

- Street Cred : 0
 Re: Engine Mount help
OK....I get it now...I have to get on my back and pretend the mount is a front bumper bolt like whats on the bumper shocks. THANKS!

77mali- Donating Member

- Street Cred : 62
 Re: Engine Mount help
The Caddy North Star engine doesn't have the starter underneath, so crawling around under it doesn't work. The starter is mounted UNDER the intake manifold !!...which is made of plastic on the one I worked on.
pila- Donating Member

- Street Cred : 43
 Re: Engine Mount help
OK guys, sorry to continue this discussion....
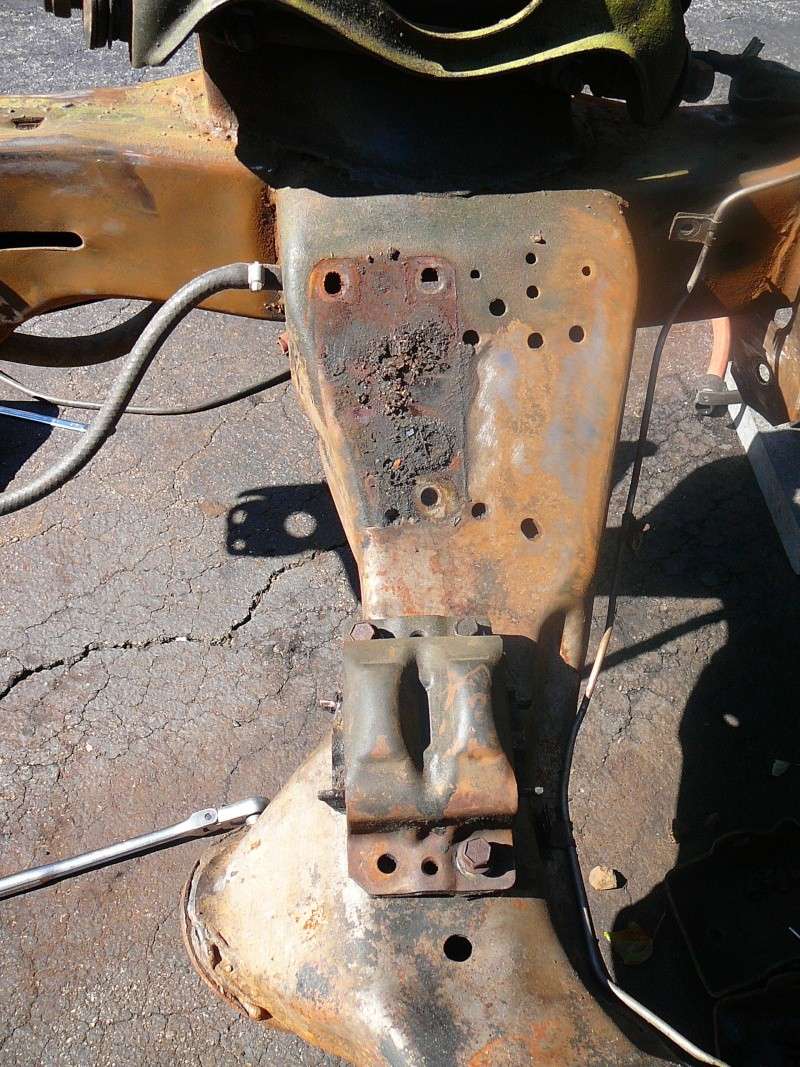
I want to take the bottom half off now to clean & paint the frame underneath them. There is all kinds of suspension parts in my way and there are no holes in the frame that have a direct "straight line" to the bolt head on the underside where I need to get a socket or wrench in order to hold it down to keep from spinning...is there a special tool for this? Stupid books I have don't mention this....Here's a pic of them

I want to take the bottom half off now to clean & paint the frame underneath them. There is all kinds of suspension parts in my way and there are no holes in the frame that have a direct "straight line" to the bolt head on the underside where I need to get a socket or wrench in order to hold it down to keep from spinning...is there a special tool for this? Stupid books I have don't mention this....Here's a pic of them

Last edited by 77mali on Tue Jul 24, 2012 7:27 pm; edited 1 time in total

77mali- Donating Member

- Street Cred : 62
 Re: Engine Mount help
In the 28 years and 22 montes , I've never taken these off.

1973 454 MONTE- Donating Member

- Street Cred : 36
 Re: Engine Mount help
It looks impossible to get at the bolt heads on the underside without taking off the springs & control arms I'm guessing.

77mali- Donating Member

- Street Cred : 62
 Re: Engine Mount help
You need a 9/16" UNIVERSAL socket to get on the bolt heads under there, along with a long extension to get up between suspension arms etc. It's likely easier with a helper to hold the nuts, but I work alone and didn't have any real problem with those.
I also used the same holes plus an added hole, to bolt the Caddy mounts in my project.

this pic is before the holes were drilled.....
I also used the same holes plus an added hole, to bolt the Caddy mounts in my project.

this pic is before the holes were drilled.....

Last edited by pila on Tue Jul 24, 2012 7:44 pm; edited 1 time in total
pila- Donating Member

- Street Cred : 43
 Re: Engine Mount help
I just bought one of those along with a new 1/2" drive wrench... my extention is about 12" (does it need to be longer?)...I tried every angle imaginable to reach them...do you remember where exactly you lined it up? Did you have the shocks on or off, was thinking that may help?

77mali- Donating Member

- Street Cred : 62
 Re: Engine Mount help
I rarely use 1/2" drive tools, but you may need another few inches on the extension. The 3/8" drive extensions probably fit up through there easier.
pila- Donating Member

- Street Cred : 43
 Re: Engine Mount help
I have an adapter on the 1/2" Universal to fit 3/8" and was using the 3/8" extension & socket. I bought the 1/2" for the bigger stuff like the bolts on the control arms for a bit more leverage in tight spots. I'll keep trying I'm sure it's not impossible. If I could get my hand in there to place a socket, I'd be all set...

77mali- Donating Member

- Street Cred : 62
 Re: Engine Mount help
I tried everything on mine as well. In my case, the rubber was broken on the left mount. I ended up cutting the bolts off and dragging the bolts out with a magnet. I had a tool that came with a Reese hitch I bought for my truck. It was basically a small spring, 3/8" in diameter and about an inch long. One end of this spring ended with a straight piece of wire about 30" long. I was able to thread the new bolts into the spring end and then worm the long wire end thought the frame and out the desired holes, thus pulling the bolt through where I needed it.
A lot of guys just weld solid mounts in place though.
A lot of guys just weld solid mounts in place though.
77ElClassic- Donating Member

- Street Cred : 5
 Re: Engine Mount help
Take a short box end wrench and insert it in the slotted hole in the frame where gas line exits the frame. Then use any rachet or wrench to remove the nuts. Gently remove bolts which will be in the box end wrench.
You can also use a combination of 3/8" rachets with u-joints and extensions from underneath though the lower control arm mounts holes.
It can be done.
You can also use a combination of 3/8" rachets with u-joints and extensions from underneath though the lower control arm mounts holes.
It can be done.
jerry46765- Donating Member

- Street Cred : 20
TW Monte likes this post
 Re: Engine Mount help
I think I'll try again this week sometime. What a pain this is.
Thanks for the suggestions!
Thanks for the suggestions!

77mali- Donating Member

- Street Cred : 62
 Re: Engine Mount help
I think I had the control arms off of my car when I changed the mounts, the rubber was shot. I changed my control arm bushings and ball joints with the control arms out. I think it made it easier to reach up and grab those motor mount bolts. Although I pulled the mounts off of my '80 El Camino because they were like new. That car had all of it's suspension components intact. It's a pain but it's most definately possible. I may have used a 3/8" flex end to get em off along with the right length of 3/8" extensions.

DiscoMalibu- G3GM Member

- Street Cred : 7
 Re: Engine Mount help
With all the suspension stuff out of the way it was easy access right through the frame on my back. One of the bolts required a 9/16" box wrench on the inside while turning the opposite side with a 9/16" socket. The other two were easy- direct access though frame holes & a double socket attack- LOL. I have not tried the other side as it is still assembled. Think I'll wait to remove the other mount until after I tear it down.

77mali- Donating Member

- Street Cred : 62
 Re: Engine Mount help
Just an update as I recently removed the drivers side mount a little differently this time.
There really is no easy way to get the bottom half out with the suspension stuff in the way. Personally I think it's nearly impossible & what a pain in the butt. I was able to use a small 9/16" offset wrench on the bottom side & just stuck my hand up in the frame while using a 9/16" socket wrench topside.
There really is no easy way to get the bottom half out with the suspension stuff in the way. Personally I think it's nearly impossible & what a pain in the butt. I was able to use a small 9/16" offset wrench on the bottom side & just stuck my hand up in the frame while using a 9/16" socket wrench topside.

77mali- Donating Member

- Street Cred : 62
 Re: Engine Mount help
Maybe I got lucky but when I removed mine I simply spun the hell out of the nuts with a fast air wrench while putting side pressure on the bolts.
They eventually spun off. When I put the NEW bolts back in I snaked them into their holes with a Harbor Freight $3 four jaw flexable pick up tool. Started them by hand and finished them tight with the air wrench again then checked them with a box end wrench to make sure they were tight. Replaced them both in about 20 min.
They eventually spun off. When I put the NEW bolts back in I snaked them into their holes with a Harbor Freight $3 four jaw flexable pick up tool. Started them by hand and finished them tight with the air wrench again then checked them with a box end wrench to make sure they were tight. Replaced them both in about 20 min.

SSTOOLMAN- Donating Member

- Street Cred : 7
Page 1 of 2 • 1, 2 
G3GM :: G3 Tech :: Engine & Driveline
Page 1 of 2
Permissions in this forum:
You cannot reply to topics in this forum|
|
|


» Roll Call and Car showcase
» Central Texas Noob
» Welcome Keith Seymore
» Wanted: Front park lamp assemblies
» 75 Hurst Olds T-tpos
» G3 Chevy rims- help ID these
» 75 el camino project.
» Have had a few questions
» vinyl top removal