Spring/C-Arm Tool
+3
riddick75
clanceman427
ant7377
7 posters
Page 1 of 1
 Spring/C-Arm Tool
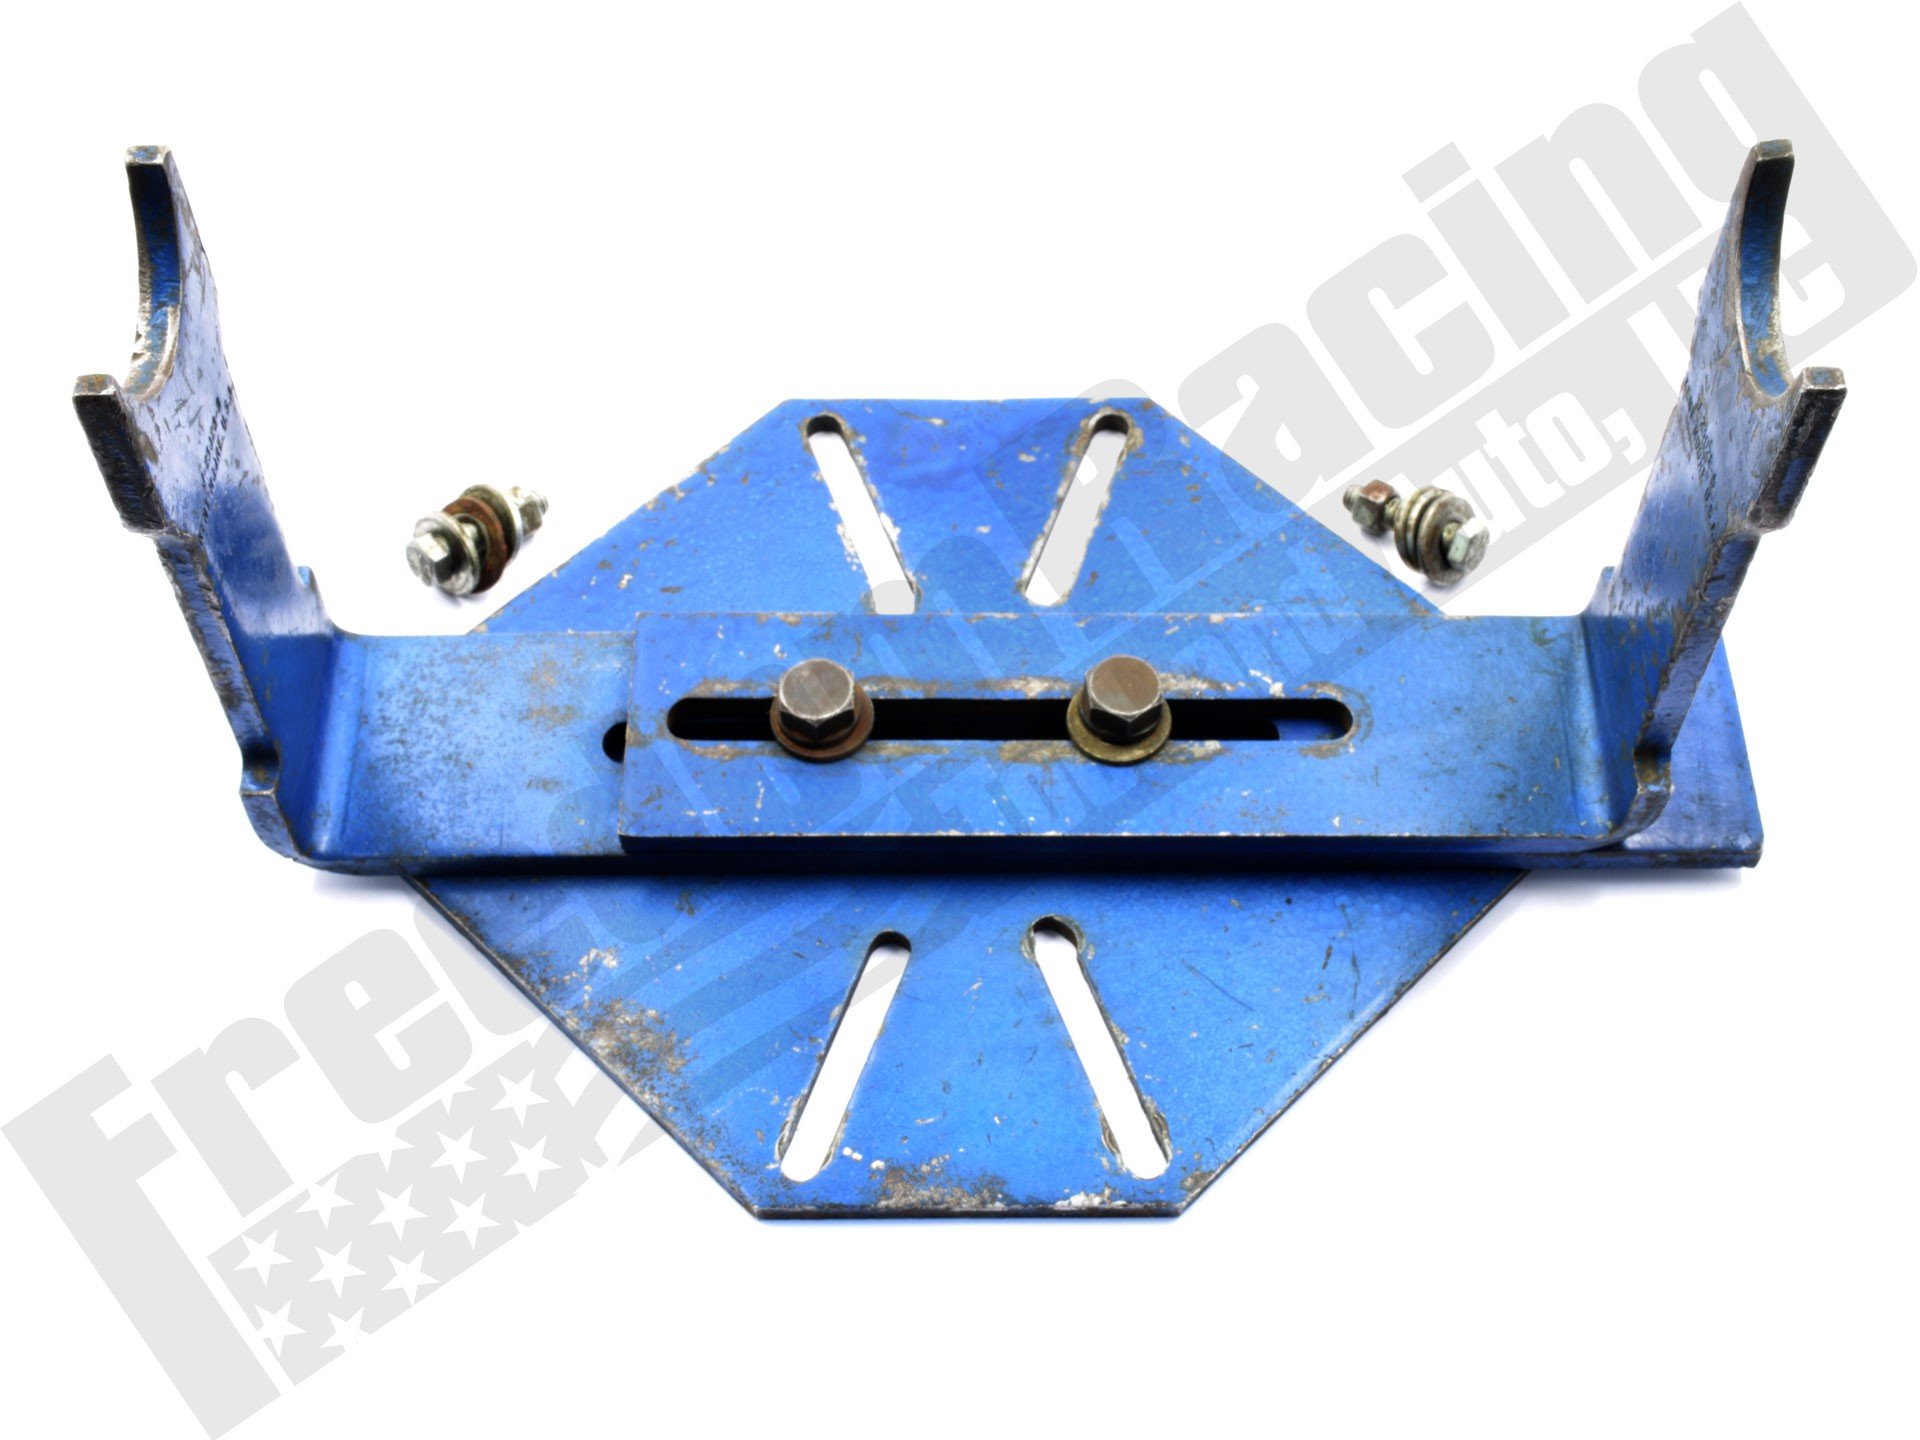
Anyone familiar with this old school tool? Got one lying around collecting dust?

77mali- Donating Member

- Street Cred : 62
 Re: Spring/C-Arm Tool
I dont recall ever seeing something like that.
If its for control arm bushings I just used my cheapo ball joint press kit from harbor freight. Comes with all the necessary cups and spacers. $40 kit. Made it real easy to install my control arm bushings and ball joints instead of using my press.
I made a pipe that goes between the ears of the control arm while pressing. That way you dont press the "ears" together and screw things up.
And use masking tape on all the cups and spacers not to mess up newly painted parts.
Or you can come by and use my stuff anytime.

Joe73- Donating Member

- Street Cred : 83
 Re: Spring/C-Arm Tool
I made a tool similar to that, but it wasn't for the bushings......it was for jacking on the lower control arm..
pila- Donating Member

- Street Cred : 43
 Re: Spring/C-Arm Tool
pila wrote:I made a tool similar to that, but it wasn't for the bushings......it was for jacking on the lower control arm..
Exactly!
Looking for a used one on the cheap
Having a bear of a time w/ the engine out of the car getting the springs & lower C-arms to line up correctly. The spring needs to "bend" up into the frame and no box store "spring compressor" tool will work. I tried two styles and every other way possible. Worse comes to worse I will make something out of some 4x4's & angle iron. I will need to jack the rear of the C-arms up into the frame to bolt them in place while the spring is lined up & secured properly to the lower arm.
Joe73 wrote:I dont recall ever seeing something like that.
If its for control arm bushings I just used my cheapo ball joint press kit from harbor freight. Comes with all the necessary cups and spacers. $40 kit. Made it real easy to install my control arm bushings and ball joints instead of using my press.
I made a pipe that goes between the ears of the control arm while pressing. That way you dont press the "ears" together and screw things up.
And use masking tape on all the cups and spacers not to mess up newly painted parts.
Or you can come by and use my stuff anytime.
Thanks for the kind offer Joe. I got all the bushings in- that was the easy part.

77mali- Donating Member

- Street Cred : 62
 Re: Spring/C-Arm Tool
Yes its difficult getting springs in without the weight of the engine.
I did my front springs without the engine last summer. Took my time and the first one took about 30 min. To install. Second one, abour 15 min.
I used an internal compressor. Took the upper arms off the tbreads so I just had the long bolt and the bottom hooks which tbread on tbe bolt.
I first bolted on, loosely, my lower arm and let it hang straight down verticle out of the way.
Install the upper arm also loosely.
Then take the hook part off the threaded compressor bolt, add a wasber to the bolt, and insert from the top down through your shock bolt hole in the frame. But the bottom hooks back on the threads.
Slide yout spring up into its frame pocket and put tbe hooks on it to hold. Rotate the spring to orient the bottom end of the spring tbat it will cover at least one of the orient holes in the lower arm cup. Not supposed to cover both holes.
Then start tighening the compresskr bolt to suck the spring up into the frame pocket.
Put your spindle on the upper ball joint. Swing the lower arm up to see how sbe looks.
Once you knkw the orient is good and the lower ball joint can go into the spindle, put the nut on but dont torque anything yet.
Now you will notice to spring has to move towards the engine to seat in its lower cup. Tap the spring with a block of wood and hammer til she seats. You will probably have to loosen the compressor bolt a little as you go.
You will have three small paint scratches on your lower arm. One in the center of the arm from when the spring was being pushed toward the engine. And one on eash side of the cup. Three very small scratches tbat are easily touched up. You might not even notice them.
Please forgive any spelling errors above. Im typing on my phone in my treestand waiting deer to come by. Lol
Any questions just ask.

Joe73- Donating Member

- Street Cred : 83
 Re: Spring/C-Arm Tool
LMAO- Get that Deer!
Thanks for the reply. I tried that method, not working for me. For some reason the tool which you describe & I have (rented- autozone) does not seat flat on my frame & I scratched the *uck out of it trying to make it work through the shock hole. Gonna go a different route.
Thanks for the reply. I tried that method, not working for me. For some reason the tool which you describe & I have (rented- autozone) does not seat flat on my frame & I scratched the *uck out of it trying to make it work through the shock hole. Gonna go a different route.

77mali- Donating Member

- Street Cred : 62
 Re: Spring/C-Arm Tool
Really? The tbreaded rod with the nut welded on the end should slide right in and sit flat.
Any idea why its not flat?
Btw, one doe went by. My buddy is having alot of activity but no big does or bucks with more than 4 points. Need to have at least 3 points on one side to be legal in my area. Antler restriction.
Any idea why its not flat?
Btw, one doe went by. My buddy is having alot of activity but no big does or bucks with more than 4 points. Need to have at least 3 points on one side to be legal in my area. Antler restriction.

Joe73- Donating Member

- Street Cred : 83
 Re: Spring/C-Arm Tool
Paul. Get some fat friends to come over and stand on the front of the frame and go to work! I hate to say it but that might work!
ant7377- G3GM Addict

- Street Cred : 36
 Re: Spring/C-Arm Tool
Joe73 wrote:Really? The tbreaded rod with the nut welded on the end should slide right in and sit flat.
Any idea why its not flat?
Btw, one doe went by. My buddy is having alot of activity but no big does or bucks with more than 4 points. Need to have at least 3 points on one side to be legal in my area. Antler restriction.
No Idea why, the washer is the problem and they are not bent or anything, it's just weird. It rubs against the frame where the welded "bend" is for the upper C-arm behind the shock hole. It really did a job on the frame, I'm going to have to grind it smooth & repaint that section.
ant7377 wrote:Paul. Get some fat friends to come over and stand on the front of the frame and go to work! I hate to say it but that might work!
LOL...not going to go there!

77mali- Donating Member

- Street Cred : 62
 Re: Spring/C-Arm Tool
I will come up. Buy me a burger. I ll sit there and hold down the car.

ant7377- G3GM Addict

- Street Cred : 36
 Re: Spring/C-Arm Tool
Maybe get a thicker piece of metal and drill a hole in it. Use it as a washer with a small piece under one side of it to level it. And put a piece of cardbkard on the frame first so stuff doesnt get scratched. Or tape up the pieces.
Once you figure it out it does quick. I did my first one with a buddy and tbe second by myself.
Once you figure it out it does quick. I did my first one with a buddy and tbe second by myself.

Joe73- Donating Member

- Street Cred : 83
 Re: Spring/C-Arm Tool
http://m.ebay.com/itm/Kent-Moore-J-22739-Front-Coil-Spring-Remover-Installer-Tool-/281558674710?nav=SEARCH
Paul found this one on ebay.
Paul found this one on ebay.

ant7377- G3GM Addict

- Street Cred : 36
 Re: Spring/C-Arm Tool
Paul, would this help you?
http://transamcountry.com/community/index.php?topic=4042.msg40322#msg40322
http://transamcountry.com/community/index.php?topic=4042.msg40322#msg40322

ant7377- G3GM Addict

- Street Cred : 36
 Re: Spring/C-Arm Tool
I found them online too- and found that F-body thread also. The correct P/N is J-23028, according to my service manual. There are numerous "components" that go along with it like "-01" etc. Depending on what type of car/truck you're working on but the one I posted is designed to fit our style arms. I really don't want to spend the money for one so I'll prob just make something up.
Thank you for all the feedback fellas.
Thank you for all the feedback fellas.

77mali- Donating Member

- Street Cred : 62
 Re: Spring/C-Arm Tool
when I put my front springs in I didn't even have the weight of the body, just the frame. what i did was compress the spring with the compressor the most I felt comfortable with (seemed like the screw was starting to strip). I set it in the bottom arm and lined it up where it should go in the frame. took my floor jack and some strong straps and basically turned it into a press.
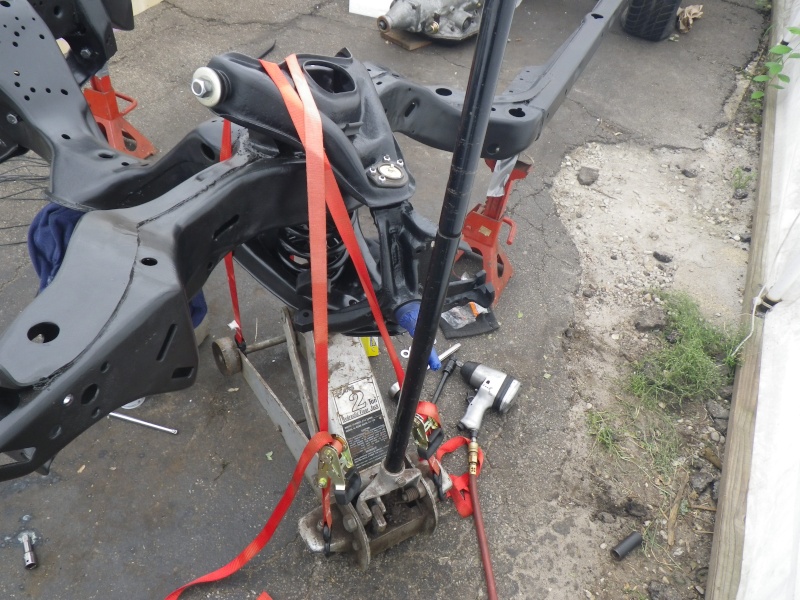
started jacking till I could get the knuckle bolted, granted it was probably dumb but it worked, probably a few extra straps as safety would have been good, but I just worked quickly. Just throwing an idea out there if you haven't got them in yet.

started jacking till I could get the knuckle bolted, granted it was probably dumb but it worked, probably a few extra straps as safety would have been good, but I just worked quickly. Just throwing an idea out there if you haven't got them in yet.

riddick75- G3GM Member

- Street Cred : 6
 Re: Spring/C-Arm Tool
Thanks for posting.
I saw a similar method on youtube the other day. I'll most likely do something very similar. The only things I'd change is maybe using the spring compressor tool through the bottom of the lower arm just to hold it on so it doesn't pop out. I'll need a bigger jack too like what you have. Curious if you know what those straps are rated for?
I saw a similar method on youtube the other day. I'll most likely do something very similar. The only things I'd change is maybe using the spring compressor tool through the bottom of the lower arm just to hold it on so it doesn't pop out. I'll need a bigger jack too like what you have. Curious if you know what those straps are rated for?

77mali- Donating Member

- Street Cred : 62
 Re: Spring/C-Arm Tool
I'd just watch the straps getting cut on any sharp metal edges. I always put the spring in a vice on the last coil and use the impact wrench to quickly compress the spring.
clanceman427- G3GM Enthusiast

- Street Cred : 16
 Re: Spring/C-Arm Tool
Or just use the threaded bolt and threaded hooks from an internal spring compressor. Put a washer on the bolt and drop it through the shock hole in the frame. Then suck the spring up into the frame pocket. Then install the arm easily.
I know some have had a problem getting it done this way. But I was super easy and quick for me. Did it by myself in a very short time.
BTW, I'd install your motor mounts prior to putting the lower arm in place. Way easier to get to the bolts without that arm in the way.
I know some have had a problem getting it done this way. But I was super easy and quick for me. Did it by myself in a very short time.
BTW, I'd install your motor mounts prior to putting the lower arm in place. Way easier to get to the bolts without that arm in the way.

Joe73- Donating Member

- Street Cred : 83
 Re: Spring/C-Arm Tool
I had the compressor tool in there, think it was the center one but the hole on the top of the pocket was too small to fit the tool so I had to work it from the bottom.
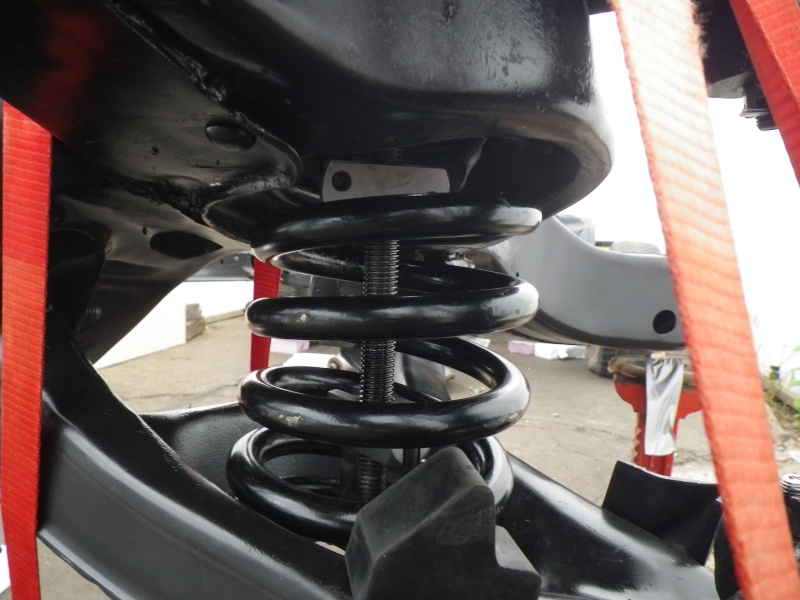
I tried with the tool on the lower arm but trying to swing the arm up the spring wouldn't move the way I needed it to, so I compressed the spring separate of the arms, set it in the top pocket, brought up the lower arm so the spring was lined up the best I could, got the jack in place and held and went from there. Not sure what the straps are rated for and being I didn't know how much force I was dealing with It wouldn't matter, in this case ignorance was bliss. lol don't get me wrong it did concern me if the straps would break thats why I made sure I was at least out of the firing direction of both the spring and strap snap back. For all I know it might have been the same video I watched that gave me the idea.

I tried with the tool on the lower arm but trying to swing the arm up the spring wouldn't move the way I needed it to, so I compressed the spring separate of the arms, set it in the top pocket, brought up the lower arm so the spring was lined up the best I could, got the jack in place and held and went from there. Not sure what the straps are rated for and being I didn't know how much force I was dealing with It wouldn't matter, in this case ignorance was bliss. lol don't get me wrong it did concern me if the straps would break thats why I made sure I was at least out of the firing direction of both the spring and strap snap back. For all I know it might have been the same video I watched that gave me the idea.

riddick75- G3GM Member

- Street Cred : 6
 Re: Spring/C-Arm Tool
Thanks , Someone sent that to me. I love that one.

Joe73- Donating Member

- Street Cred : 83
 Re: Spring/C-Arm Tool
I did the same thing but used a chain wrapped around the bottom of the jack and wrapped through the upper control arm for stability.
brownbomber77- G3GM Member

- Street Cred : 4
 Re: Spring/C-Arm Tool
We being car-nuts, we can usually figure out a way to do things, even without all the special ( read $$) tools to get the job done 
pila- Donating Member

- Street Cred : 43
Page 1 of 1
Permissions in this forum:
You cannot reply to topics in this forum|
|
|


» Roll Call and Car showcase
» Central Texas Noob
» Welcome Keith Seymore
» Wanted: Front park lamp assemblies
» 75 Hurst Olds T-tpos
» G3 Chevy rims- help ID these
» 75 el camino project.
» Have had a few questions
» vinyl top removal