Roadcaptain's 77 Build Thread.
+13
thatfnthing
77mali
knightfan26917
Mcarlo77
Limey SE
michiganlarry
Hawk03
dynchel
ant7377
chevellelaguna
Joe73
bigredlaguna
pila
17 posters
G3GM :: Media :: G3 Project Pictures
Page 3 of 4
Page 3 of 4 •  1, 2, 3, 4
 Re: Roadcaptain's 77 Build Thread.
Thanks!
I'm gettin' soft in my old age. I don't remember ever even using the belts in my old 74.
Scared to get in a car without them now. Pu$$.
I'm gettin' soft in my old age. I don't remember ever even using the belts in my old 74.
Scared to get in a car without them now. Pu$$.

Roadcaptain S3- Donating Member

- Street Cred : 26
 Re: Roadcaptain's 77 Build Thread.
Roadcaptain S3 wrote:You should. It's pretty easy and the results are usually really good. Be careful applying though, it's thin and can run easily if you spray it too close. Several thin, light coats
works best, and if your item has a heavy grain you mess it up.
well thjis will be a temporary fix cause all the vinyl in my car is sun damaged all to hell..... you don't even want to know what the dash looks like.
but eventually I want one of the old horse shoe shifters from the true chevelles. I think they look amazing.
wunderlich_33- G3GM Member

- Street Cred : 4
 Re: Roadcaptain's 77 Build Thread.
what about these captain
https://www.opgi.com/chevelle/1976/interior-accessories/seat-accessories/463230/
https://www.opgi.com/chevelle/1976/interior-accessories/seat-accessories/463230/

wunderlich_33- G3GM Member

- Street Cred : 4
 Re: Roadcaptain's 77 Build Thread.
Might do those temporarily.
But the big empty holes in the roof would bug me. Plus, no air bags/shoulder belts + collision = broken chest or dead for sure.
But the big empty holes in the roof would bug me. Plus, no air bags/shoulder belts + collision = broken chest or dead for sure.

Roadcaptain S3- Donating Member

- Street Cred : 26
 Re: Roadcaptain's 77 Build Thread.
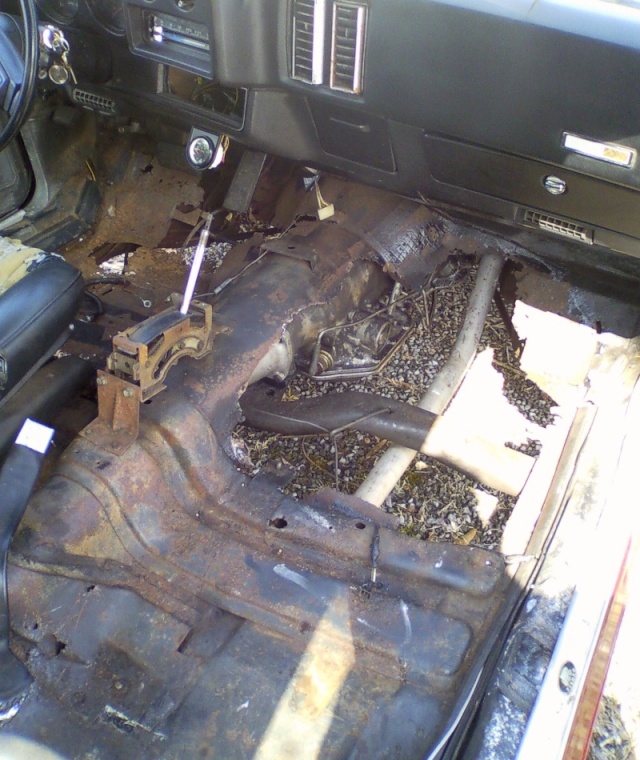
One more question ( I don't mean to be a pain) but did you have to go underneath the car to remove the console, is the tranny going to be in the way of removing it? ( casing it out before I get started) . I could only fine two small screws aside from the 4 holding the shifter plate in place. and they were at the from of the flip up part of the console..... what am I missing here?

wunderlich_33- G3GM Member

- Street Cred : 4
 Re: Roadcaptain's 77 Build Thread.
I had a bench seat, I've converted to buckets.
You shouldn't have to get under the car to take it out.
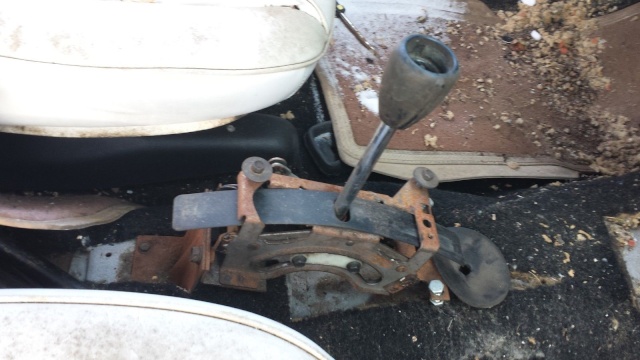
Pics pulled from another site:

 " />
" />

 " />
" />
As far as I can tell, the front console bracket is tack welded (I think) the rear shifter bracket is bolted.
I'm trying to find the brackets for mine now. I found one for the front, but it's from a 70-72. It might work.
You shouldn't have to get under the car to take it out.
Pics pulled from another site:
 " />
" /> " />
" />As far as I can tell, the front console bracket is tack welded (I think) the rear shifter bracket is bolted.
I'm trying to find the brackets for mine now. I found one for the front, but it's from a 70-72. It might work.

Roadcaptain S3- Donating Member

- Street Cred : 26
 Re: Roadcaptain's 77 Build Thread.
Do not need to get under the car to remove the floor console. It's pretty easy, really. What you need to do is remove the storage box, shifter plate and top half of console to expose some mtg bolts.
Probably know this already, but the shifter knob needs to come off before you can separate the shifter A$$'y from the console.
Probably know this already, but the shifter knob needs to come off before you can separate the shifter A$$'y from the console.
Mcarlo77- Donating Member

- Street Cred : 78
 Re: Roadcaptain's 77 Build Thread.
yeah mine is the swivel seats. which seem to grab a lot of attention.
Okay just two brackets and a few bolts.
I wasn't sure if it was clipped in (as was suggested to me ) and didn't want to pull up on some 40 year old abs/vinyl clips and have them snap like my seat belt holders that attached to the head of the seats.
but sounds simple enough.
Ill be honest ive never rebuilt/worked on a car before purchasing the laguna two years ago. we always had hot rods I just wasn't allowed anywhere near them. so ive got a lot of research ahead of me.

wunderlich_33- G3GM Member

- Street Cred : 4
 Re: Roadcaptain's 77 Build Thread.
Two things I should have expounded upon...there are two screws at the front of the upper half of the console that need to come out (in addition to the two you found in front of the storage box lid) in order to lift that section off the console base. Hard to see sometimes; especially if dirt and grime have covered up the screw heads.
Secondly, the storage box lid needs to be in the "up" position so the spring hinge can clear the side of the box opening.
Ask if you have any questions.
Secondly, the storage box lid needs to be in the "up" position so the spring hinge can clear the side of the box opening.
Ask if you have any questions.

Mcarlo77- Donating Member

- Street Cred : 78
 Re: Roadcaptain's 77 Build Thread.
Mcarlo77 wrote:Two things I should have expounded upon...there are two screws at the front of the upper half of the console that need to come out (in addition to the two you found in front of the storage box lid) in order to lift that section off the console base. Hard to see sometimes; especially if dirt and grime have covered up the screw heads.
Secondly, the storage box lid needs to be in the "up" position so the spring hinge can clear the side of the box opening.
Ask if you have any questions.
my spring hinge broke of awhile back as all the laguna storage box lids seem to do. so its attached by a regular hing on the side. so I hope the internal part of the hinge wont be an issue, probably dropped through.

wunderlich_33- G3GM Member

- Street Cred : 4
 Re: Roadcaptain's 77 Build Thread.
Roadcaptain S3 wrote:" />
The mats came from Auto Custom Carpets (ACC). They were the ONLY comapny I could find that had the right color and the "Malibu Classic" embroidery.
COOL mats!
Love the color combo.
Cort
1979 & 1989 Caprice Classics | pigValve, paceMaker, cowValve
"Everybody wants love to be easy" __ Nitty Gritty Dirt Band __ 'Stand A Little Rain'

knightfan26917- G3GM Senior Member

- Street Cred : 8
 Re: Roadcaptain's 77 Build Thread.
Thanks Cort.
I was gonna go for black embroidery, but I kinda like the subtle look a little better.
I was gonna go for black embroidery, but I kinda like the subtle look a little better.

Roadcaptain S3- Donating Member

- Street Cred : 26
 Re: Roadcaptain's 77 Build Thread.
YW!
Hmmm ... I agree about the subtle look for the embroidery. I think the black would've stood out a bit too much, if that makes sense. However ... a light-dark brown might've been an interesting choice.
Cort www.oldcarsstronghearts.com
1979 & 1989 Caprice Classics | pigValve, paceMaker, cowValve
"I know there's so much more to life" __ Vonda Shepard __ 'Searchin' My Soul (Ally McBeal)'
Hmmm ... I agree about the subtle look for the embroidery. I think the black would've stood out a bit too much, if that makes sense. However ... a light-dark brown might've been an interesting choice.
Cort
1979 & 1989 Caprice Classics | pigValve, paceMaker, cowValve
"I know there's so much more to life" __ Vonda Shepard __ 'Searchin' My Soul (Ally McBeal)'

knightfan26917- G3GM Senior Member

- Street Cred : 8
 Re: Roadcaptain's 77 Build Thread.
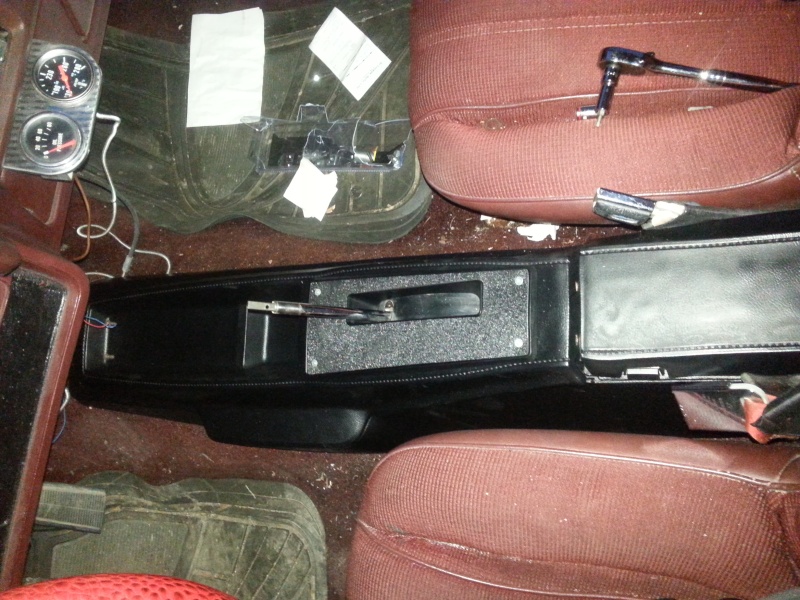
hey captain, thanks to your instructions i got an almost new center console lol. i sadly never remember to take before photos. but it was the stock maroon and badly beaten up. 100% improvement.


wunderlich_33- G3GM Member

- Street Cred : 4
 Seat belt Solution...at last!
The swivels were in and the mounting points did not work for factory swivel belts that I paid $$$ for. #*#!
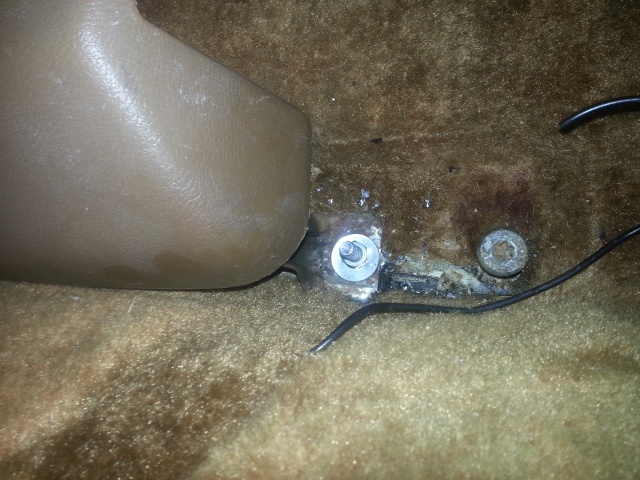
Heres with the drivers seat all the way forward...note the star bolt for the seat belt base. When the seat was all the way back (like it has to be to fit my fat butt) the seat trim piece and slide rails covered the bolt. Obviously, the stock swivel belt base stopped the seat from going back far enough.

 " />
" />
I searched and read, couldn't find too much about belts anywhere.So then I posted here whining about it. Wally (bless him) said he used some Camaro belts in his ride. I poked around a bit and came up with some from a 93 Z28. Even got the right color. I THINK any belts from a 93-02 Camaro or Firebird will work, but not 100% on that. These mostly were plug and play.
This is next to the factory bench belt (chevelle top, Z28 bottom). Note that the Z28 belt does NOT have a retractor on the bottom end, just a steel plate with plastic sleeve. That's kinda important for seat clearance.

 " />
" />
Note the roof retractors are ALMOST identical...more on that in a minute..Chevelle-red,Camaro-black

 " />
" />
The retractor bolted right up to the roof, BUT the cover wouldn't allow the belt to slide in and out. I had to trim the cover just a little bit to allow for proper install. You can see it here:

 " />
" />
The floor mount bolted right in, as did the female side of the belt. I was even able to leave the sleeve intact since it bent enough to allow the seat to slide back.
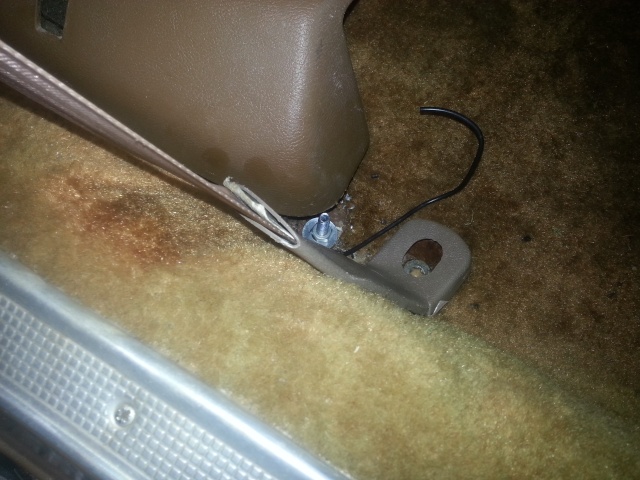
Seat forward:

 " />
" />
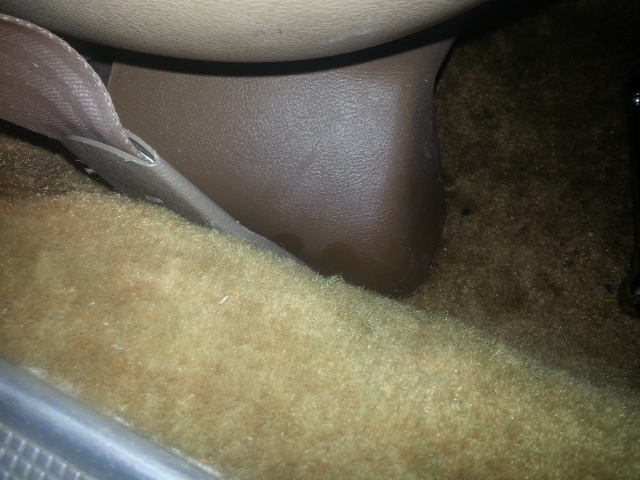
Seat all the way back:

 " />
" />
So there it is, problem solved...nearly drove me bat****. If you want to update your belts to something a little newer, or if you've swapped out the bench or if you just want that damn stock retractor out of the middle of the floor, look for 93-02 Camaro or firebird belts.

 " />
" />

 " />
" />
Now I have to figure out how to get some guides on without tearing up the seats...Wally?
Heres with the drivers seat all the way forward...note the star bolt for the seat belt base. When the seat was all the way back (like it has to be to fit my fat butt) the seat trim piece and slide rails covered the bolt. Obviously, the stock swivel belt base stopped the seat from going back far enough.
 " />
" />I searched and read, couldn't find too much about belts anywhere.So then I posted here whining about it. Wally (bless him) said he used some Camaro belts in his ride. I poked around a bit and came up with some from a 93 Z28. Even got the right color. I THINK any belts from a 93-02 Camaro or Firebird will work, but not 100% on that. These mostly were plug and play.
This is next to the factory bench belt (chevelle top, Z28 bottom). Note that the Z28 belt does NOT have a retractor on the bottom end, just a steel plate with plastic sleeve. That's kinda important for seat clearance.
 " />
" />Note the roof retractors are ALMOST identical...more on that in a minute..Chevelle-red,Camaro-black
 " />
" />The retractor bolted right up to the roof, BUT the cover wouldn't allow the belt to slide in and out. I had to trim the cover just a little bit to allow for proper install. You can see it here:
 " />
" />The floor mount bolted right in, as did the female side of the belt. I was even able to leave the sleeve intact since it bent enough to allow the seat to slide back.
Seat forward:
 " />
" />Seat all the way back:
 " />
" />So there it is, problem solved...nearly drove me bat****. If you want to update your belts to something a little newer, or if you've swapped out the bench or if you just want that damn stock retractor out of the middle of the floor, look for 93-02 Camaro or firebird belts.
 " />
" /> " />
" />Now I have to figure out how to get some guides on without tearing up the seats...Wally?
Last edited by Roadcaptain S3 on Wed Apr 15, 2015 6:16 pm; edited 4 times in total

Roadcaptain S3- Donating Member

- Street Cred : 26
 Re: Roadcaptain's 77 Build Thread.
Thank you sir...not perfect, but much better than nothing.
I hated that factory retractor in the middle of the back floor.
I hated that factory retractor in the middle of the back floor.

Roadcaptain S3- Donating Member

- Street Cred : 26
 Re: Roadcaptain's 77 Build Thread.
That came out really nice! Good work!

thatfnthing- Donating Member

- Street Cred : 65
 Re: Roadcaptain's 77 Build Thread.
calm down buddy. gm uses the same hole for the bracket that holds the back leg of the swivel. than they put another hole for the seat belt. please see pics
driver side- left bolt would be stock location for a bench seat retractor. right bolt is factory location for bucket seat retractor
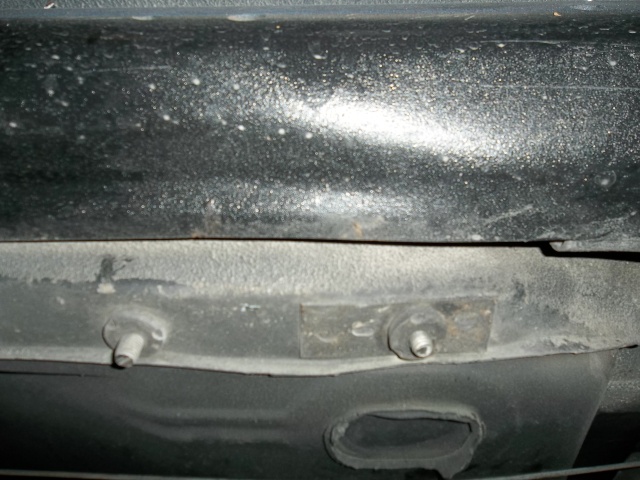
seat is all the way forword
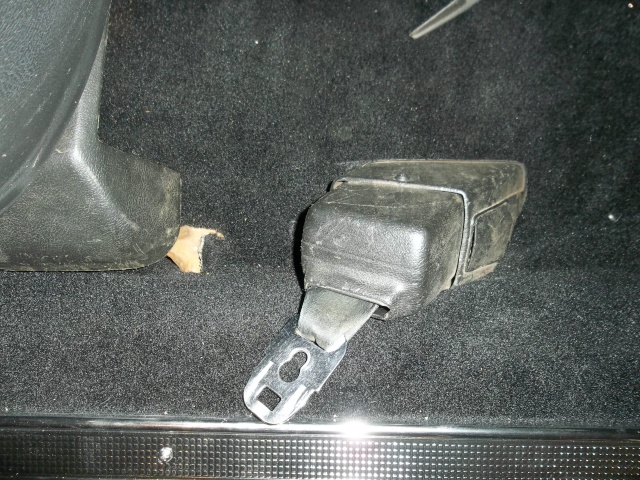
seat is all the way back
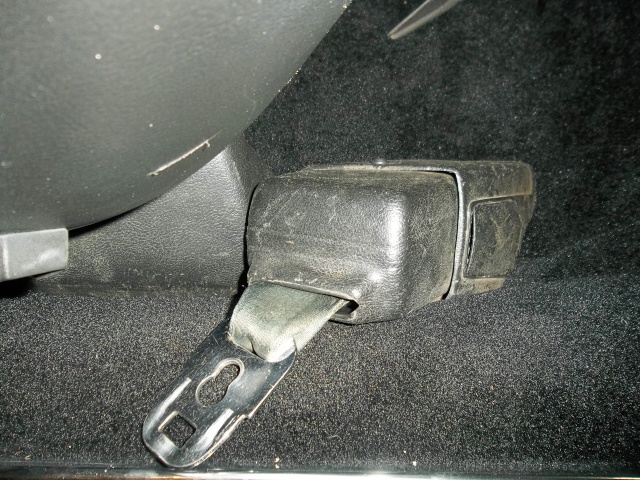
driver side- left bolt would be stock location for a bench seat retractor. right bolt is factory location for bucket seat retractor

seat is all the way forword

seat is all the way back


1973montec- Donating Member

- Street Cred : 17
 Re: Roadcaptain's 77 Build Thread.
Thanks.
Hmmm. Maybe different for 77 or a bench seat car?
My car doesn't have the right hand hole.
Either way, kinda like the camaro belts better. Cheaper too.
Hmmm. Maybe different for 77 or a bench seat car?
My car doesn't have the right hand hole.
Either way, kinda like the camaro belts better. Cheaper too.
Last edited by Roadcaptain S3 on Sat Apr 25, 2015 9:06 am; edited 1 time in total

Roadcaptain S3- Donating Member

- Street Cred : 26
 Re: Roadcaptain's 77 Build Thread.
its good to know about the Camaro belts.
I know a guy building one hell of a 75 laguna and he says where he lives hes not allowed to have anything other then a stock belt in the car so hes been trying to find one for about 2 years now. I think the camaro ones would pass inspection though.
hes just not allowed after market safety equipment.
good job though. its nice when you get another piece of the puzzle

wunderlich_33- G3GM Member

- Street Cred : 4
 Re: Roadcaptain's 77 Build Thread.
tain/>
[color=#cc00ff]Now I have to figure out how to get some guides on without tearing up the seats...Wally?[/quote]
That's a hard one as its Vinyl. When I do Upholstery I put the screws in the seat before the cover goes on then push down on cover to find the screws and mack a small "x" with a razor blade and back them out. Not sure who did your covers but feel around by pushing with your thumb and see if you can feel a screw head. If its a fabric seat you can use a pin and push in to find the hole. You may have to do that on the vinyl to find the hole.
I need two of the retainers in black. I have the piece that bolts to the seat. I think some one sells new ones now days.

Wallyuph- Donating Member

- Street Cred : 31
 Re: Roadcaptain's 77 Build Thread.
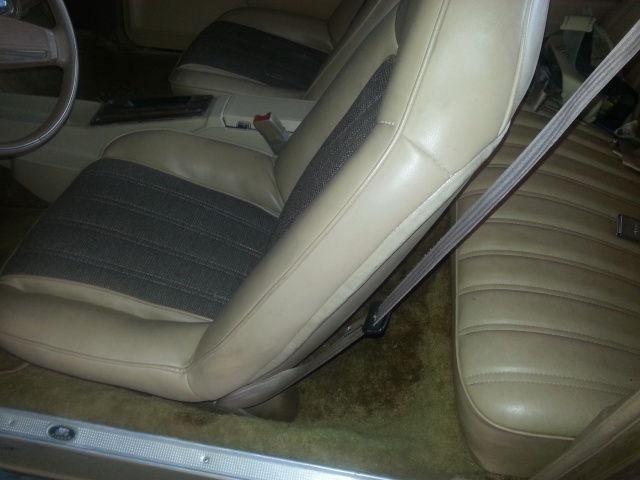
I've poked around on the vinyl and can't feel anything in the normal area to mount to. I THINK these seats may be from a 73 without the shoulder belt. I can feel the upper edge of the seat and may try mounting them there.
As it is, the shoulder belts cuts across high and at a weird angle like you can see in the pic.
I might have some retainers...I'll check the pile and pm you.
As it is, the shoulder belts cuts across high and at a weird angle like you can see in the pic.
I might have some retainers...I'll check the pile and pm you.

Roadcaptain S3- Donating Member

- Street Cred : 26
 Re: Roadcaptain's 77 Build Thread.
Do a Google image search for the seats to see the location for them in general they are down the side a bit.

Wallyuph- Donating Member

- Street Cred : 31
Page 3 of 4 •  1, 2, 3, 4
 Similar topics
» 1974 chevelle build thread
» The interchangability thread
» repro wheels that can be fitted wth OEM hubcaps
» The interchangability thread
» repro wheels that can be fitted wth OEM hubcaps
G3GM :: Media :: G3 Project Pictures
Page 3 of 4
Permissions in this forum:
You cannot reply to topics in this forum|
|
|


» Roll Call and Car showcase
» Central Texas Noob
» Welcome Keith Seymore
» Wanted: Front park lamp assemblies
» 75 Hurst Olds T-tpos
» G3 Chevy rims- help ID these
» 75 el camino project.
» Have had a few questions
» vinyl top removal