R&R brake booster and install vacuum pump & reservoir
3 posters
G3GM :: G3 Tech :: Engine & Driveline
Page 1 of 1
 R&R brake booster and install vacuum pump & reservoir
As we know, when the Monte Carlo was introduced in 1970, it was Chevrolet’s foray into the personal luxury car (PLC) market and was described by some as a “muscle car in a velvet glove.” Unfortunately, government emissions regulations stripped her of her muscle the very next year thus initiating what’s since been called the Malaise era “muscle” cars. For the second generation, Chevrolet made significant improvements to handling & drivability, and offered a dizzying array of luxury options but they continued to supply their cars with anemic engines.
Today (50 years later), those limitations don’t apply so much anymore, be it because the car is considered too old to require a smog certification or the ability to retrofit an LSX engine thus the “muscle car” part of the description no longer has to be wishful thinking. Being that I’m an old school guy, I’ve stuck with a carbureted small block Chevrolet (SBC) engine the entire time I’ve owned her, with each iteration I’ve put in her being a little more powerful than the one before. One of the things I’ve noticed as I’ve gone with more powerful engines was that the “glove” lost some of its velvetiness. To spell it out, options such as air conditioning (A/C) and cruise control (CC) require fair amounts of engine vacuum to operate as intended. In the case of the CC, vacuum becomes an issue when the road goes uphill and the CC transducer meters vacuum to the servo to open the throttle. As the throttle opens, vacuum is reduced thus starving the servo of the vacuum it needs to open the throttle. Talk about being torn between two lovers. Anyway, to get more power from an SBC, you need a bigger cam shaft. A big cam has more overlap – the time where both the intake and exhaust valves are open – which won’t allow the engine to pull much vacuum during idle compared to a stock cam. This is mostly noticed when using power assisted brakes in stop-and-go traffic and while parking.
The easiest, least expensive and most common solution for the lack of vacuum needed by the brake booster has been to install an auxiliary vacuum reservoir/canister in-line between the engine and booster to store vacuum the engine produces at higher RPMs. The canister is simply an empty tank with an input and an output port, nothing to wire up, can be mounted anywhere and are 100% silent. Though it helps, the canister can be depleted with frequent use of the brakes at low RPM like in a traffic jam or drive-thru. Some of you may opt for upgrading to a hydro-boost system. I’ll address my reservation about that in a moment. A more expensive solution to the vacuum problem is installing a vacuum pump. These have been used on production cars for decades, mainly on cars equipped with turbo chargers or some other forced induction system. The beauty with one of these is even if the engine quits while you’re rolling down the highway, as long as you have power to the pump, you have brakes, unlike hydro-boost systems. A pump is, however, more complex than a canister. It needs to be supplied with 12-volt current, must be mounted where it’s not likely to be exposed to water, away from exhaust heat, and needs a vacuum sensor to regulate when the pump goes on and off, and can make some unpleasant noise. For my application – powerful daily driver with creature comforts –, I chose to install both a pump and an auxiliary reservoir, which has a vacuum gauge on it, for the best of both worlds.
Whenever I make any kind of change to my car that differs from the original configuration, I like it to be clean and uncluttered, and I put thought into future maintenance. To make space for this upgrade, I decided to “delete” the fuel vapor carbon canister (FVCC). The issue with deleting the FVCC is what to do about managing the fuel vapors generated in the fuel tank. In the way-back days, fuel vapors were simply vented to the atmosphere. I don’t mind the subtle aroma of gasoline but when it’s constant, it could mask the presence of a fuel leak. The purpose of the FVCC is to collect and capture those vapors until such time as they could be purged into the carburetor. One of the clever things GM did was to have the purge valve built into the carb. The port on the carb for the FVCC is ported vacuum. I connected the fuel tank vent line that originally went to the FVCC directly to the FVCC port on the carb. My observations are no gasoline smell, no release of pressure or vacuum when I remove the gas cap to fill the tank, and engine starting is only occasionally slightly rough – probably a little rich from the increased concentration of fuel vapor.
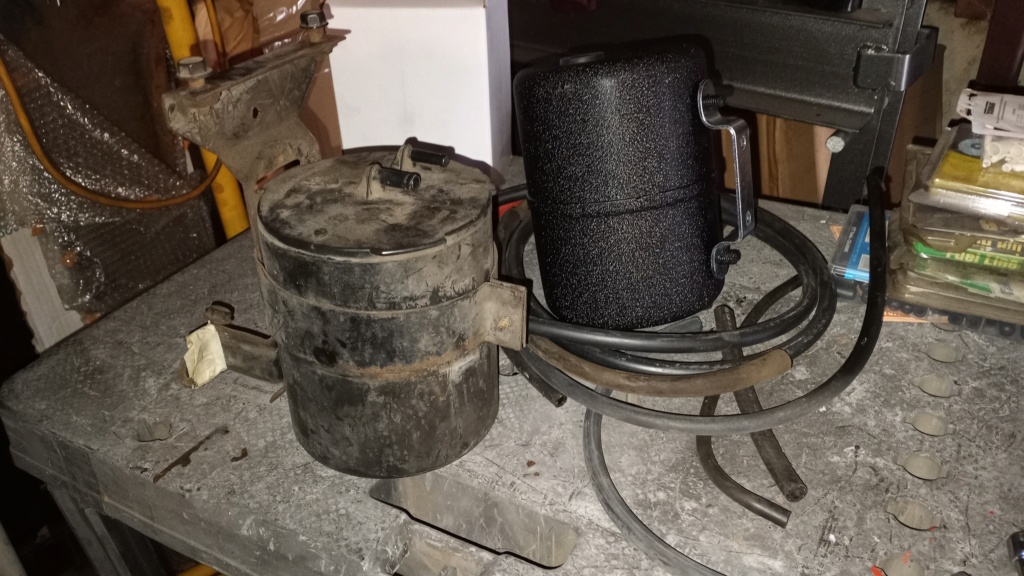
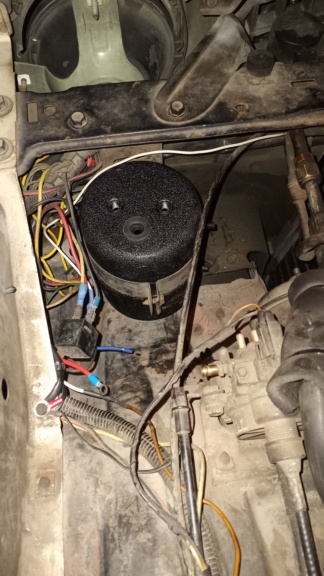
With the FVCC gone, I repurposed that space for the vacuum pump; it’s only slightly larger than the FVCC. Had I chosen to install just the auxiliary vacuum canister, I could have used the original bracket for the FVCC; both canisters are nearly identical in size.

This is how it could look…

Anyway, I chose to mount the reservoir just above the steering gear box not only because there is plenty of space but also because it’s easy to access for any future maintenance or repairs. To mount the pump where the FVCC was, I had to drill and tap the pump’s mounting bracket to match the holes of the FVCC’s bracket so as to use the original bolts. The directions for the pump strongly recommend wiring it to a source that’s switched with the ignition. I chose to utilize the circuit that was dedicated to the carburetor idle stop solenoid. I hadn’t used that circuit since 1985 when I swapped out the original 2-barrel carb and manifold for an early Quadrajet setup but I didn’t want to gut it from the car “just in case.” Wow, I just blew my own mind; 38-years after setting that wire aside for “something”, I finally have a use for it. That circuit can only handle 10 amps whereas the pump has a 15 amp fuse, so, I wired it to a power relay which, in turn, supplies the pump with all the current it can use. The vacuum hose from the pump goes straight to the canister’s check valve. The canister has a tee; one end feeding the cruise control, the other going to a 4-way manifold for 1) the brake booster, 2) the factory A/C vacuum tank and 3) an inline check valve to the base of the carburetor. One of my biggest concerns is losing the ability to bring my 4,300 pound car to a complete stop in an emergency situation, so, I decided to retain the engine vacuum source as a redundant backup. That way, if the electric vacuum pump should fail, I still have engine vacuum for the brake booster.
In my case, I also had a failing power brake booster. I determined that the rear seal likely failed. Because the booster is a Delco-Morane dual diaphragm type, the failure wasn't sudden and complete. For months after I swapped the engine, I noticed something was off in regards to my brakes but I chalked it up to the heavy cam because it only seemed to occur during periods of extended low RPM operation & multiple brake applications, i.e. parking lots and traffic jams. After I installed the Wagner adjustable PCV valve and isolated the cruise control from vacuum, I readjusted the carb. That's when the change in the brakes really became apparent. I ran some diagnostics and, sure enough, the booster was the culprit. Because it's a dual diaphragm design, only one part of the system had failed.
I recorded video of this and uploaded to YouTube:
Everything's all bitchin' now. Just need to track down the source of that vacuum seepage.
Today (50 years later), those limitations don’t apply so much anymore, be it because the car is considered too old to require a smog certification or the ability to retrofit an LSX engine thus the “muscle car” part of the description no longer has to be wishful thinking. Being that I’m an old school guy, I’ve stuck with a carbureted small block Chevrolet (SBC) engine the entire time I’ve owned her, with each iteration I’ve put in her being a little more powerful than the one before. One of the things I’ve noticed as I’ve gone with more powerful engines was that the “glove” lost some of its velvetiness. To spell it out, options such as air conditioning (A/C) and cruise control (CC) require fair amounts of engine vacuum to operate as intended. In the case of the CC, vacuum becomes an issue when the road goes uphill and the CC transducer meters vacuum to the servo to open the throttle. As the throttle opens, vacuum is reduced thus starving the servo of the vacuum it needs to open the throttle. Talk about being torn between two lovers. Anyway, to get more power from an SBC, you need a bigger cam shaft. A big cam has more overlap – the time where both the intake and exhaust valves are open – which won’t allow the engine to pull much vacuum during idle compared to a stock cam. This is mostly noticed when using power assisted brakes in stop-and-go traffic and while parking.
The easiest, least expensive and most common solution for the lack of vacuum needed by the brake booster has been to install an auxiliary vacuum reservoir/canister in-line between the engine and booster to store vacuum the engine produces at higher RPMs. The canister is simply an empty tank with an input and an output port, nothing to wire up, can be mounted anywhere and are 100% silent. Though it helps, the canister can be depleted with frequent use of the brakes at low RPM like in a traffic jam or drive-thru. Some of you may opt for upgrading to a hydro-boost system. I’ll address my reservation about that in a moment. A more expensive solution to the vacuum problem is installing a vacuum pump. These have been used on production cars for decades, mainly on cars equipped with turbo chargers or some other forced induction system. The beauty with one of these is even if the engine quits while you’re rolling down the highway, as long as you have power to the pump, you have brakes, unlike hydro-boost systems. A pump is, however, more complex than a canister. It needs to be supplied with 12-volt current, must be mounted where it’s not likely to be exposed to water, away from exhaust heat, and needs a vacuum sensor to regulate when the pump goes on and off, and can make some unpleasant noise. For my application – powerful daily driver with creature comforts –, I chose to install both a pump and an auxiliary reservoir, which has a vacuum gauge on it, for the best of both worlds.
Whenever I make any kind of change to my car that differs from the original configuration, I like it to be clean and uncluttered, and I put thought into future maintenance. To make space for this upgrade, I decided to “delete” the fuel vapor carbon canister (FVCC). The issue with deleting the FVCC is what to do about managing the fuel vapors generated in the fuel tank. In the way-back days, fuel vapors were simply vented to the atmosphere. I don’t mind the subtle aroma of gasoline but when it’s constant, it could mask the presence of a fuel leak. The purpose of the FVCC is to collect and capture those vapors until such time as they could be purged into the carburetor. One of the clever things GM did was to have the purge valve built into the carb. The port on the carb for the FVCC is ported vacuum. I connected the fuel tank vent line that originally went to the FVCC directly to the FVCC port on the carb. My observations are no gasoline smell, no release of pressure or vacuum when I remove the gas cap to fill the tank, and engine starting is only occasionally slightly rough – probably a little rich from the increased concentration of fuel vapor.
With the FVCC gone, I repurposed that space for the vacuum pump; it’s only slightly larger than the FVCC. Had I chosen to install just the auxiliary vacuum canister, I could have used the original bracket for the FVCC; both canisters are nearly identical in size.

This is how it could look…

Anyway, I chose to mount the reservoir just above the steering gear box not only because there is plenty of space but also because it’s easy to access for any future maintenance or repairs. To mount the pump where the FVCC was, I had to drill and tap the pump’s mounting bracket to match the holes of the FVCC’s bracket so as to use the original bolts. The directions for the pump strongly recommend wiring it to a source that’s switched with the ignition. I chose to utilize the circuit that was dedicated to the carburetor idle stop solenoid. I hadn’t used that circuit since 1985 when I swapped out the original 2-barrel carb and manifold for an early Quadrajet setup but I didn’t want to gut it from the car “just in case.” Wow, I just blew my own mind; 38-years after setting that wire aside for “something”, I finally have a use for it. That circuit can only handle 10 amps whereas the pump has a 15 amp fuse, so, I wired it to a power relay which, in turn, supplies the pump with all the current it can use. The vacuum hose from the pump goes straight to the canister’s check valve. The canister has a tee; one end feeding the cruise control, the other going to a 4-way manifold for 1) the brake booster, 2) the factory A/C vacuum tank and 3) an inline check valve to the base of the carburetor. One of my biggest concerns is losing the ability to bring my 4,300 pound car to a complete stop in an emergency situation, so, I decided to retain the engine vacuum source as a redundant backup. That way, if the electric vacuum pump should fail, I still have engine vacuum for the brake booster.
In my case, I also had a failing power brake booster. I determined that the rear seal likely failed. Because the booster is a Delco-Morane dual diaphragm type, the failure wasn't sudden and complete. For months after I swapped the engine, I noticed something was off in regards to my brakes but I chalked it up to the heavy cam because it only seemed to occur during periods of extended low RPM operation & multiple brake applications, i.e. parking lots and traffic jams. After I installed the Wagner adjustable PCV valve and isolated the cruise control from vacuum, I readjusted the carb. That's when the change in the brakes really became apparent. I ran some diagnostics and, sure enough, the booster was the culprit. Because it's a dual diaphragm design, only one part of the system had failed.
I recorded video of this and uploaded to YouTube:
Everything's all bitchin' now. Just need to track down the source of that vacuum seepage.

zucchi- G3GM Member

- Street Cred : 4
73ss, Finn Monte and 76Chevelle2Tone like this post
 Re: R&R brake booster and install vacuum pump & reservoir
Zucchi .
You are certainly creative. As for vacuum I mentioned in another thread how critical that vacuum performance was to the G3s since they were balancing performance and emissions. I feel that all vacuum valves and devices need to be replaced or at least thoroughly cleaned on a regular schedule rather than letting them drift off spec while driving.
You are certainly creative. As for vacuum I mentioned in another thread how critical that vacuum performance was to the G3s since they were balancing performance and emissions. I feel that all vacuum valves and devices need to be replaced or at least thoroughly cleaned on a regular schedule rather than letting them drift off spec while driving.

76Chevelle2Tone- G3GM Member

- Street Cred : 0
 Re: R&R brake booster and install vacuum pump & reservoir
Well, I have since found the issue; I neglected to tighten the barbed fittings onto the tee on the reservoir. Total rookie bonehead move.zucchi wrote:Just need to track down the source of that vacuum seepage.
Tightened them up last night after getting home from work. Now everything really is bitchin'.

zucchi- G3GM Member

- Street Cred : 4
 Re: R&R brake booster and install vacuum pump & reservoir
Hi Zucchi ,
Very cool set-up.
I am running a Hydro-Boost . My supercharger / all accessories belt broke on the interstate at 75mph and no issues getting the car stopped.
The appendage on the side of the side of the Hydro-Boost unit is a "reserve" canister.
GM has been using Hydro-Boost since the early 70s. Heavy duty Trucks and 2500/3500 series. Installed of Buick Grand Nationals in the 80s and Diesel Olds. Chevy Astro Vans in the 90s.
And as of late hundreds of thousands of the Suburbans , Yukons , Denalis , and 3/4 and 1 ton pickups.
Ford used them on Cobras mid 90s , 2000s.

impalamonte- G3GM Enthusiast

- Street Cred : 18
G3GM :: G3 Tech :: Engine & Driveline
Page 1 of 1
Permissions in this forum:
You cannot reply to topics in this forum|
|
|


» Roll Call and Car showcase
» Central Texas Noob
» Welcome Keith Seymore
» Wanted: Front park lamp assemblies
» 75 Hurst Olds T-tpos
» G3 Chevy rims- help ID these
» 75 el camino project.
» Have had a few questions
» vinyl top removal